JacketShop - Responsive Shopify Theme
- Created: 14 October 2016
- Latest Update: 14 October 2016
- By: Buddha Themes
- Email: manager@iamdesigning.com
Thanks for purchasing our "JacketShop - Responsive Shopify Theme".This is a clean, pleasant, responsive theme for your shopify store that stands out of crowd.
This theme comes with many features like FullPage Slider, Ajax filters ,Countdown , New tag, Image switching based on options and Lightbox(colorbox) that will be spectaculous and gives a unique impresssion about your store. Menu comes with megamenu and simple dropdown with sub menu by which you can show all the categories available in your store. Its great for selling products of any kind.
If you need any assistance that are beyond the scope of this help file, kindly contact us through mail. Thank you so much!
Read shopify manual before you start
- Manual
- Installing a new theme
- General settings
- Create a page
- Navigation
- Products
- Collections
- Blog
- Customizing your theme
- Customizing checkout page
- Translating your theme into another language
Attention: one language = one store. Shopify does not support multilangular online!!!
Theme Features
- Responsive design: Looks great on desktops, laptops, tablets and mobiles. Give it a try on your iPhone or iPad now.
- Highly customizable: Change colors, fonts, background image through the theme settings. No coding required!
- Supports multi-currency: The currecies AUD,CAD,USD,GBP,JPY,EUR,NZD,INR,PHP are inbuilt with theme
- Product sorting on collection pages: Sort by price, A to Z, newest etc.
- Great for SEO: Uses the latest Shopify SEO features and product data is formatted for google rich snippet, so that product listings are optimized on search engines.
- Branded checkout: A seamless checkout for your customers using your logo and color scheme. You can also add a custom checkout header to your checkout screens!
- Customer accounts: Customers can register, login, change addresses and view past orders.
- Flexible slideshow: A home page slideshow that can be any height.
- Home page content: You can feature links to collections and products on your home page.
- Newsletter integration: Easily link your Mailchimp account to the newsletter form.
- Social integration: Share by Twitter, Facebook, Google+ and Pinterest.
- Retina: "Retina" is Apple's term for a high pixel-density display—a screen packed with so many pixels you shouldn't be able to see the individual cells with your naked eye. It's more than just the resolution of the display; it's the pixels per inch (ppi).
Getting Started
- Getting up and running with JacketShop is quick and easy. Simply create a Shopify account, purchase the theme and upload it. You'll then have the opportunity to customize it to your liking before publishing it as your main theme.
- If that sounds like a lot, don't worry… each step is outlined in detail below and it's entirely possible to go from scratch to a store running JacketShop in under ten minutes!
- Creating a Shopify Account
- If you already have a Shopify account then you can skip ahead to the next section. If you're considering setting up a store but haven't done so yet, read on.
- Shopify is a hosted ecommerce solution that allows you to set up and run your own online store. Pick an ecommerce website template (preferably from us!), list your products, accept credit card orders, and ship your goods — all with a few clicks of the mouse. With Shopify it's easy to sell online and there's no software to download or maintain.
Theme Installation
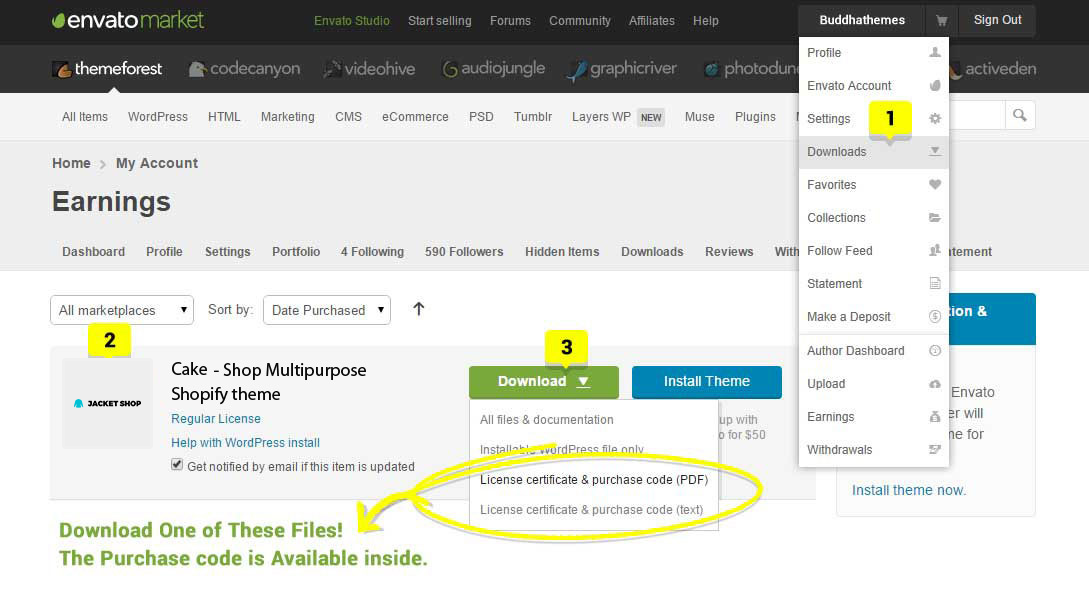
- Step 1 : At first, after purchasing this theme, please download the package from Themeforest. All you need to do is move your mouse over your login name in right top corner (of course after you`re logged in Themeforest) and then click Download. Here you will find all the items that you have purchased. It looks exactly just as the diagram next to.
- Step 2 : In the next step click the Download >All files and documentation and save the package on your computer.
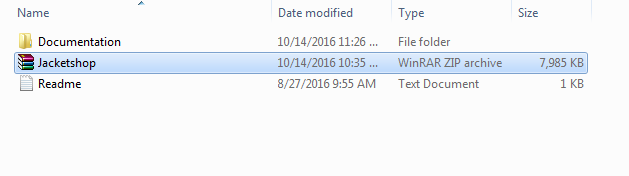
- Step 3 : Please unpack the whole package after downloading it from Themeforest.On that extracted JacketShop_v1.zip, You can find things like Documentation, Zipped file and Readme.txt. The file that you need to install is : JacketShop.zip
What's Included
- Extracted Folder JacketShop_v1
- Which Contains the JacketShop.zip, Documentaion & readme.txt..
Theme Installation
Installing JacketShop is easy and quick.
To install the theme, please log in to your Shopify store and go to the Themes. From there, follow the instruction below:
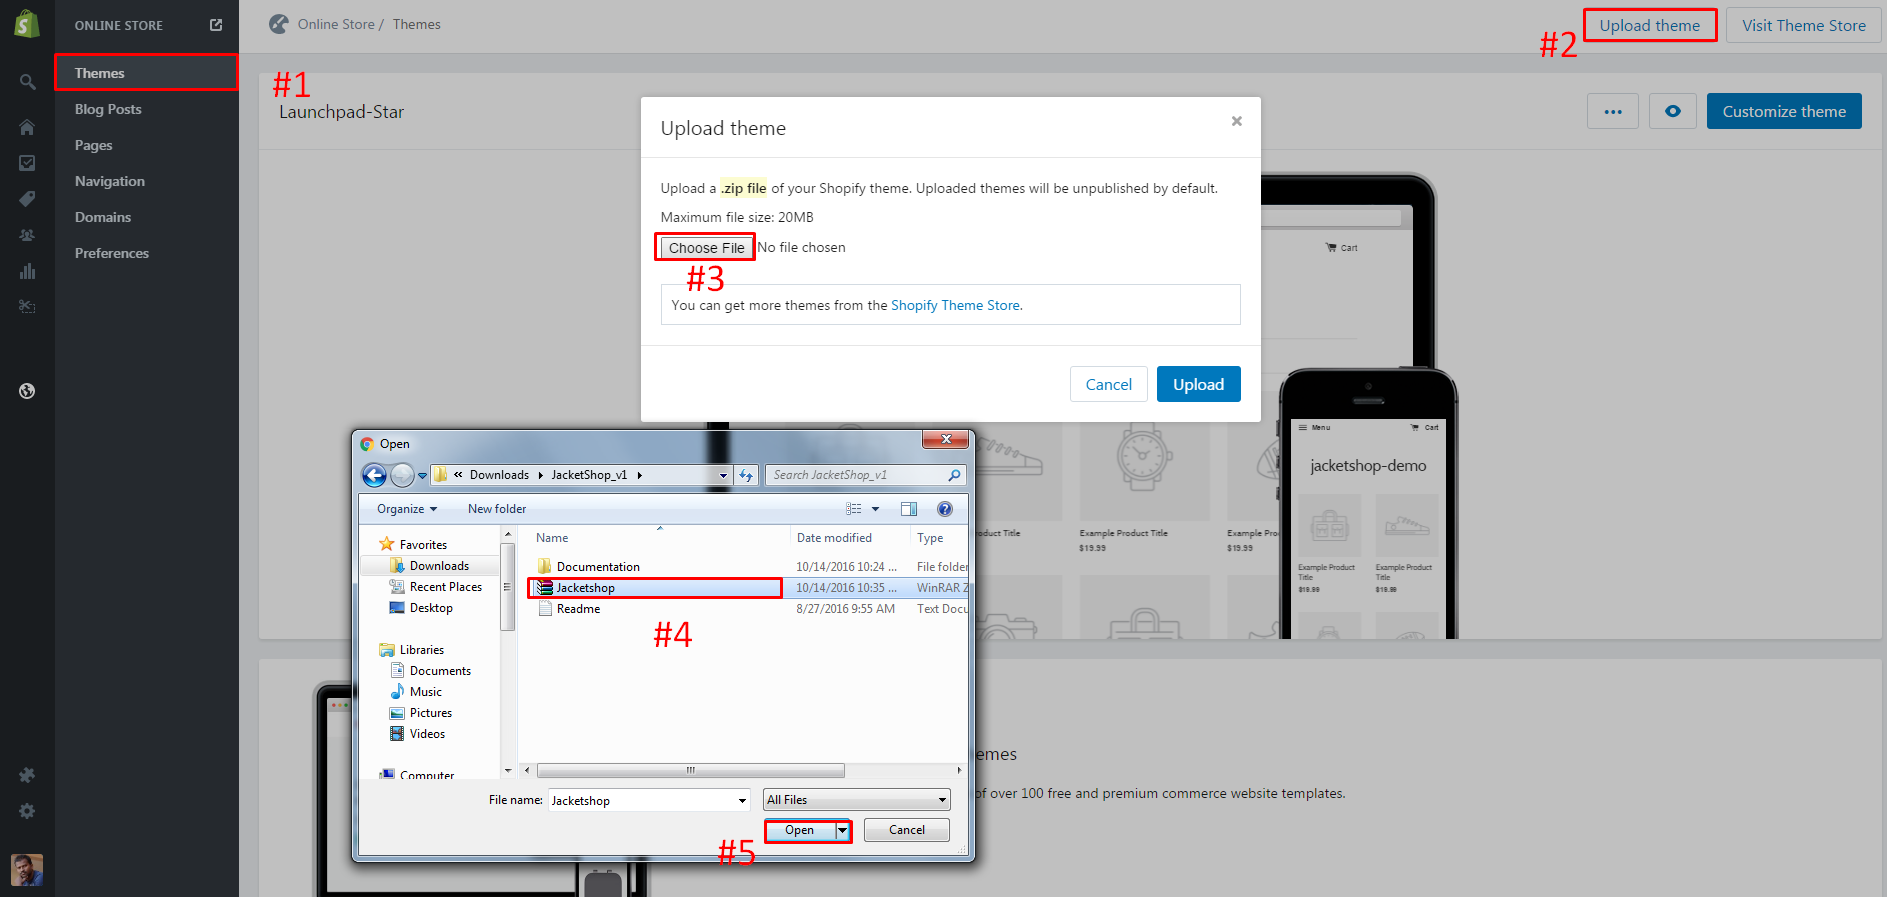
Note: Use the file JacketShop.zip to upload to your Shopify site
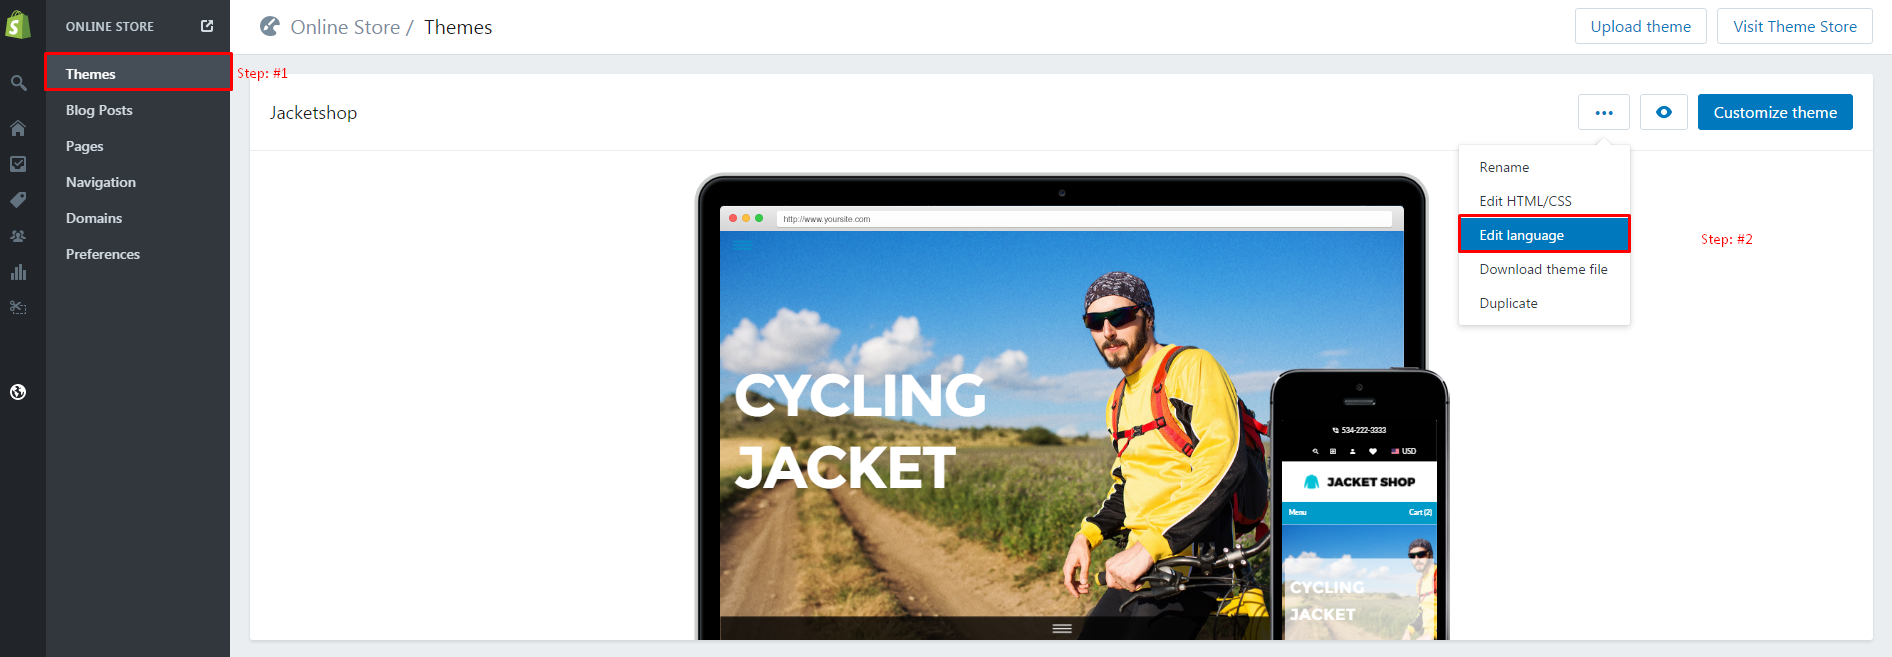
1. In your back office go to: Online Store > Themes:
-
Click: Upload a theme
-
Click on Choose File button and select JacketShop.zip file, then click: Upload
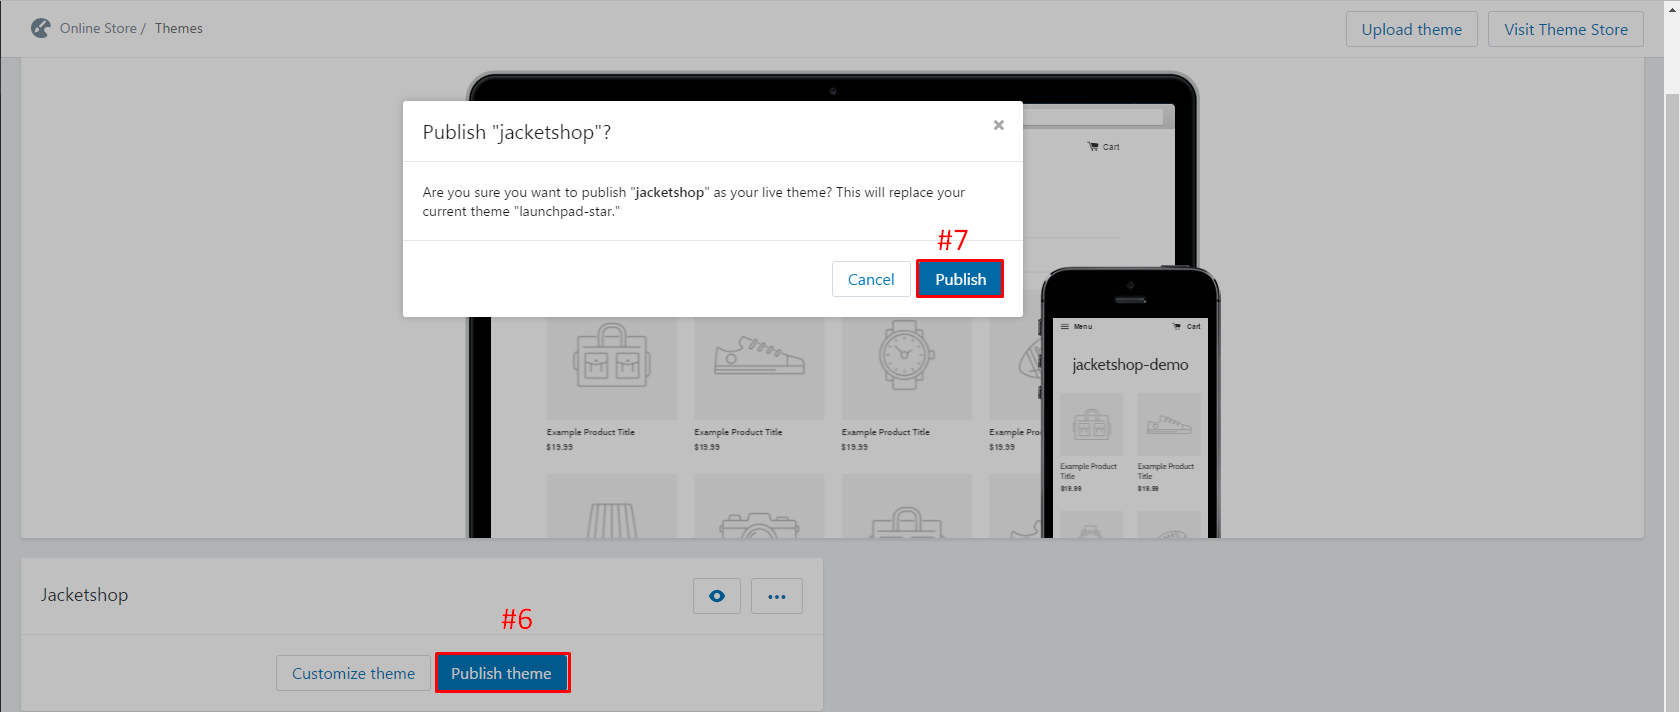
2. In your Backoffice Dashboard go to: Online Store > Themes > Scroll to respective demo:
-
Click: Publish theme
-
Click: Publish
Text Editor
As per shopify language translation supporting feature , we need to keying all the text based information at Language Editor section, so that we have loaded all these information with the same. Kindly refer the followings screen shot to know about edit those information.
Just go to your store's theme section and confirm which theme is going to be the primary one(Published theme) , Then do the followings...
OR


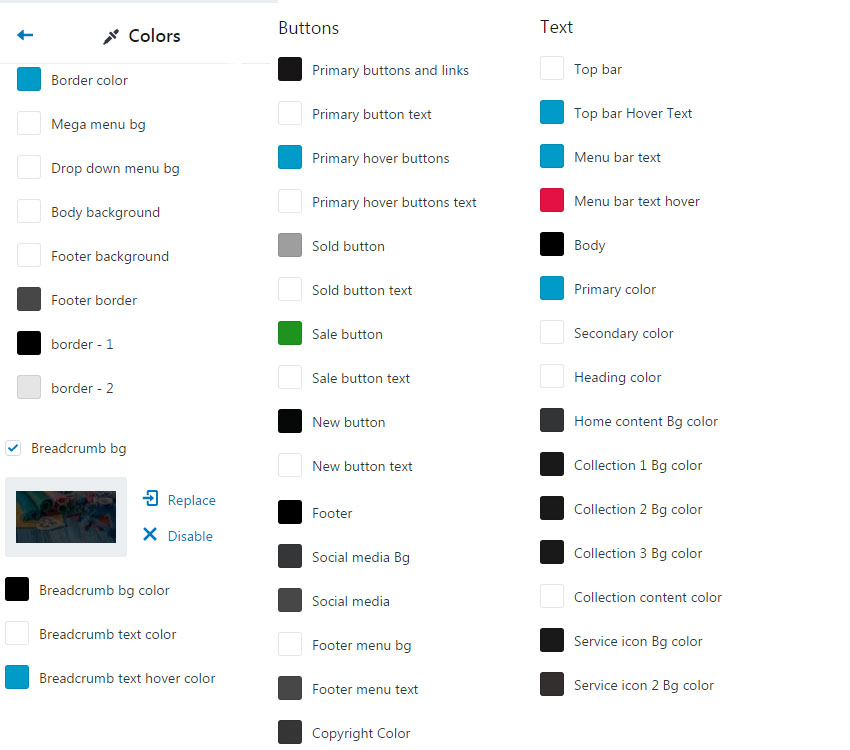
Global Settings
Global settings are options that will affect your entire site. This seems like a good place to start customizing your theme...
In this section, you choose the colors for your site. It includes background colors for sections like the menu bar and footer, as well as text colors. Let's explore the options:- The Primary Color option controls your main text color, various interface colors, button colors, and more. It is well used throughout your site. The color you choose here should contrast with both a white background and the background color you choose for the outer site section.
- The Secondary Color is used for alternate text color and other places.
- The Link/Button hover color will appear when you hover over most links and buttons.

ADD PAGE WISHLIST
You need to add followings pages to enjoy the features of theme.
From your shop admin, go to the Online Store / Pages
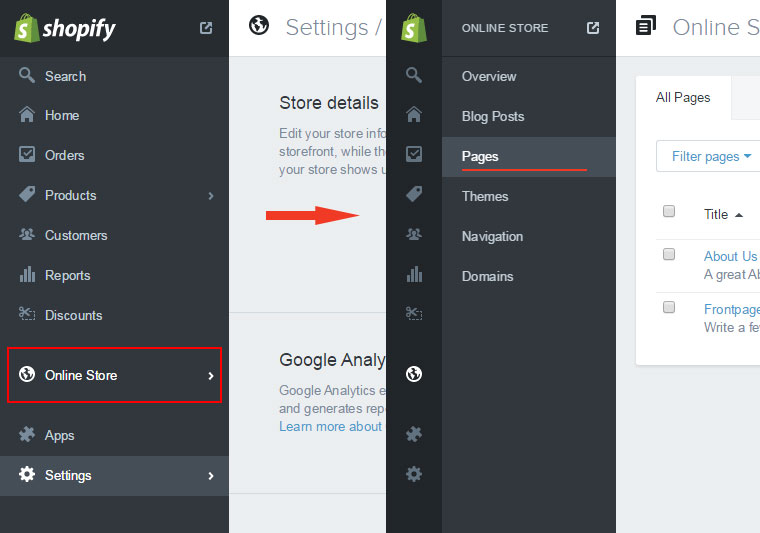
- In a Online Store / Pages, find and click button "Add a page"
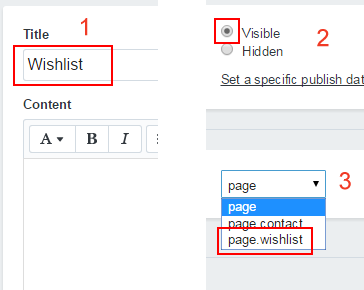
- Write in Title field as " wishlist
- Select Visibility: Visible
- Select Template: page.wishlist
- Click save
ADD PAGE CONTACT
- In a Online Store / Pages, find and click button "Add a page"
- Write in Title field as "Contact"
- Select Visibility: Visible
- Select Template: page.contact
- Click save

Mega Menu Settings
To create a new menu:
- Step 1: From your Shopify admin, click Online Store, then click Navigation
- Step 2: Select the Add menu button.
- Step 3: Give your navigation a title. A handle will automatically be generated from this title.
- Step 4: Add links to your menu.
- Step 5: Once you have added all of your links click Save.
Add collection image as given below screenshot .

How to change icons?
We have used two types of light weight font icons with this theme as follows.
- Font Awesome Icons
- Material Design Iconic Font
Add Font Awesome icon class in the respective field, E.g follow the screen shots...
Note: All Font Awesome icon's class will start with "fa"
![]()
Add Material Design icon class in the respective field, E.g follow the screen shots...
Note: All Material Design icon's class will start with "zmdi"
![]()
Home Settings
Home page options can be easily configurable via these settings.

Collection Page
Collection page contains following options.
- Sorting: Sort the products depends on low-price,high-price,best-products,new to old,old to new.
- Grid view
- List view
- Number of items on page: Display the product by selecting numbers
- Quick Shop
- Items per page
- Product Sorting
- Categories: First section of collection sidebar.To display categories create linklist and navigate linkilst from theme settings.Can add the title too
- Best Selling: To display this section create collection in the name of best selling or what you like to add.And choose the collection in theme settings which you creat collection the name of best selling.
- Filters: Color,size,label.To display colors in filters.
- You should add tags for each product as per variants (Color, Size) in your product tags fields.
- And add the same tag names in respective filter input fields as below...
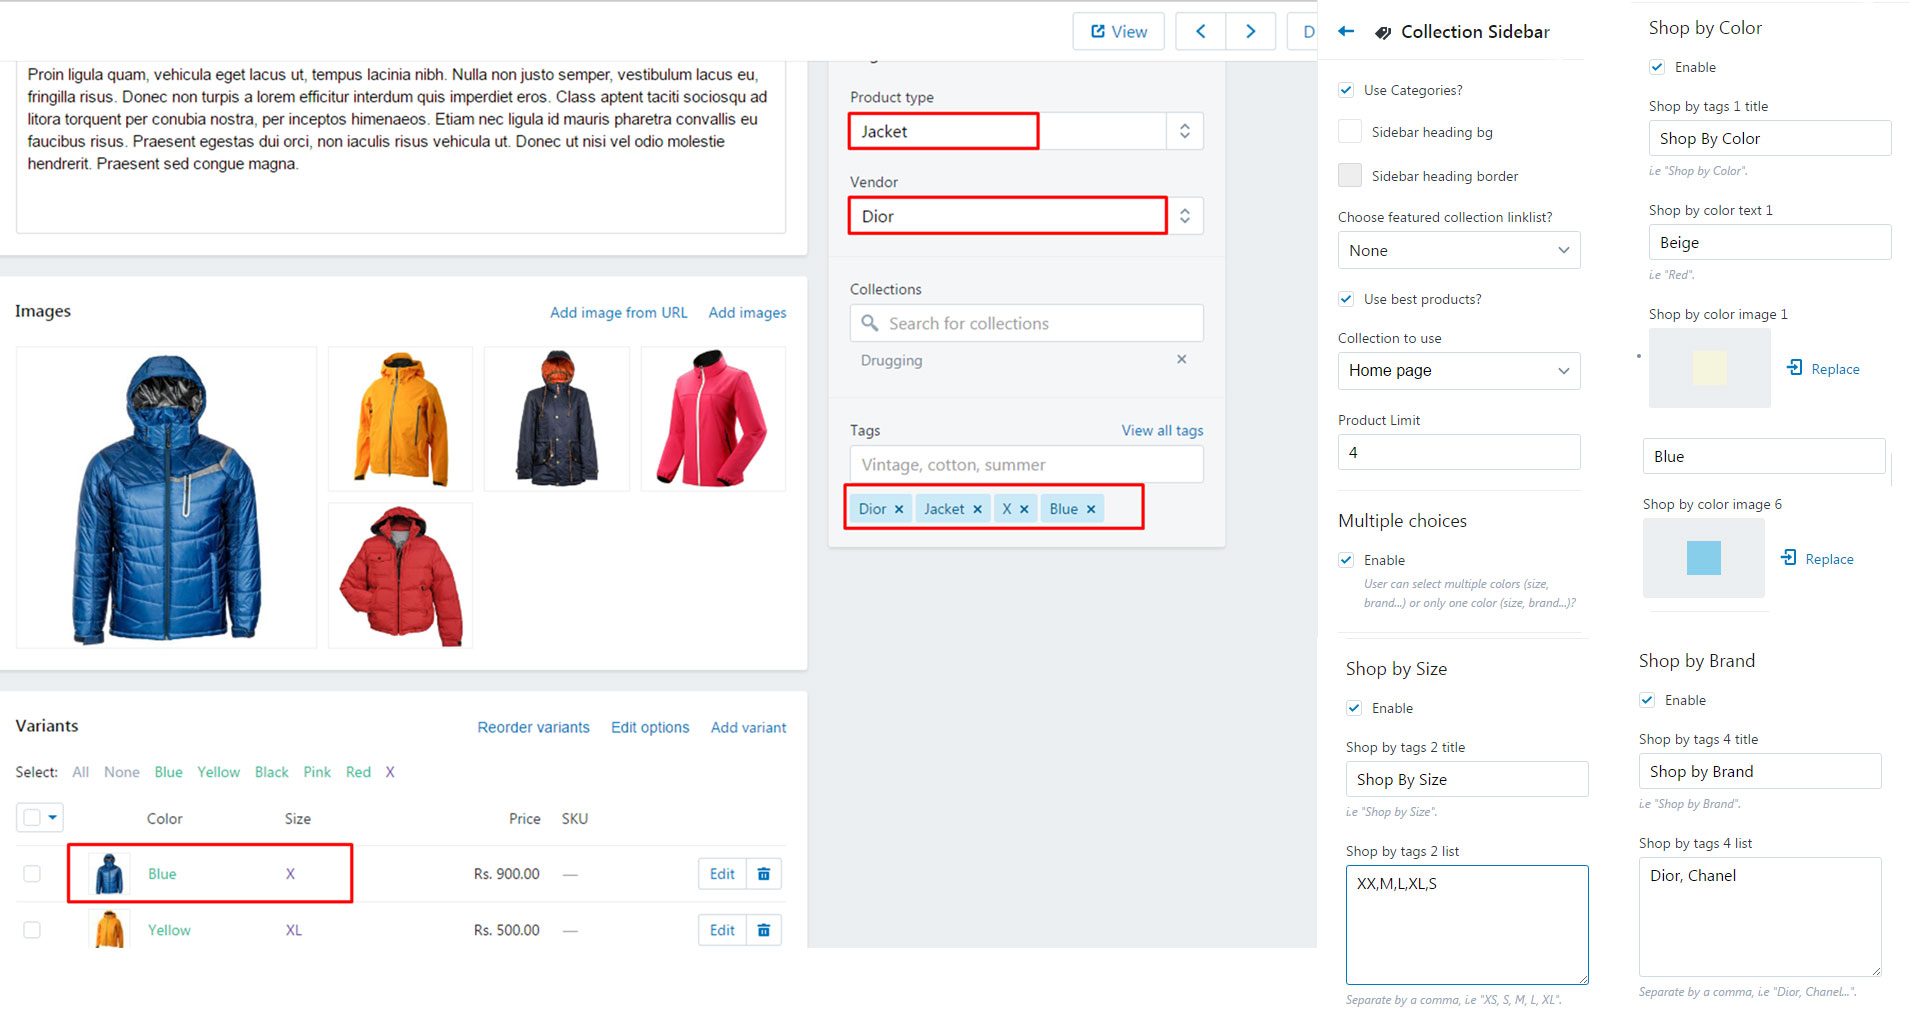
- You should add tags for each product as per variants (Color, Size) in your product tags fields.
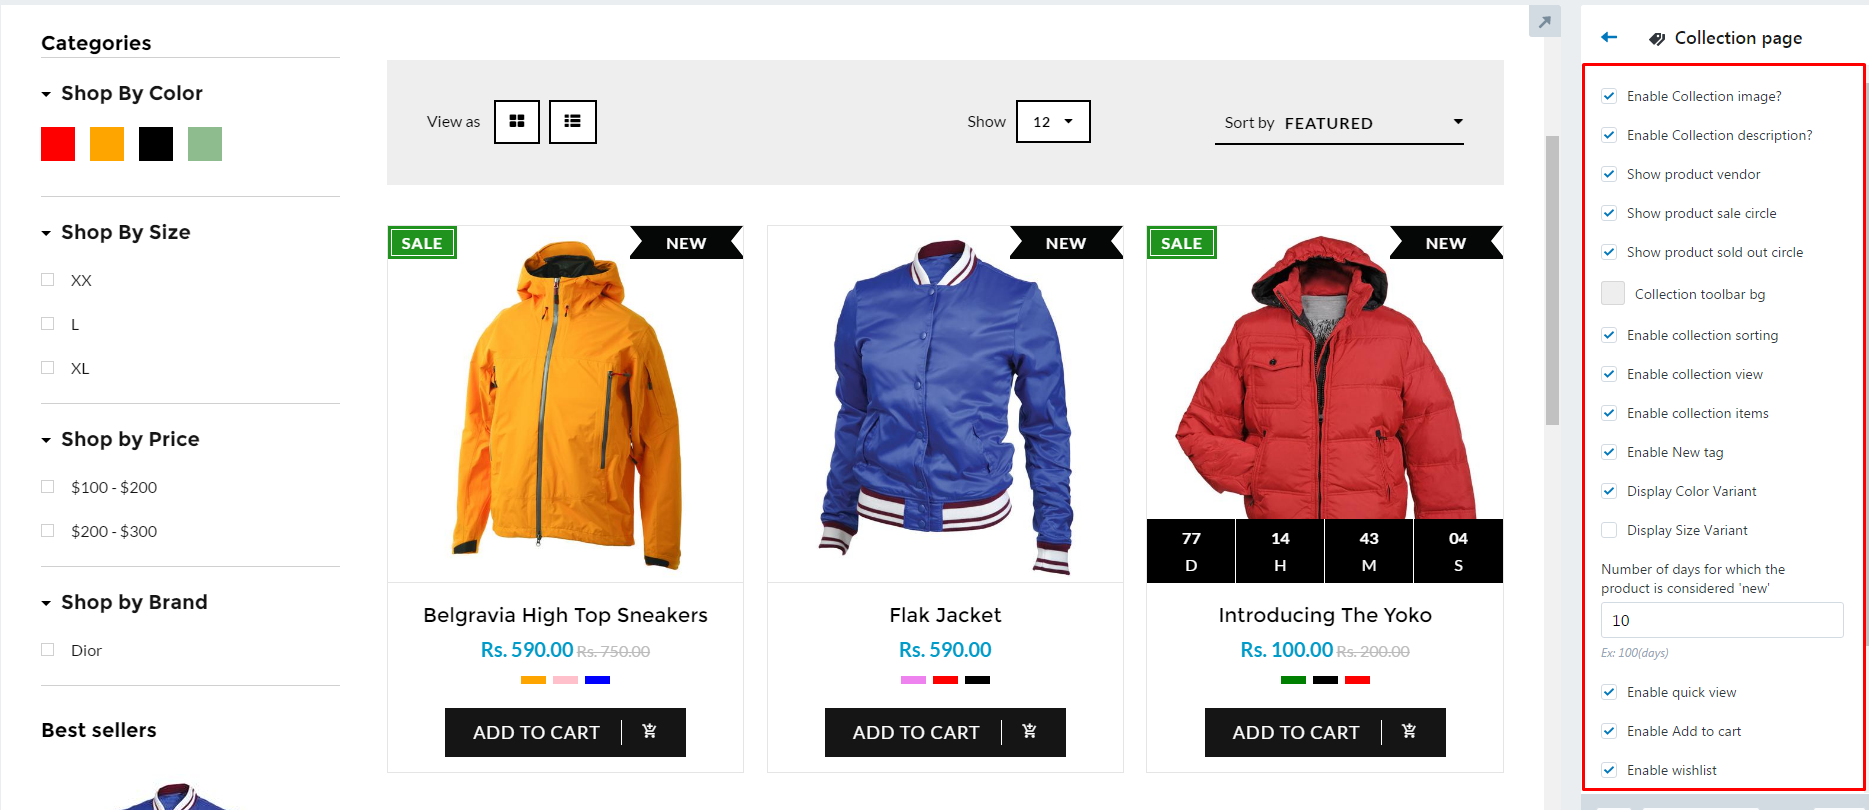
Collection sidebar contains categories,best seller and filters.In filters have added product color,size,brands
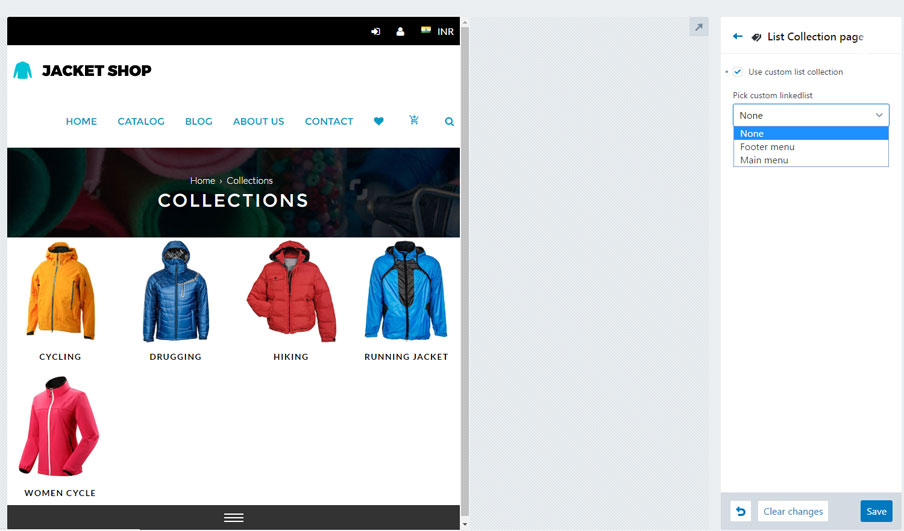
List Collection Page e.g https://jacketshop-demo.myshopify.com/collections
In two way you can display the collection @/collections page.
- Can display every collection from your store.
- Can display the collection which you need to display(custom collection) To add custom collection create linklist to display particular collection.Then Choose that linklist from theme settings which you create linklist for custom collections.
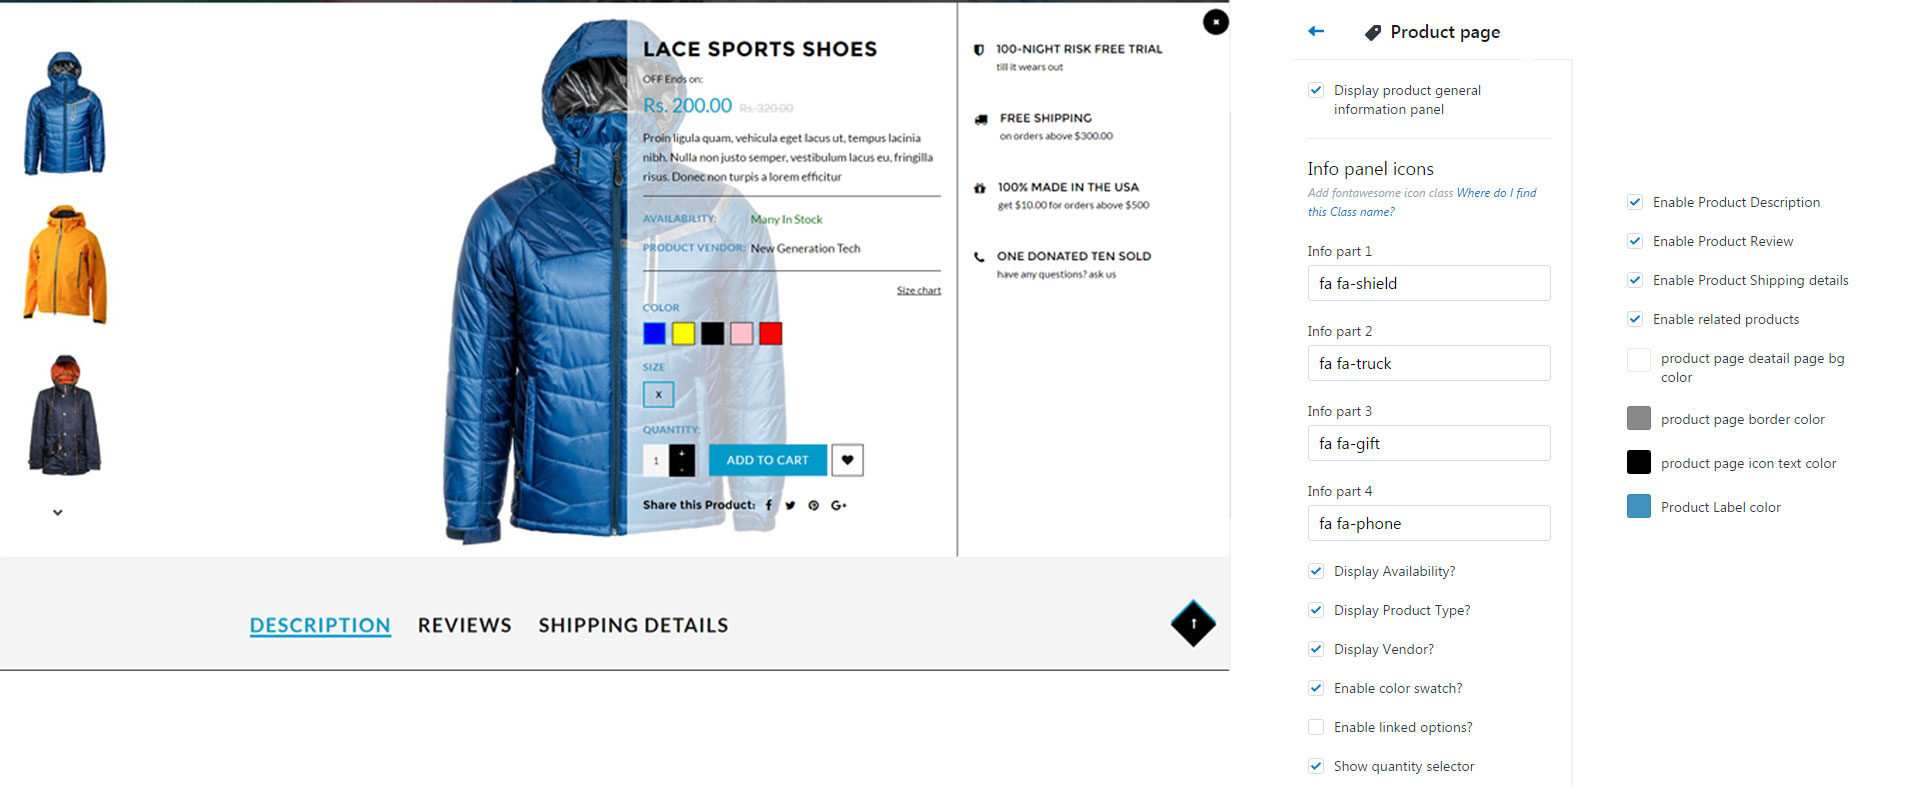
Product Page
Product detail page includes:
- Product zoom with lightbox.
- Product detail page includes availiability,product vendor,product type and everything have to add in your product to display.
- And it provides product variants, Add to cart option,wishlist,product quantity,social sharing,related products.
- Product color variant displayed as color swatch box .
- While disable linked options, all the options will display at a time(You will have choice to pick the combinations).
- Ex: when select the particular product color, all the sizes will appear without any restriction. use can pick each any size, Available status will change based on option selection
- When enable linked options it displays only related variant options.
- Ex:When select particular product color, related size options to that specific color will appear.
If you enable product review , don't foreget to install Product Review app.
You can change the icons by using Fontawesome icon class Where do I find this Class name?
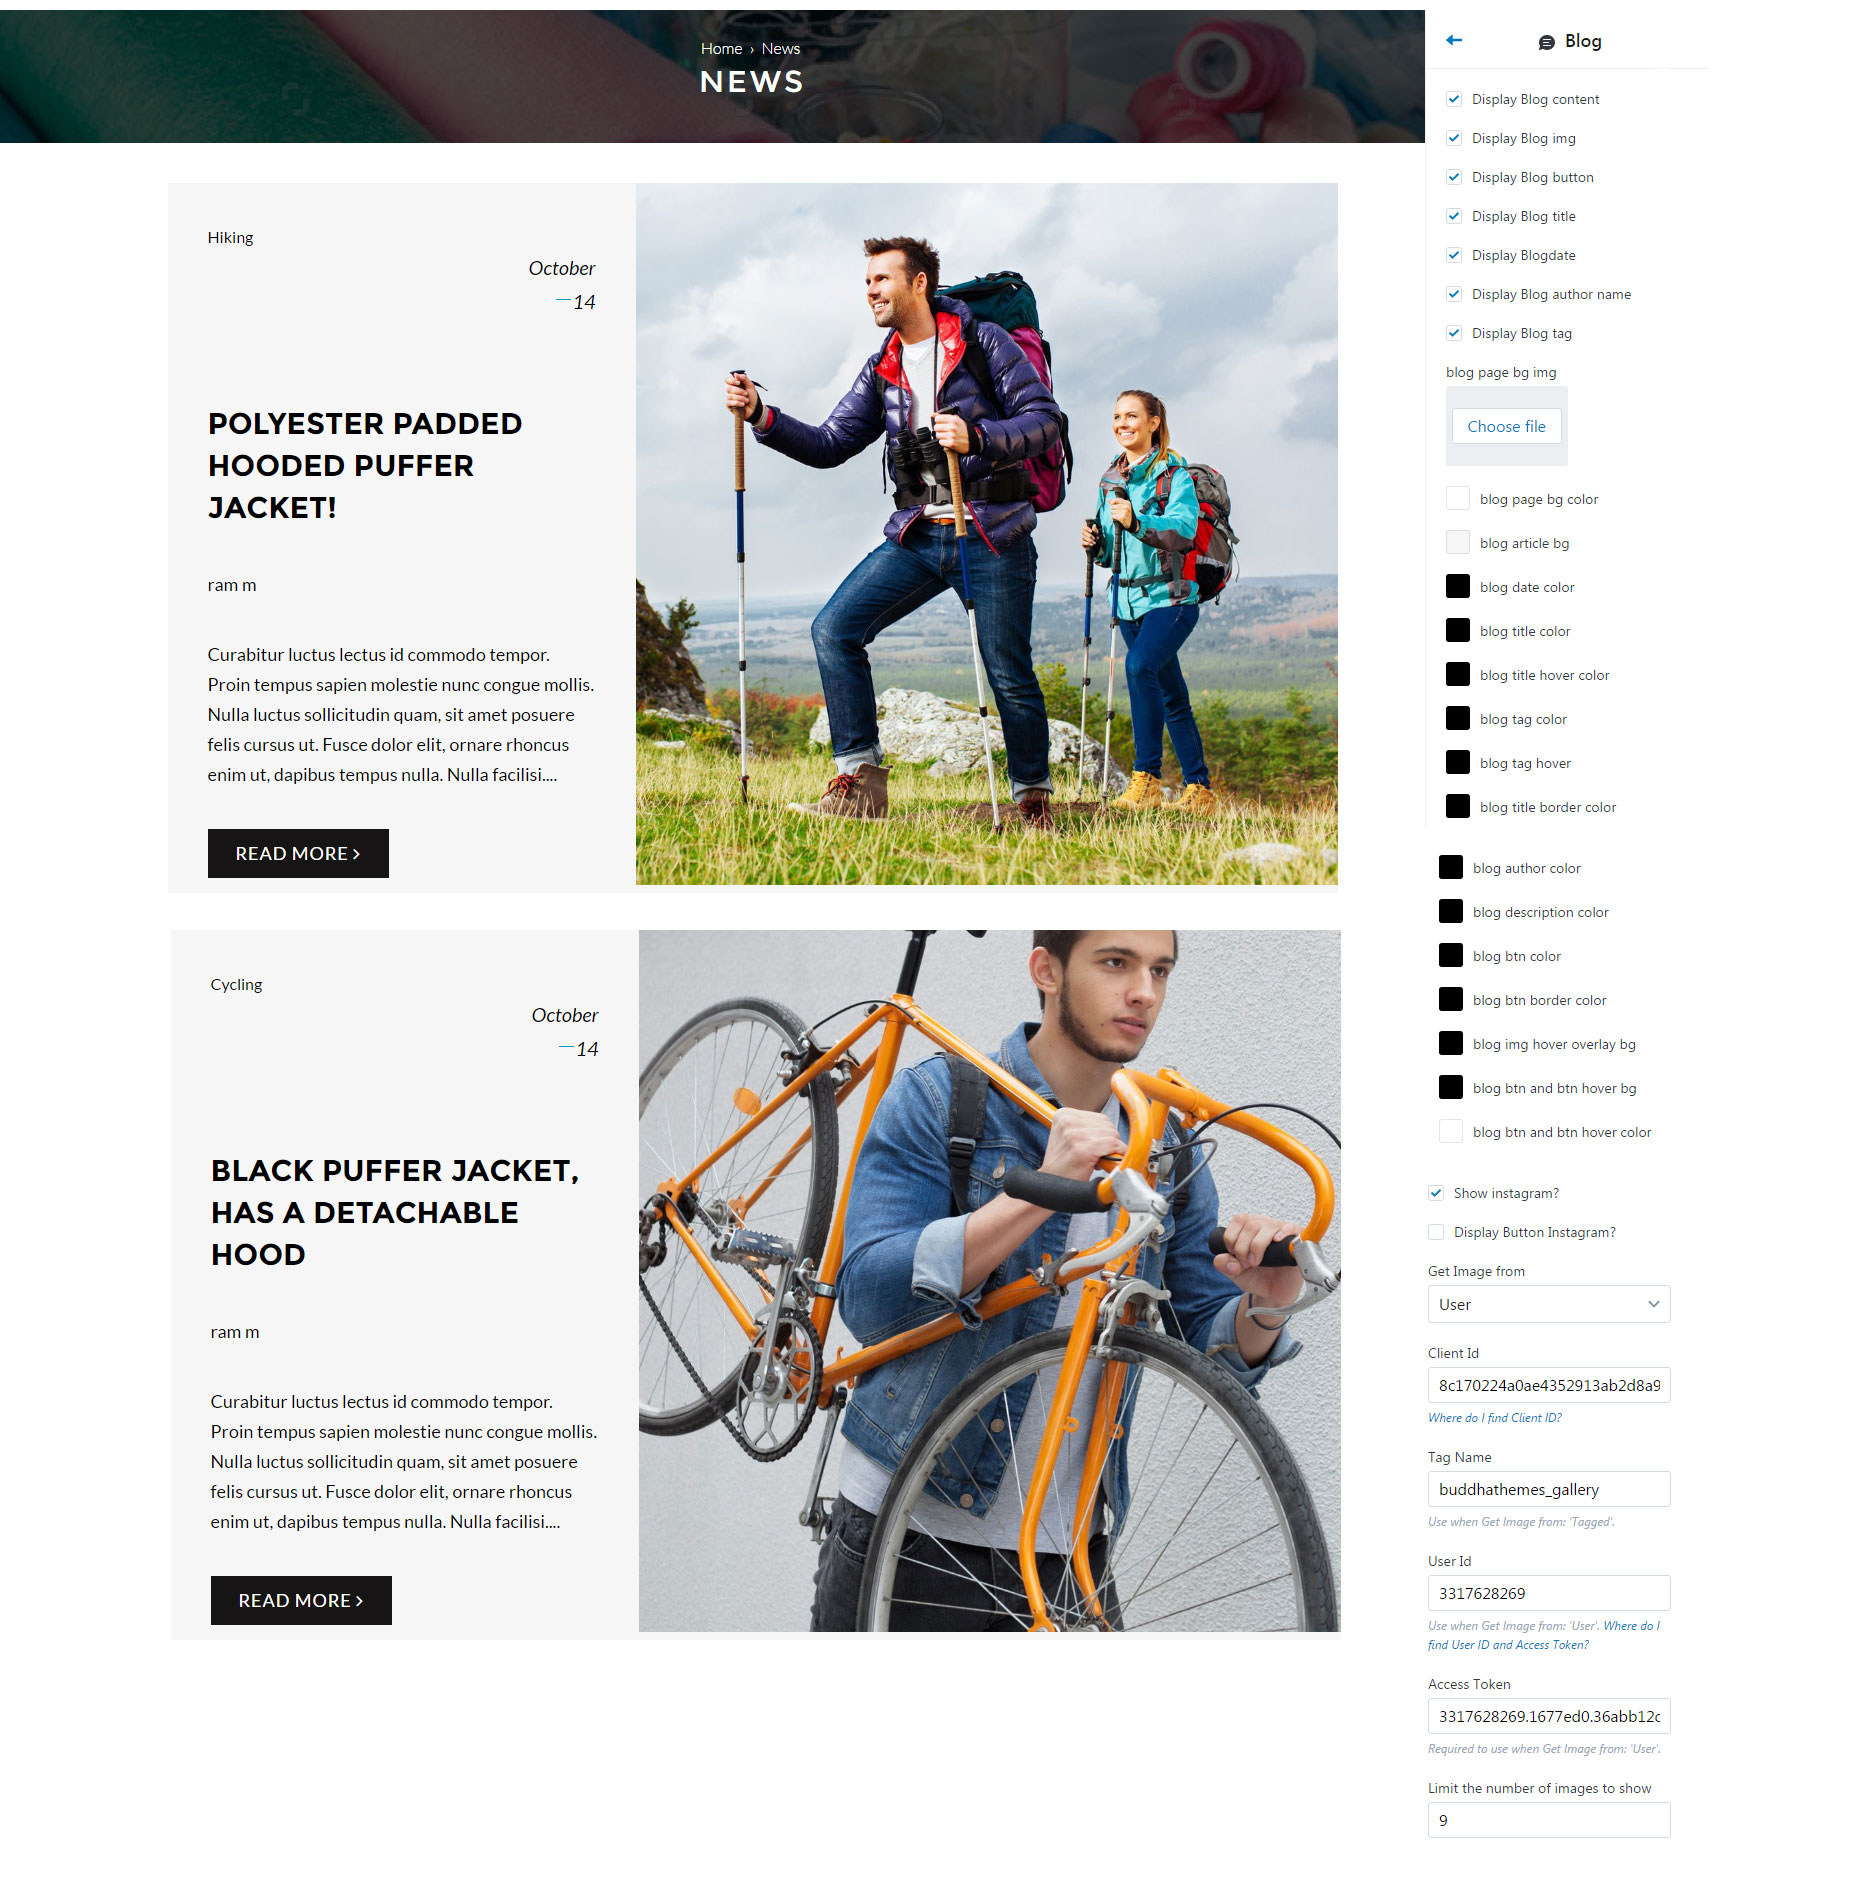
Blog Page
Select Blog Posts in admin and hit -> Add blog post, which is available at top right corner to add new one.
- Blog page contains image tite,description,read more button.
- It includes sidebar with articles and categories.
- To display categories add tags in blog posts when you add blog.Ex:Leather clothes,cotton.
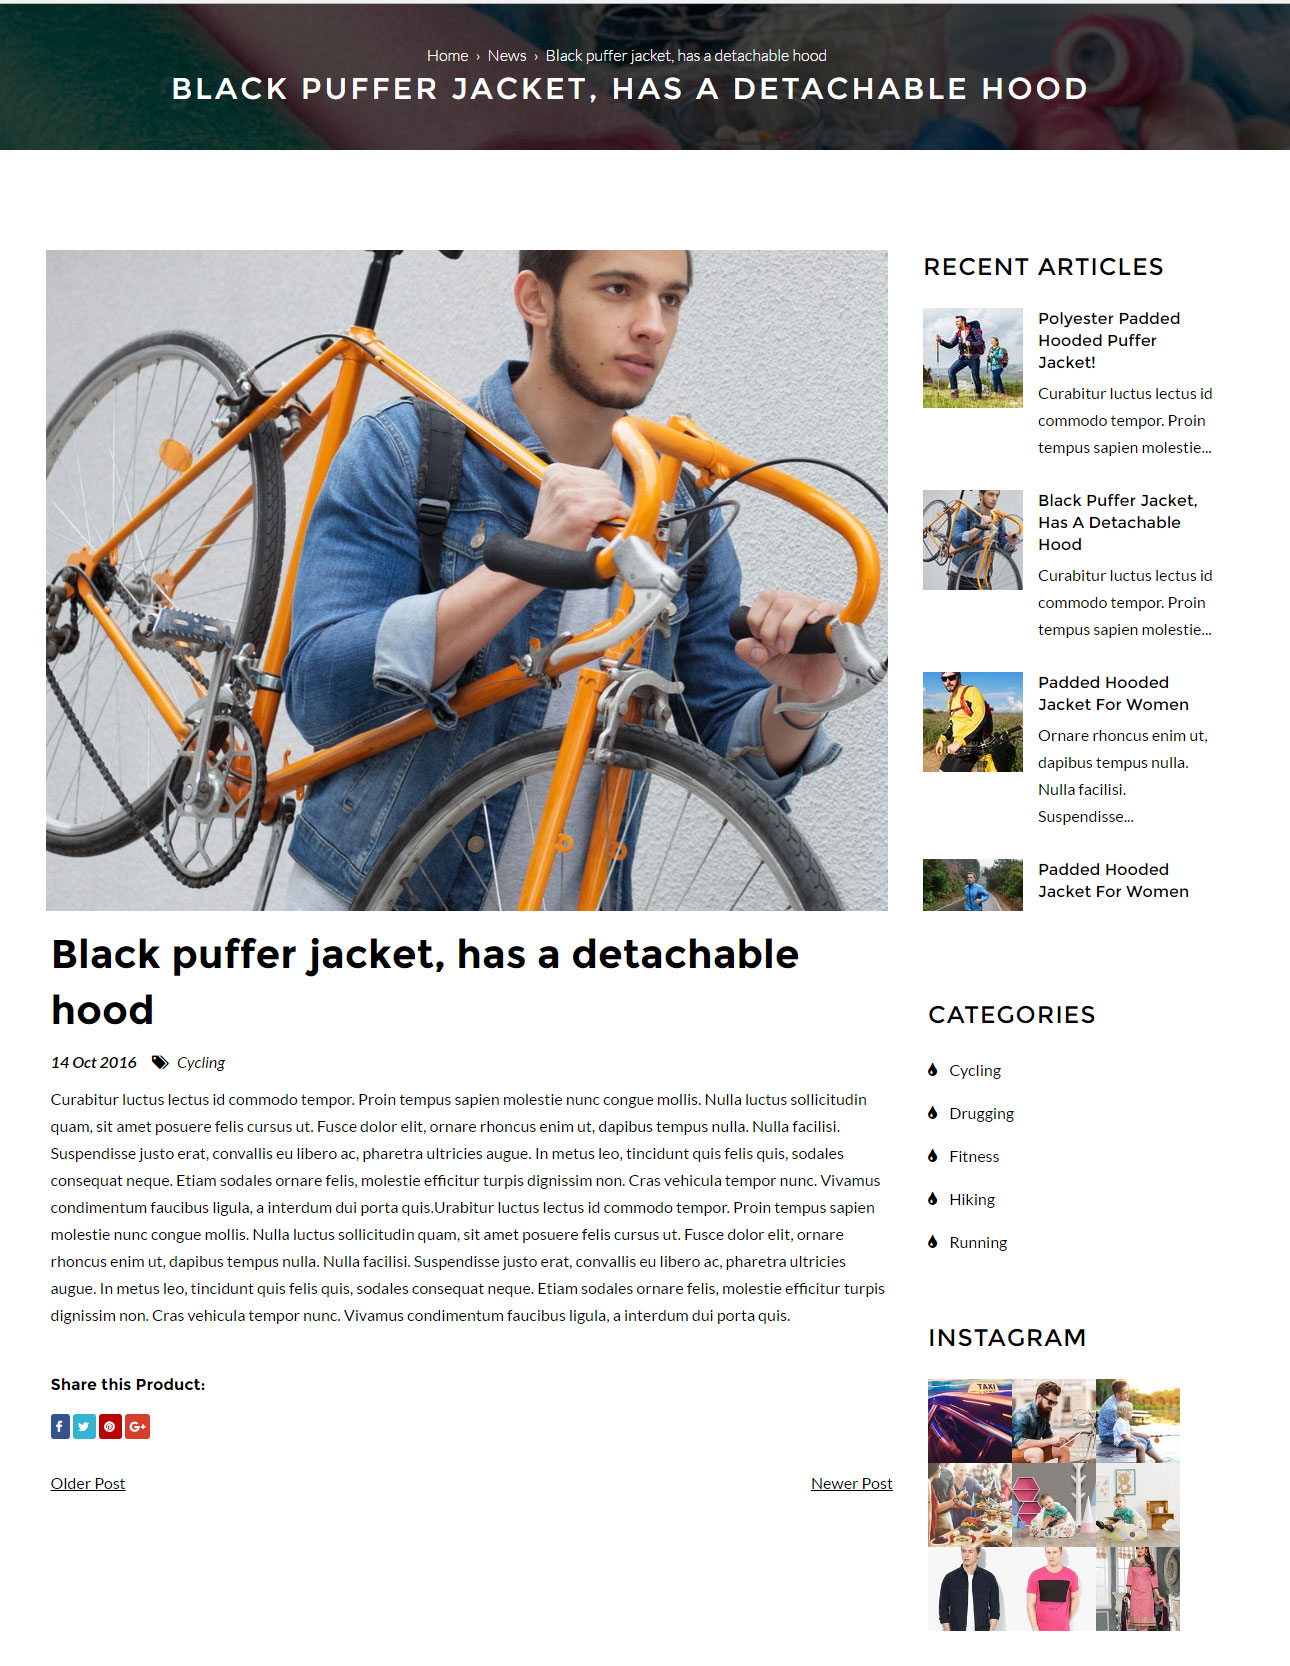
Article Page
Article page coontains post details , and recent artile widget at sidebar & instagram gallery.
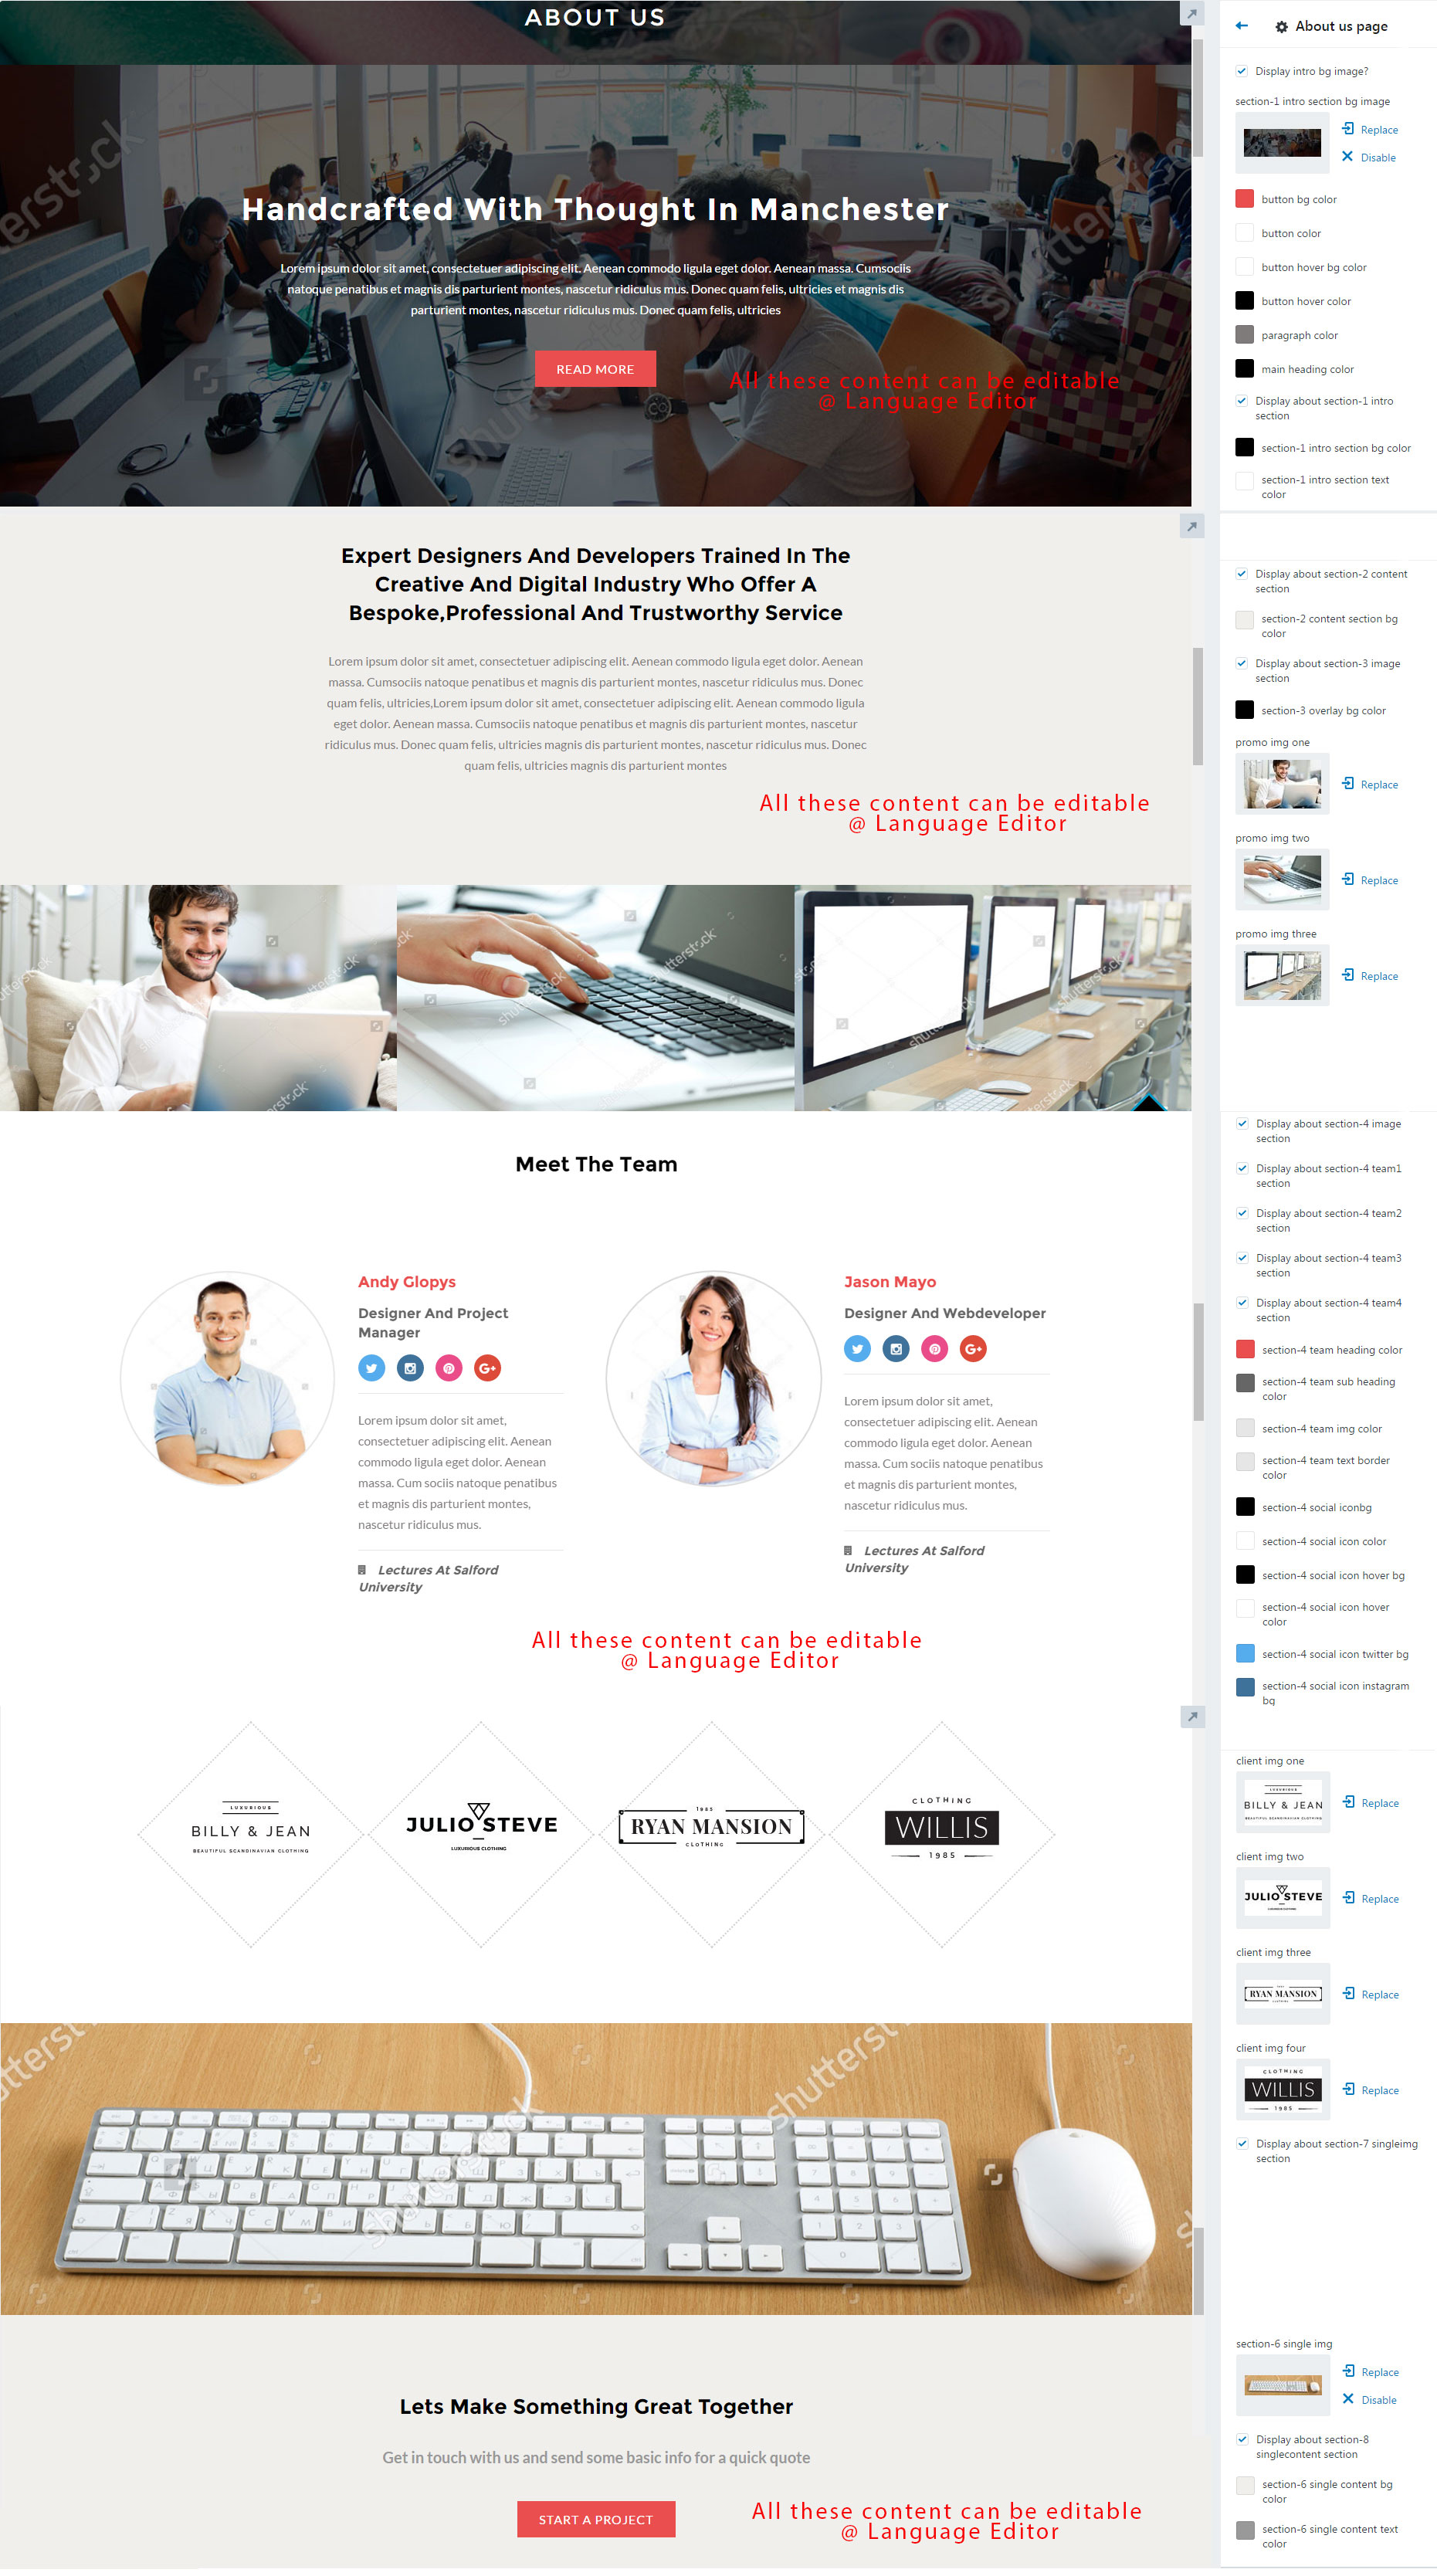
About Page
About page contains follow these sections
- Image with content section: Here have options to enable/disable.And every title description and link can get from back end options.
- Intro Box: This section contains title,description,button with theme settings options.
- Team Section: This section contains team image,name,description and link.And also each team have individual social icons and have options to add , from them settings.
- Client logo section: This section contains client logo,name and link.Can edit images name link from theme settings.
- Bottom banner section: Here you can add any custom banner image.
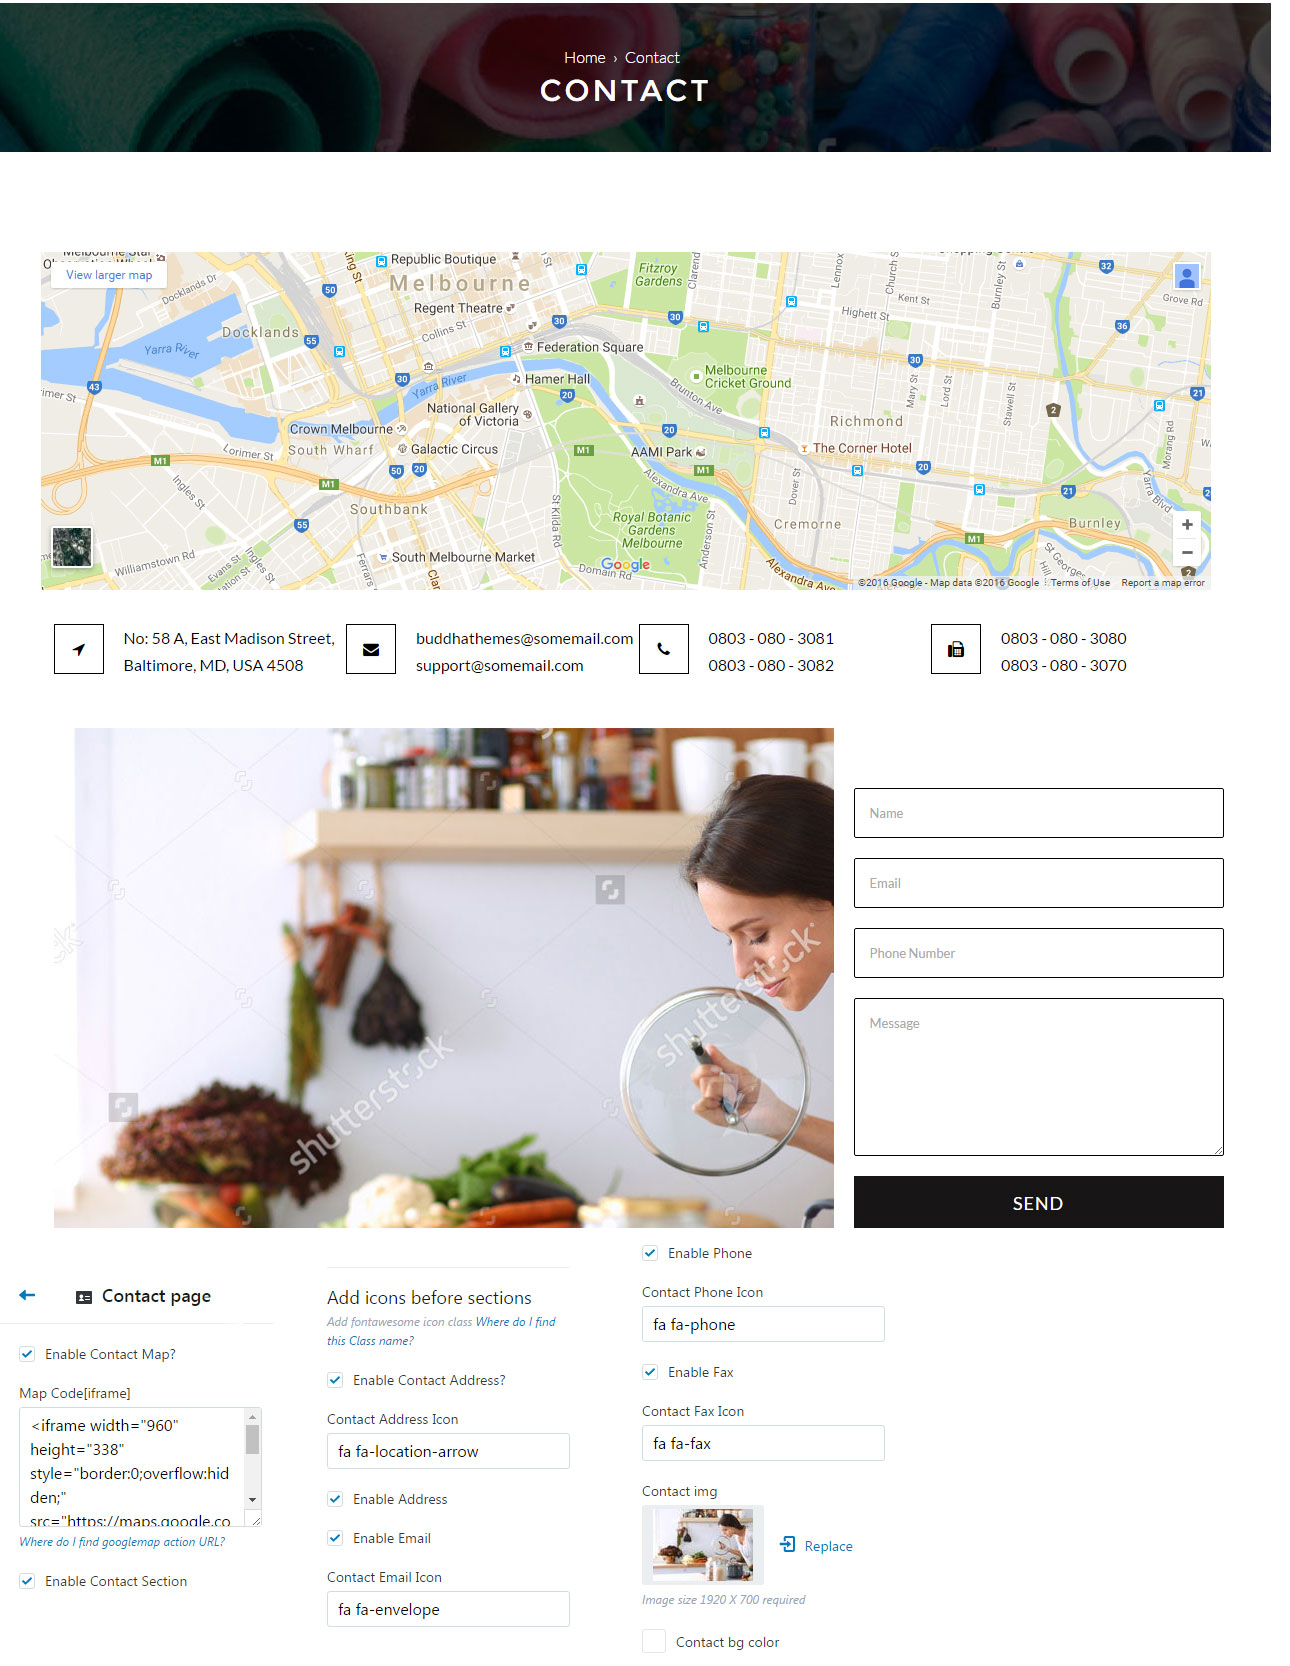
Contact Page
Contact page options can be easily configurable via these settings.
- Contact page have an option to embed google iframe map with enable/disable features.
- Also it includes editable address fields at language translator.
- Where do I find googlemap action URL?
Footer
Footer includes 3 columns. Navigation links can be added using linked list method.
- Footer section includes footer logo and description
- Also it includes social icons and payment methods, These can edit with theme settings.
