DesignThemes LMS Addon
With our previous experience in LMS Learning Management System we have built the next generation LMS theme in the plugin structure. We have built it as plugin since it can be used with any wordpress themes. This allows you to make a robust and complete course. You can access it by going to ‘Dashboard -> LMS’. The Kalvi learning management system’s Dashboard is a great place to start working on content.
DesignThemes LMS Addon is the main plugin which does all the functionality of the Learning Management system. It is the most powerfull tool in our theme. Our plugin not only used for learning management system, it is almost used for all business purpose of education. Yes you wont believe it. Just checkout the features in which you can use our theme.
1. Learning Management System - The Default Purpose
2. Online Learning Purpose
3. One Instructor Purpose
4. One Course Purpose
5. Points System Purpose
6. Dance School Purpose
7. University Website Purpose
8. Academy Purpose
9. Kindergarden Purpose
You need anything more else in our theme? Just email us with your suggestions and our experts will look into that and try to implement in our next version.
General Addon Options
Once you login as admin in our Kalvi theme you can see a huge set of options from which the any configuration can be done.
- 1. All Classes
- 2. All Courses
- 3. All Lessons
- 4. All Quizzes
- 5. All Questions
- 6. All Assignments
- 7. All Certificates
- 8. All Gradings
- 9. All Packages
- 10. Commission Packages
- 11. Course Category
- 12. Question Category
- 13. Class Registrations
- 14. Statistics
- 15. Settings
1 All Classes
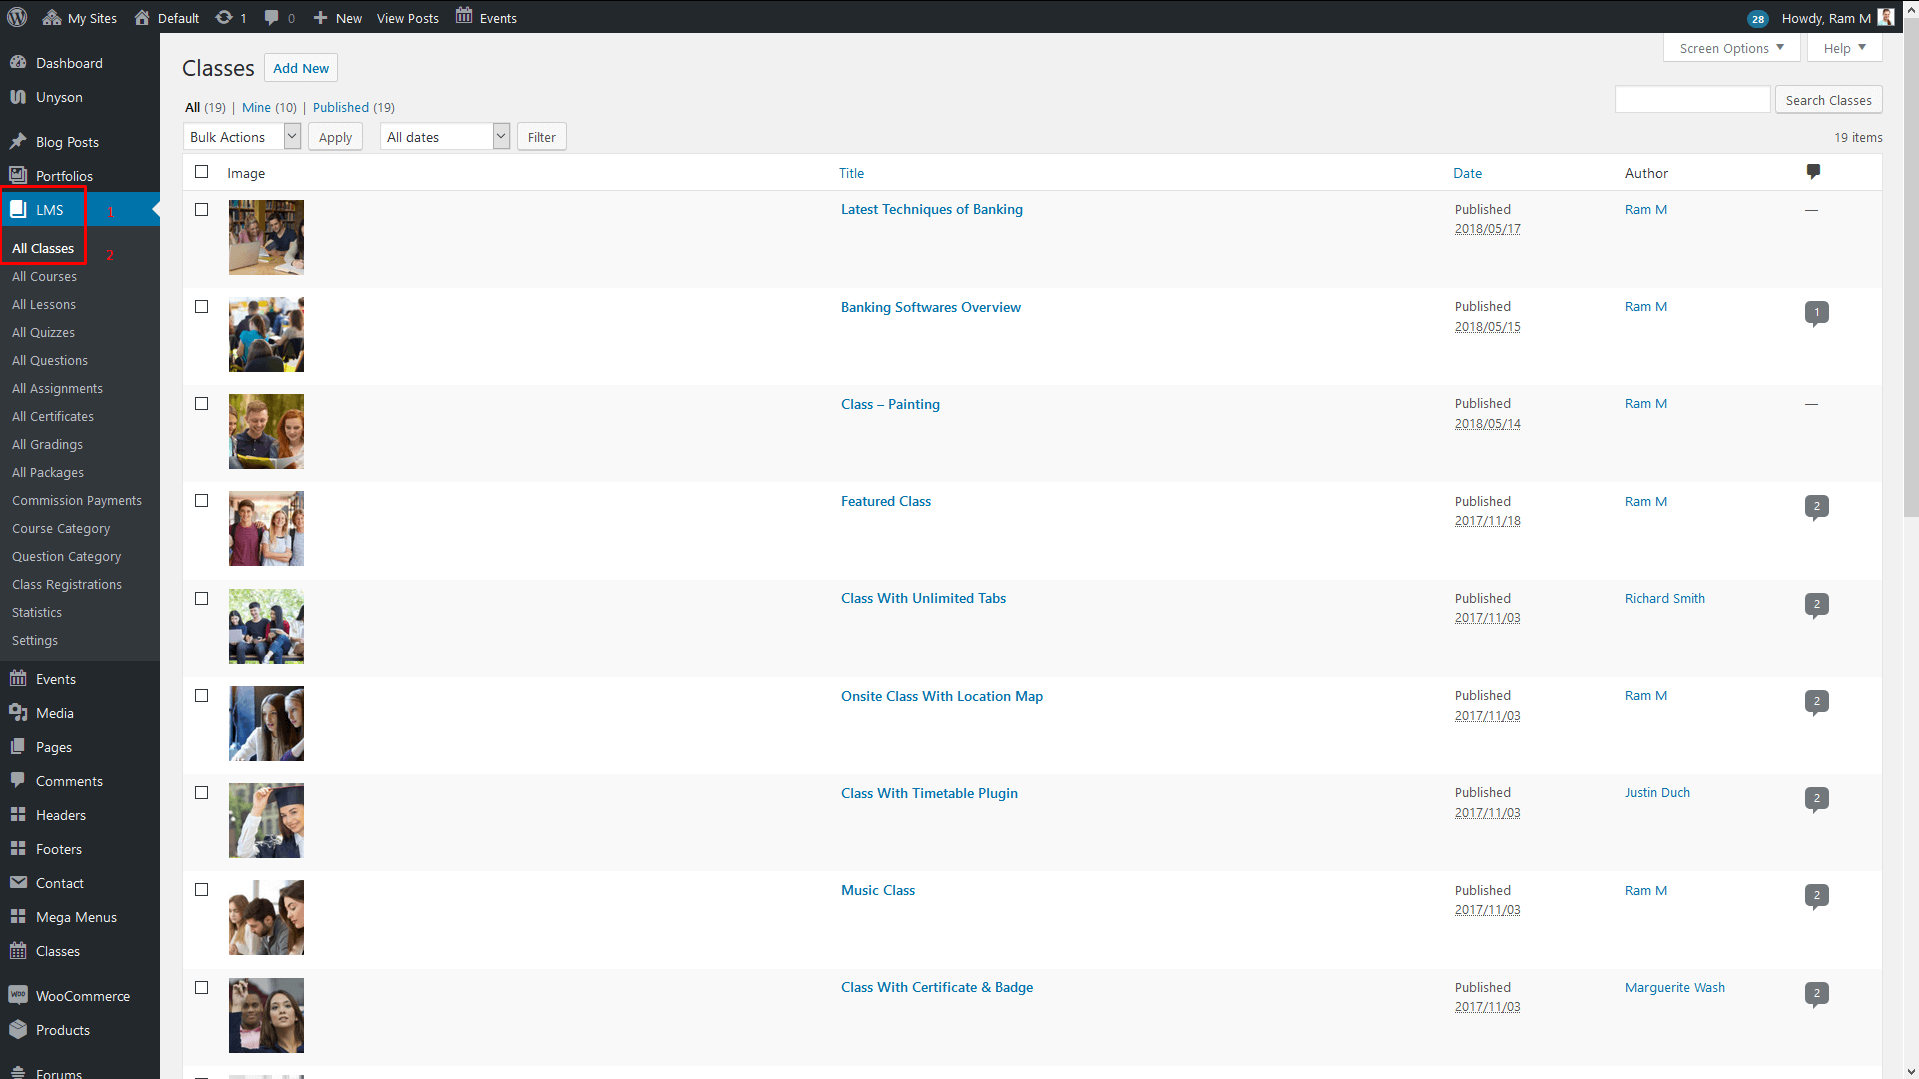
This is how the Classes backend shows for the site administrator. We do have numerous options and we will explain it one by one.
Now we are going to look the options of Classes Add New page. Once the page is opened you will have the section for the classes contents in which you can use the Visual Composer plugin. We have numerous shortcodes for classes and we will be explaining it in this documentation. Now lets see the Breadcrumb Options
1.1 Breadcrumb Options
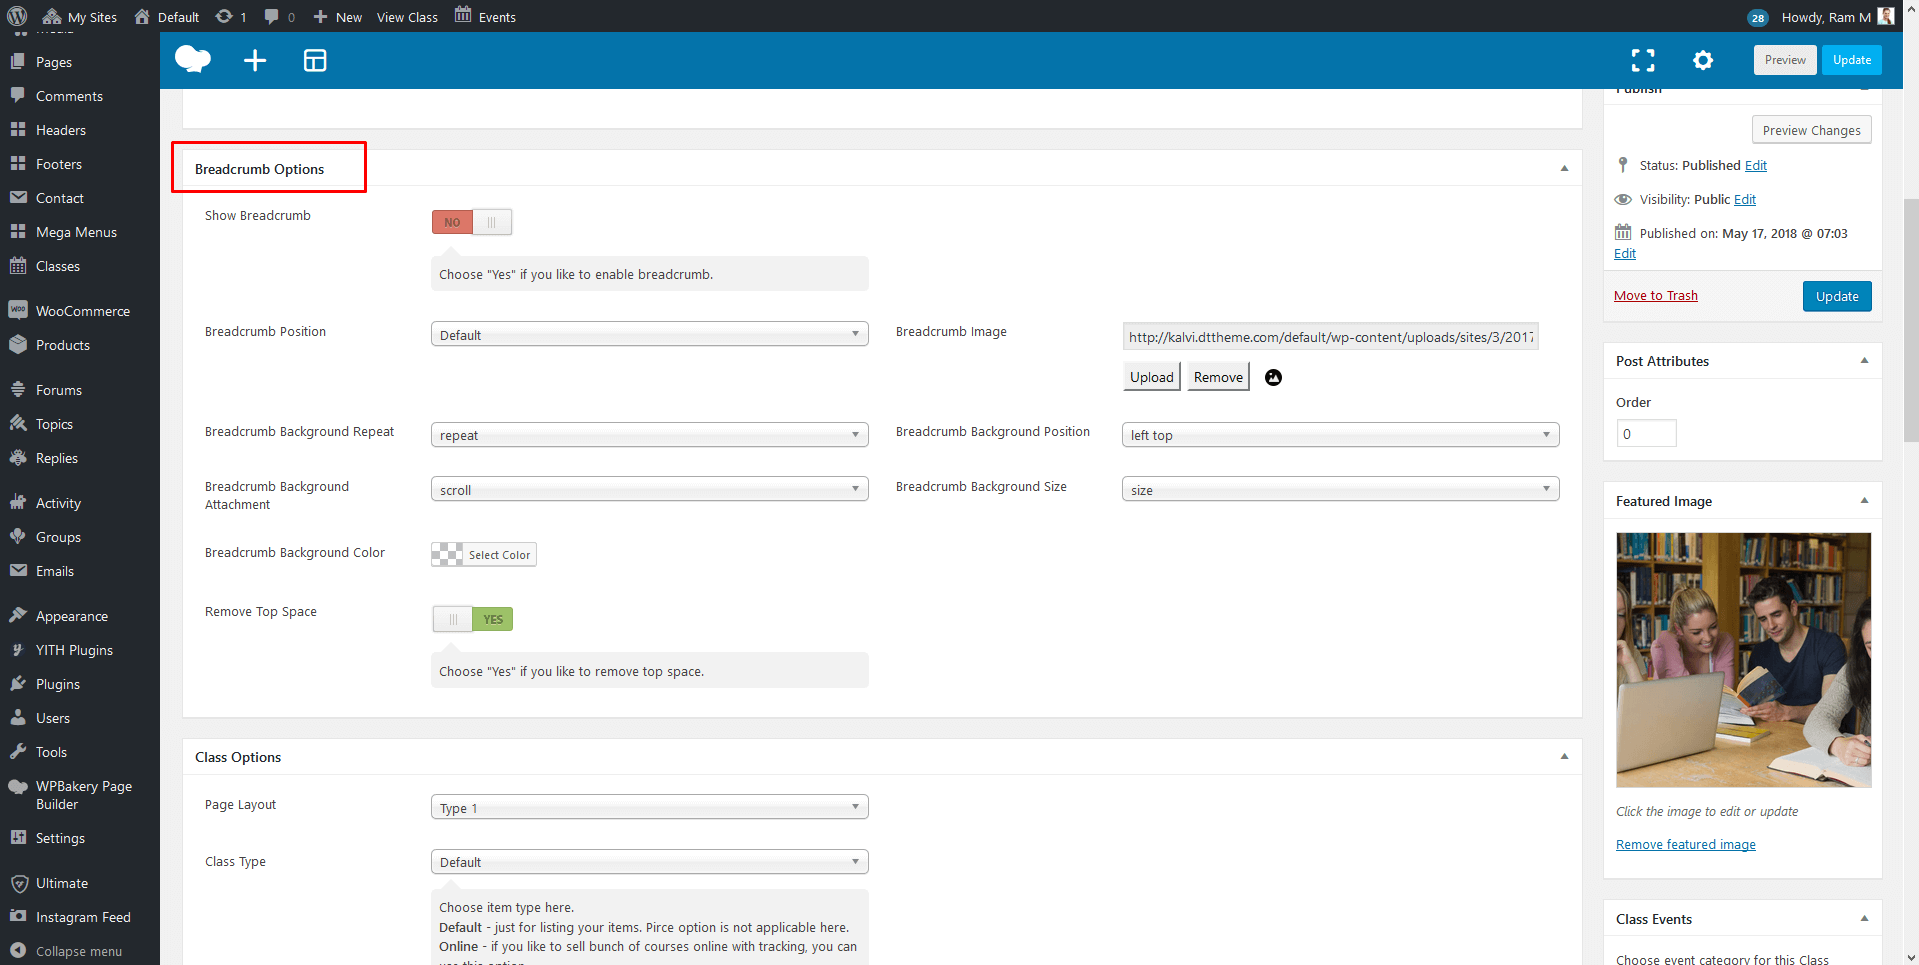
With the Breadcrumb option metabox you can enable/disable the breadcrumb, set the position of breadcrumb, set background image, set background position, set background repeat, set background color and remove the top space if needed.
Classes Overview
1.2 Class Options
1.2.1) Page Layout
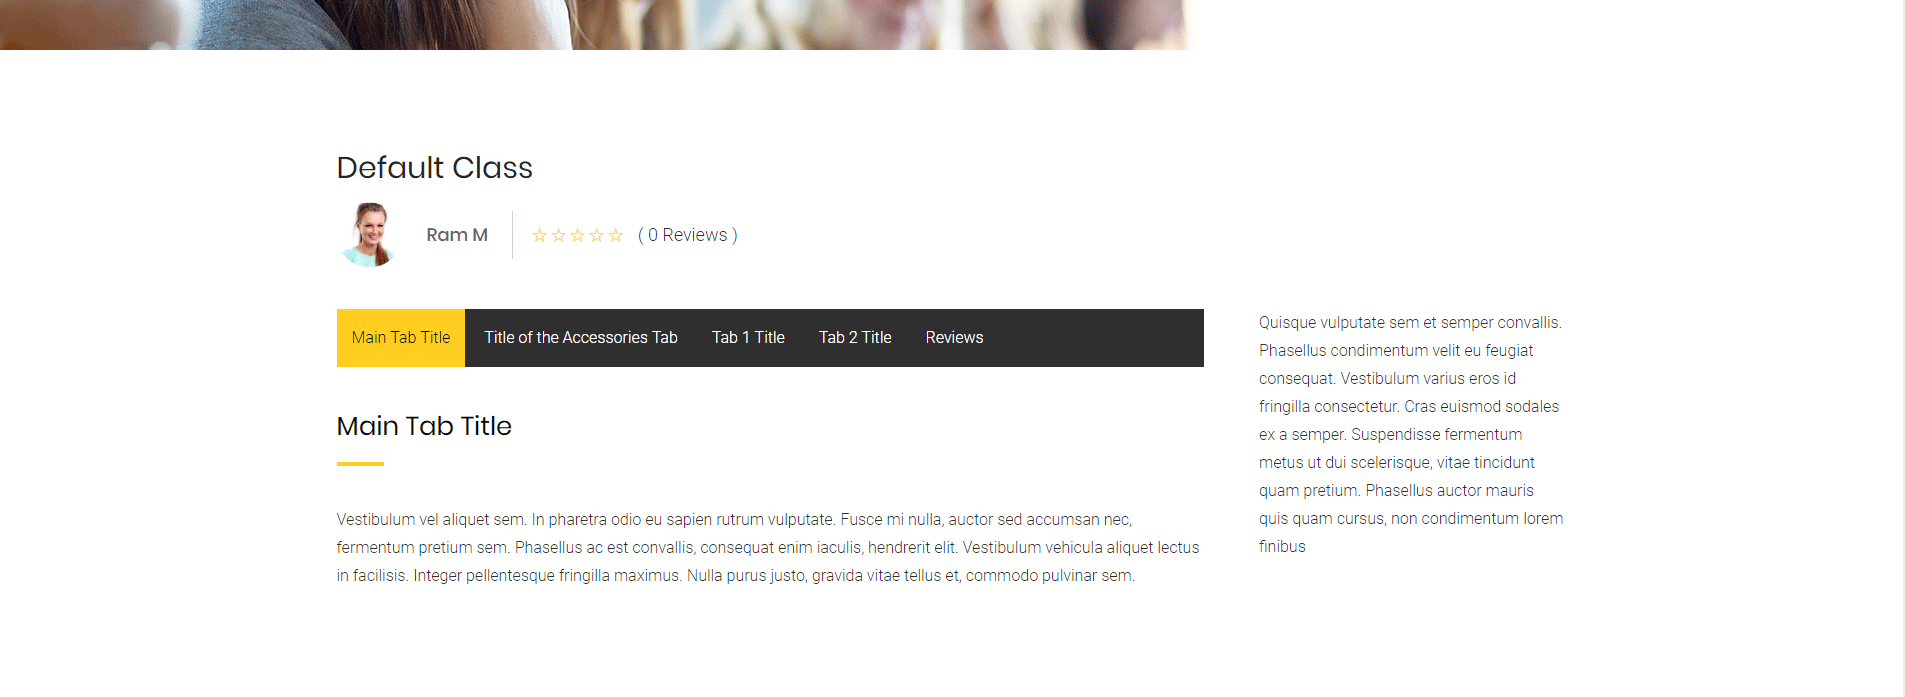
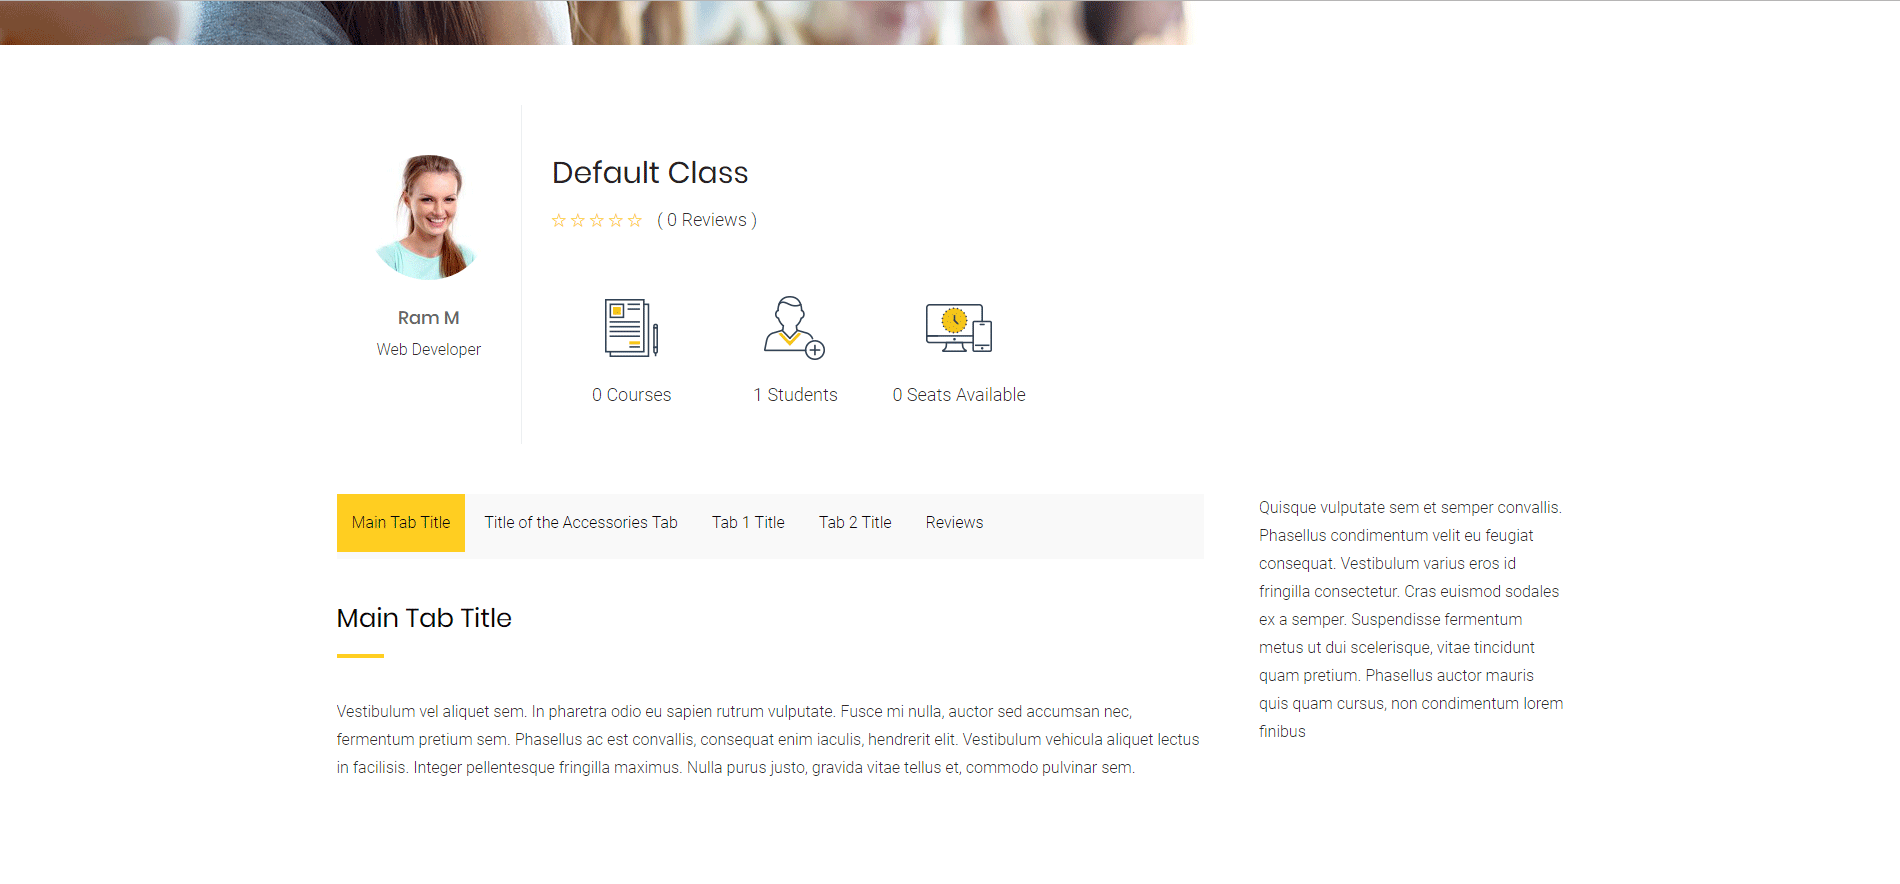
With the Classes Page Layout options you can select 4 types of Page Layout which are shown in the screenshot below.
Type 1:
|
Type 2:
|
Type 3:

|
Type 4:

|
Class Options
1.2.2) Class Type
With the Class Type options you can select 3 types of classes.
1. Default
2. Online
3. Onsite
1. Default
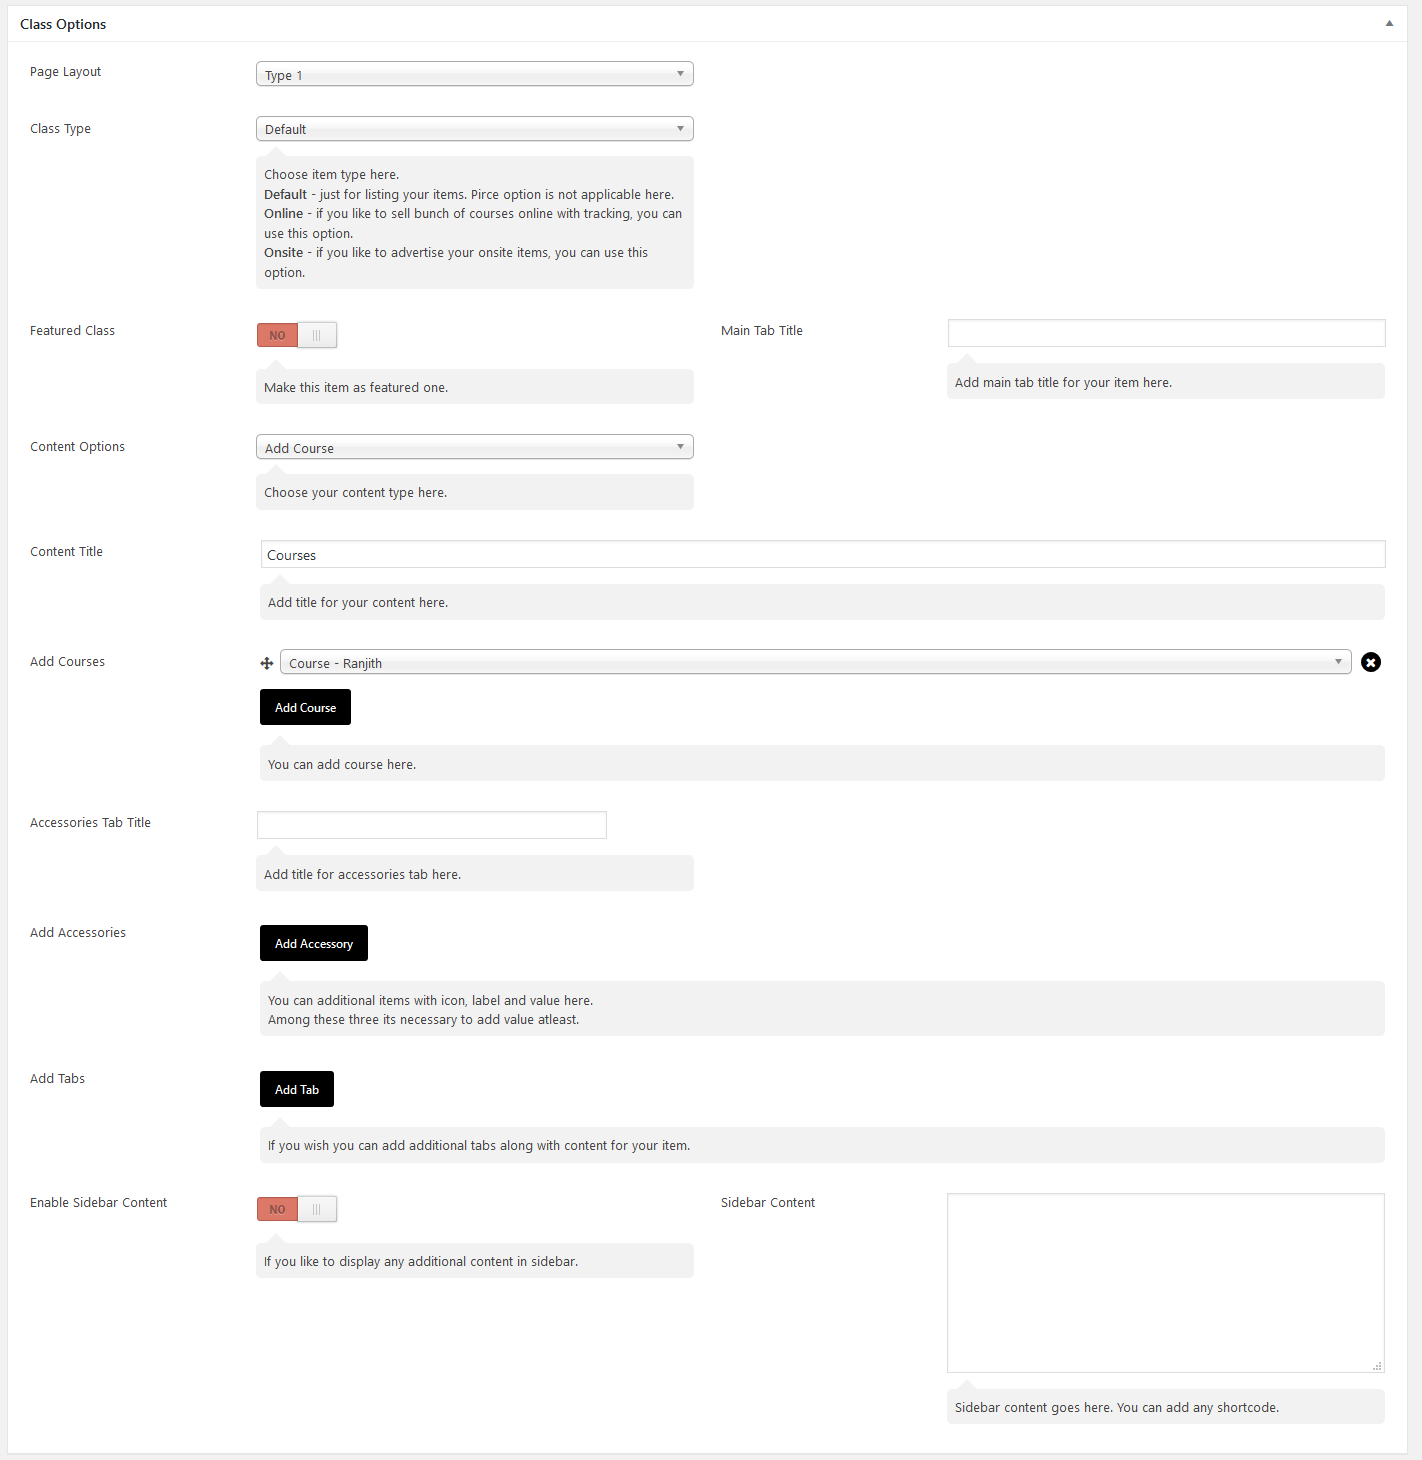
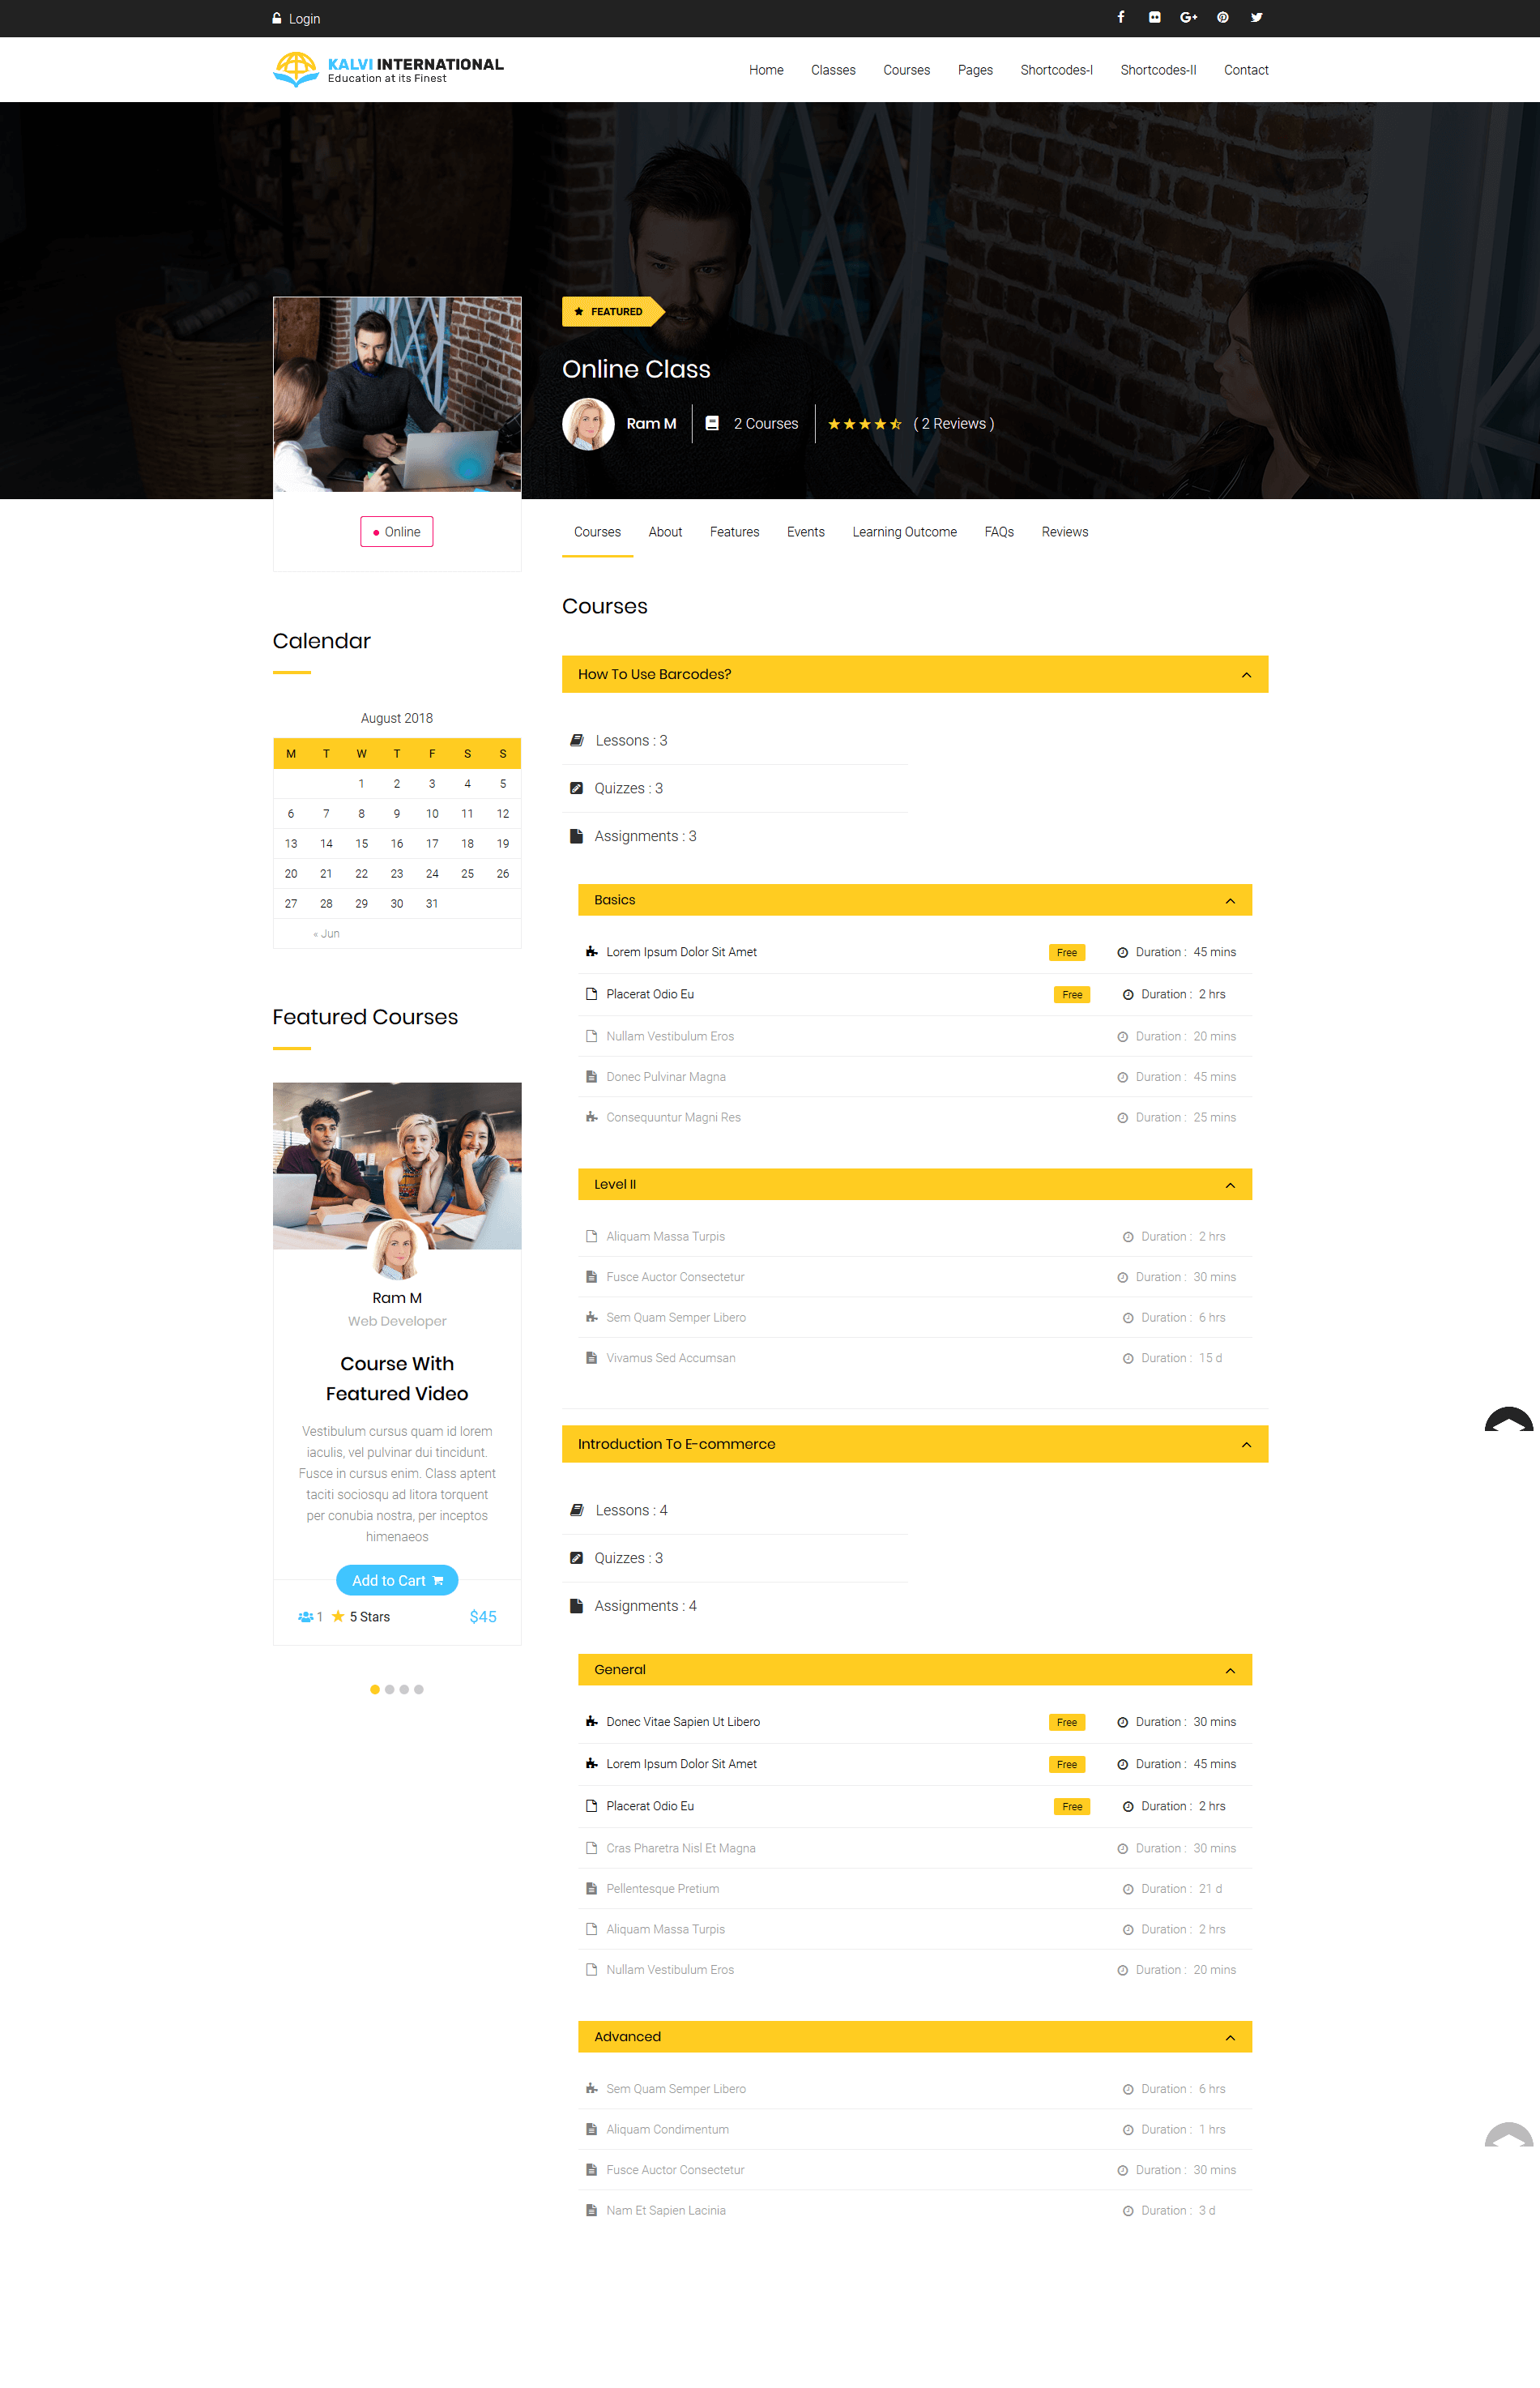
Just for listing your items. Price option is not applicable here. This type is basically used for any private education centers who offer any crash courses in their centers. For example if a education center is offering wordpress class on 20th June 2018, then this default type can be used. They can just display the Class Information in their site. Price option is not need for this default class type.
1.1) Featured Class
With this option you can set a "Featured" badge to the class item that you need.
1.2) Main Tab Title
With this option you can set title of the Main tab module in the class details page. If this field is left blank, then the default title will be "About The Program".
Default Class
1.3) Content Options
Next comes the content options. You have 2 types of content options. You can add courses or any shortcodes of the theme.
1. Add Course: If you select the "Add Course" option, then the courses selection box and Content Title option will be loaded. You can select what ever course that you need to link to this class. You can also add Content Title to that course that you are going to add. You can add as many as courses that you need without any restriction.
2. Add Shortcodes: If you select the "Add Shortcodes" option, then a text area and Content Title option will be loaded. In the text area you can add whatever shortcode that you need to display in that section and give a Content Title for that section,
1.4) Accessories Tab Title
With this option you can add Accessories tab title.
1.5) Add Accessories
With this option you can add Accessories tab inside the class content in the tab module. If you click "Add Accessory" button, the textboxes for the content section will be loaded. The contents will have Icon ( any font awesome icons), Label, Value and Description. You can add as many as accessories that you need without any restriction.
1.6) Add Tabs
With this option you can add any additional tabs to the classes content if you need. You can add title and content in the shortcode format. You can add any shortcode from the theme. You can add as many as tabs section that you need without any restriction.
1.7) Enable Sidebar Content
With this option you can add any additional content in sidebar. You need to add the sidebar content in the format of shortcodes. You can use any shortcodes from the theme. The shortcodes needs to be added in the "Sidebar Content" textarea.
1.8) Woocommerce Options
Earlier we have said that the price options does not applies for this type. Yes it does not apply, but if you need to show any price in the class details page, you can add it here. But the "Add to Cart" option will not apply for this type of class.
1.9) Class Events
Once the "Events Calendar" is activated, this option will be available. This option is used to assign any events to the class item. Here you can assign as many as events to the classes.
2. Online
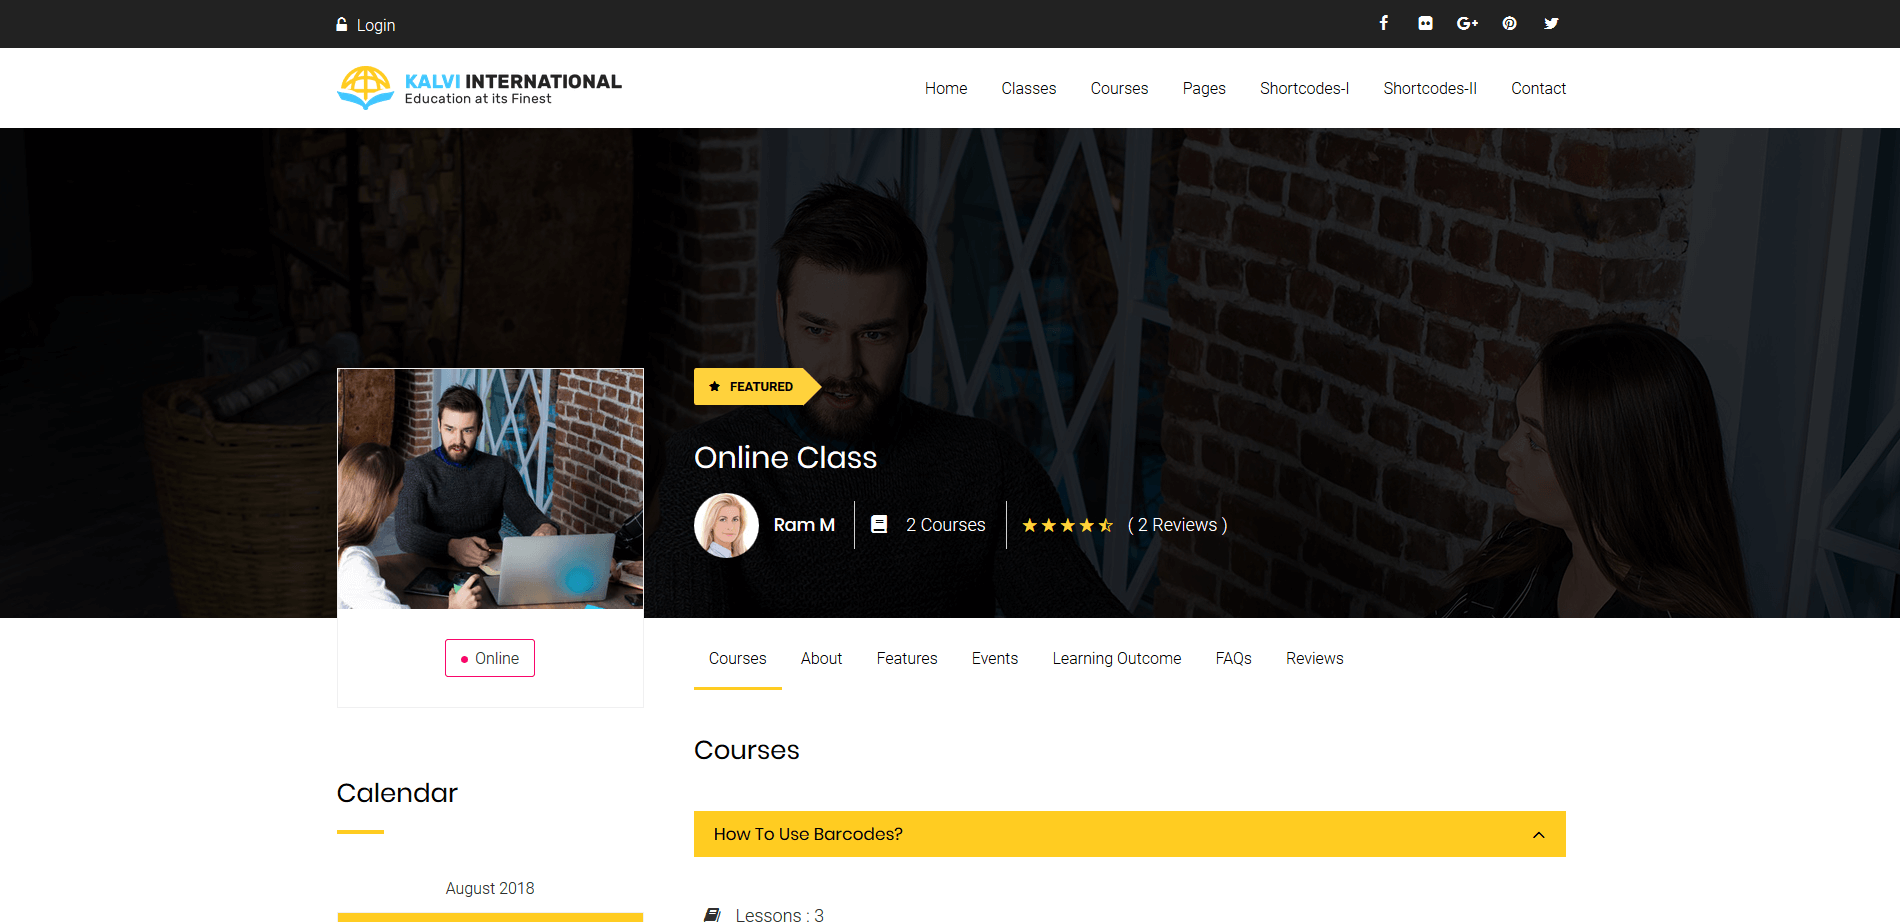
If you like to sell bunch of courses online with tracking, you can use this option. This type of courses are useful for selling the courses online. That is all the actions of the courses are done online, like the intructor can upload the course online, and the student can purchase it online and view it online and obtain his feedback, certificate, badge, etc.., everything in online.
2.1) Featured Class
With this option you can set a "Featured" badge to the class item that you need.
2.2) Main Tab Title
With this option you can set title of the Main tab module in the class details page. If this field is left blank, then the default title will be "About The Program".
2.3) Content Options
Next comes the content options. You have 2 types of content options. You can add courses or any shortcodes of the theme.
1. Add Course: If you select the "Add Course" option, then the courses selection box and Content Title option will be loaded. You can select what ever course that you need to link to this class. You can also add Content Title to that course that you are going to add. You can add as many as courses that you need without any restriction.
2. Add Shortcodes: If you select the "Add Shortcodes" option, then a text area and Content Title option will be loaded. In the text area you can add whatever shortcode that you need to display in that section and give a Content Title for that section,
Online Class
2.4) Enable Certificate
If this button is enabled, then the Certificate option will be enabled for the class item. This is the certificate that the user is going to get once he completes the class successfully.
2.5) Enable Badge
If this button is enabled, then the Badge option will be enabled for the class item. This is the badge that the user is going to get once he completes the class successfully.
2.6) Certificate Percentage (%)
This is the option to set the Certificate Percentage. The user will get the certificate only if he obtains this percentage overall.
2.7) Badge Percentage (%)
Similar to the certicate percentage, this is the option to set the Badge Percentage. The user will get the badge only if he obtains this percentage overall.
2.8) Certificate Template
Using this selection box option you can select Certificate Template which is created from the "All Certificates" menu. You can create your own certificate or use the default template. We will explain all of them separately.
2.10) Badge Image
Using this option you can upload custom image to the badge of the course.
2.11) Accessories Tab Title
With this option you can add Accessories tab title.
2.12) Add Accessories
With this option you can add Accessories tab inside the class content in the tab module. If you click "Add Accessory" button, the textboxes for the content section will be loaded. The contents will have Icon ( any font awesome icons), Label, Value and Description. You can add as many as accessories that you need without any restriction.
2.13) Add Tabs
With this option you can add any additional tabs to the classes content if you need. You can add title and content in the shortcode format. You can add any shortcode from the theme. You can add as many as tabs section that you need without any restriction.
2.14) Enable Sidebar Content
With this option you can add any additional content in sidebar. You need to add the sidebar content in the format of shortcodes. You can use any shortcodes from the theme. The shortcodes needs to be added in the "Sidebar Content" textarea.
2.15) Woocommerce Options
From this woocommerce metabox option you can set the Regular price and Sale price for the class item. No need to configure the price from the woocommerce plugin. Everything is done in our LMS Addon itself. This class will act as a woocommerce product and regular woocommerce method of purchasing a product can be performed. The woocommerce plugin needs to be installed and activated for this metabox to show.
2.16) Class Events
Once the "Events Calendar" is activated, this option will be available. This option is used to assign any events to the class item. Here you can assign as many as events to the classes.
3. Onsite
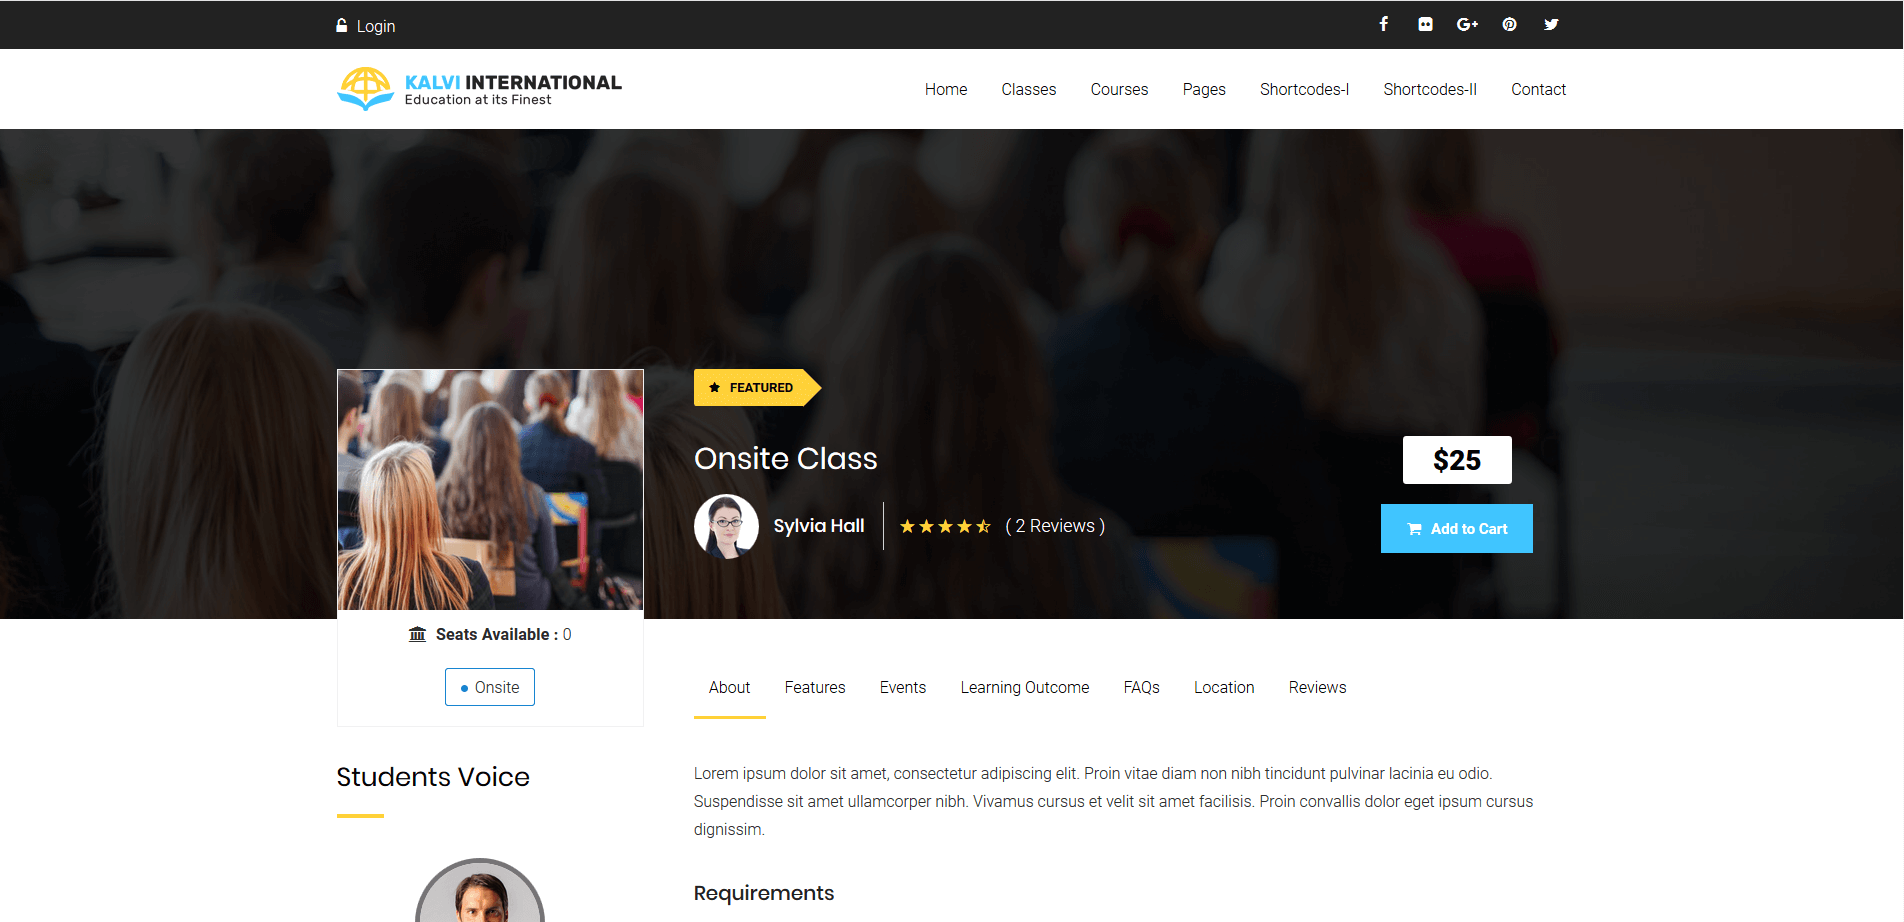
If you like to advertise your onsite items, you can use this option. That is if, this type of classes can be used for education centers who take the classes directly in the centers (Onsite) and not online. The class can be advertised with the Start Date and if needed the purchase option can also be enabled online. That is the student can purchase the course online and he can visit the center directly to take the course. Else if the purchase option is not needed, just a registration option can be enabled and the payment can be received directly in the centers by checking the registration.
3.1) Featured Class
With this option you can set a "Featured" badge to the class item that you need.
3.2) Main Tab Title
With this option you can set title of the Main tab module in the class details page. If this field is left blank, then the default title will be "About The Program".
3.3) Content Options
Next comes the content options. You have 2 types of content options. You can add courses or any shortcodes of the theme.
1. Add Course: If you select the "Add Course" option, then the courses selection box and Content Title option will be loaded. You can select what ever course that you need to link to this class. You can also add Content Title to that course that you are going to add. You can add as many as courses that you need without any restriction.
2. Add Shortcodes: If you select the "Add Shortcodes" option, then a text area and Content Title option will be loaded. In the text area you can add whatever shortcode that you need to display in that section and give a Content Title for that section,
Onsite Class
3.4) Enable Certificate
If this button is enabled, then the Certificate option will be enabled for the class item. This is the certificate that the user is going to get once he completes the class successfully.
3.5) Enable Badge
If this button is enabled, then the Badge option will be enabled for the class item. This is the badge that the user is going to get once he completes the class successfully.
3.6) Certificate Template
Using this selection box option you can select Certificate Template which is created from the "All Certificates" menu. You can create your own certificate or use the default template. We will explain all of them separately.
3.7) Badge Image
Using this option you can upload custom image to the badge of the course.
3.8) Start Date
From this Start Date, you can set a future date for the Class to start. For example you can set any date in future as start date and the date will be displayed in the Class details page. Only after the time is reached, the class can be viewed. If you need to show a countdown timer until the start date of the class, it can be enabled from Dashboard > Settings > Enable Count Down Timer - Class Start Date > Yes. This will enable countdown timer for all the classes which has the start date.
3.9) Capacity
Capacity of the class is that, the maximum purchases that can be allowed for the class. That is if you have set the capacity as 100, and once the 100 purchases are completed, then the class will not be allowed to purchase. And another thing is that the "Disable Purchases / Registration" button should be enabled to "Yes". Only if this button is enabled, the class purchase will be disabled after the class capacity is reached.
3.10) Disable Purchases / Registration
This button "Disable Purchases / Registration" works simultaneously with Capacity option. If this button is not enabled, then even the class capacity is reached, the user will be allowed to purchase the course.
3.11) Enable Purchases
If you need the class items to be sold online, you need to select "Enable Purchases" option. If that option is not selected then the "Add to cart" button will not appear in the class details page. Just the price will be displayed.
3.12) Enable Registration
If you select "Enable Registration" just a registration option will be enabled and the payment can be received directly in the centers by checking the registration. If the user is registered, then the details can be viewed by the admin from Dashboard > LMS > Class Registrations. If "Enable Purchases" button is enabled, then registration will not work and simultaneously, purchase will not work if registration is enabled.
3.13) Syllabus Preview
If you don't wish to show the course detail pages for onsite courses, you can disable it. Enabling this option will only show the preview of the courses.
3.14) Address
If you wish to show the address of the education center or any other business purposes, this field can be used.
3.15) GPS Location
This GPS location field will automatically add the Latitude and Longitude of the specified address when "Click Here to get GPS Location" button is clicked. Based on the GPS location, the location map will be shown in the front end of the class.
3.16) Accessories Tab Title
With this option you can add Accessories tab title.
3.17) Add Accessories
With this option you can add Accessories tab inside the class content in the tab module. If you click "Add Accessory" button, the textboxes for the content section will be loaded. The contents will have Icon ( any font awesome icons), Label, Value and Description. You can add as many as accessories that you need without any restriction.
3.18) Add Tabs
With this option you can add any additional tabs to the classes content if you need. You can add title and content in the shortcode format. You can add any shortcode from the theme. You can add as many as tabs section that you need without any restriction.
3.19) Enable Sidebar Content
With this option you can add any additional content in sidebar. You need to add the sidebar content in the format of shortcodes. You can use any shortcodes from the theme. The shortcodes needs to be added in the "Sidebar Content" textarea.
3.20) Woocommerce Options
From this woocommerce metabox option you can set the Regular price and Sale price for the class item. No need to configure the price from the woocommerce plugin. Everything is done in our LMS Addon itself. This class will act as a woocommerce product and regular woocommerce method of purchasing a product can be performed if "Enable purchase" option is selected. The woocommerce plugin needs to be installed and activated for this metabox to show.
3.21) Class Events
Once the "Events Calendar" is activated, this option will be available. This option is used to assign any events to the class item. Here you can assign as many as events to the classes.
3.22) Author Metabox
From this metabox you can change the author of the current class. All the authors of your site will be listed in the selection box. If the author needs to be changed, the admin can change it from this option.
2 All Courses
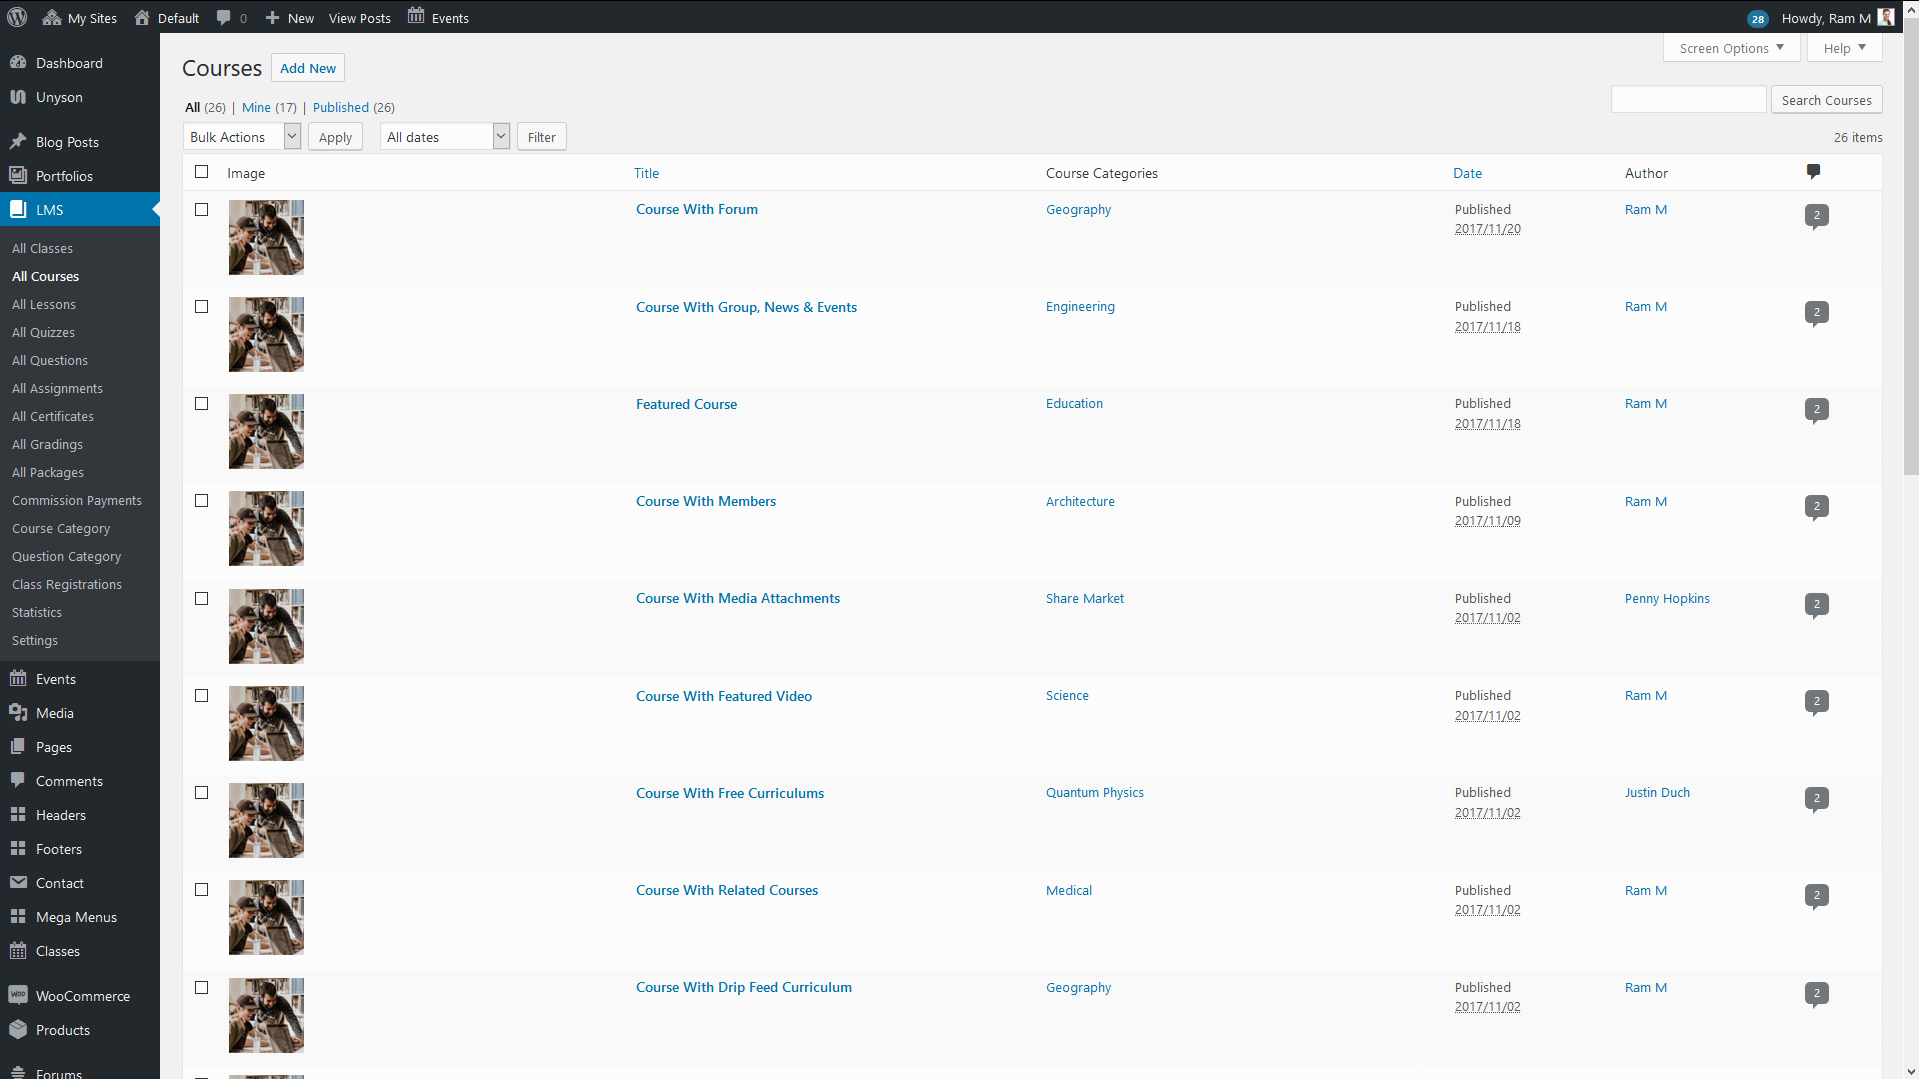
This is how the Courses backend shows for the site administrator. Courses section is the most important module in our Kalvi theme, since it has 100s of options inbuilt in it.
Now we are going to look the options of Courses Add New page. Once the page is opened you will have the section for the courses contents in which you can use the Visual Composer plugin. We have numerous shortcodes for courses and we will be explaining it in this documentation. Now lets see the Breadcrumb Options
2.1 Breadcrumb Options

With the Breadcrumb option metabox you can enable/disable the breadcrumb, set the position of breadcrumb, set background image, set background position, set background repeat, set background color and remove the top space if needed.
2.2 Courses Options
2.2.1) Page Layout
With the Courses Page Layout options you can select 4 types of Page Layout which are shown in the screenshot below.
Type 1:
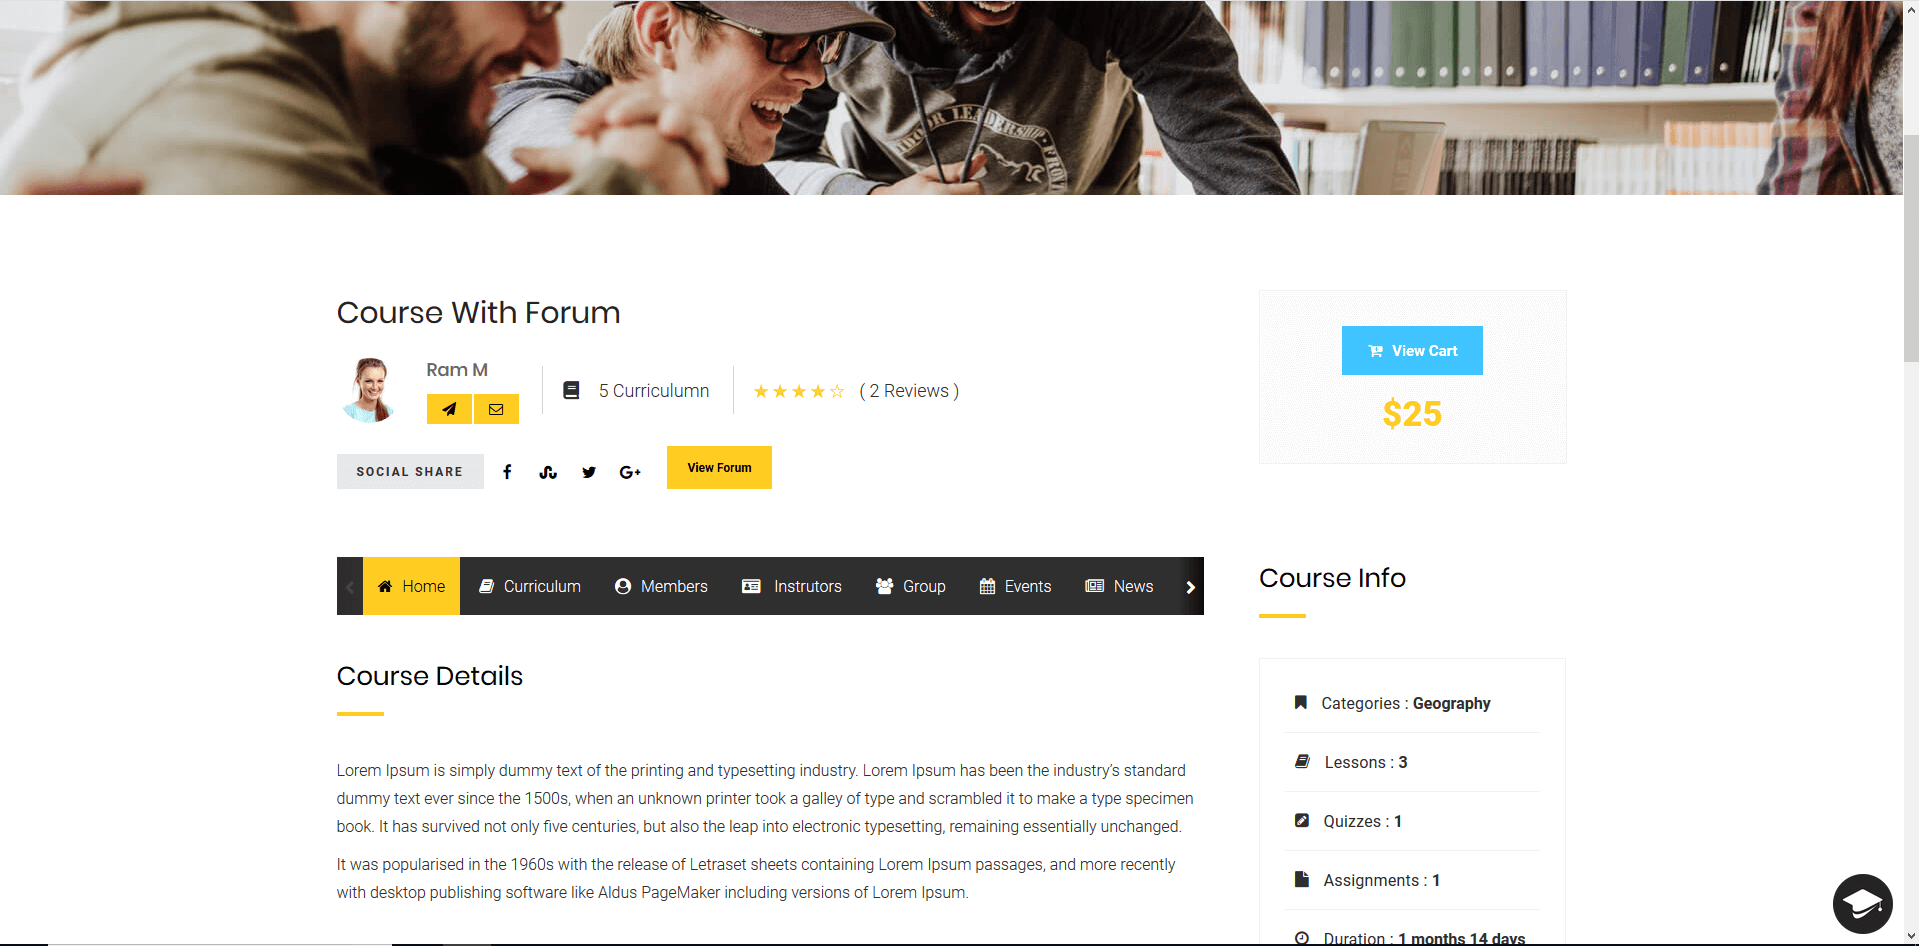
|
Type 2:
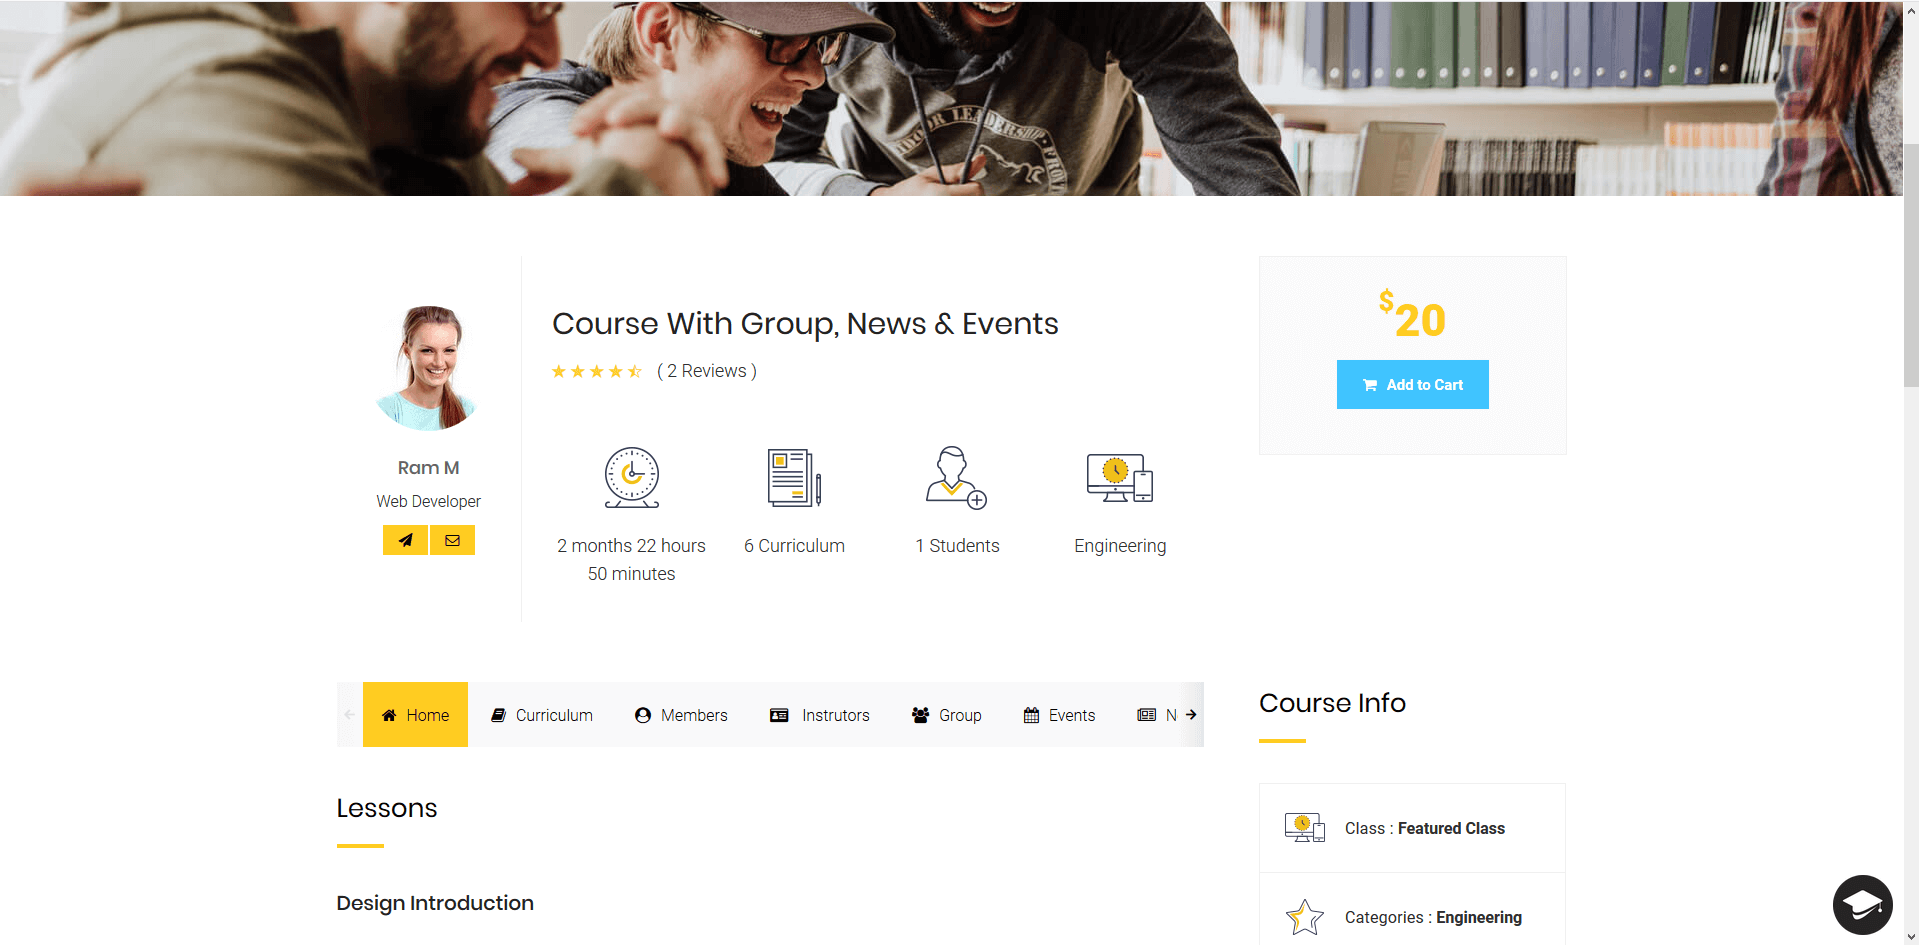
|
Type 3:

|
Type 4:
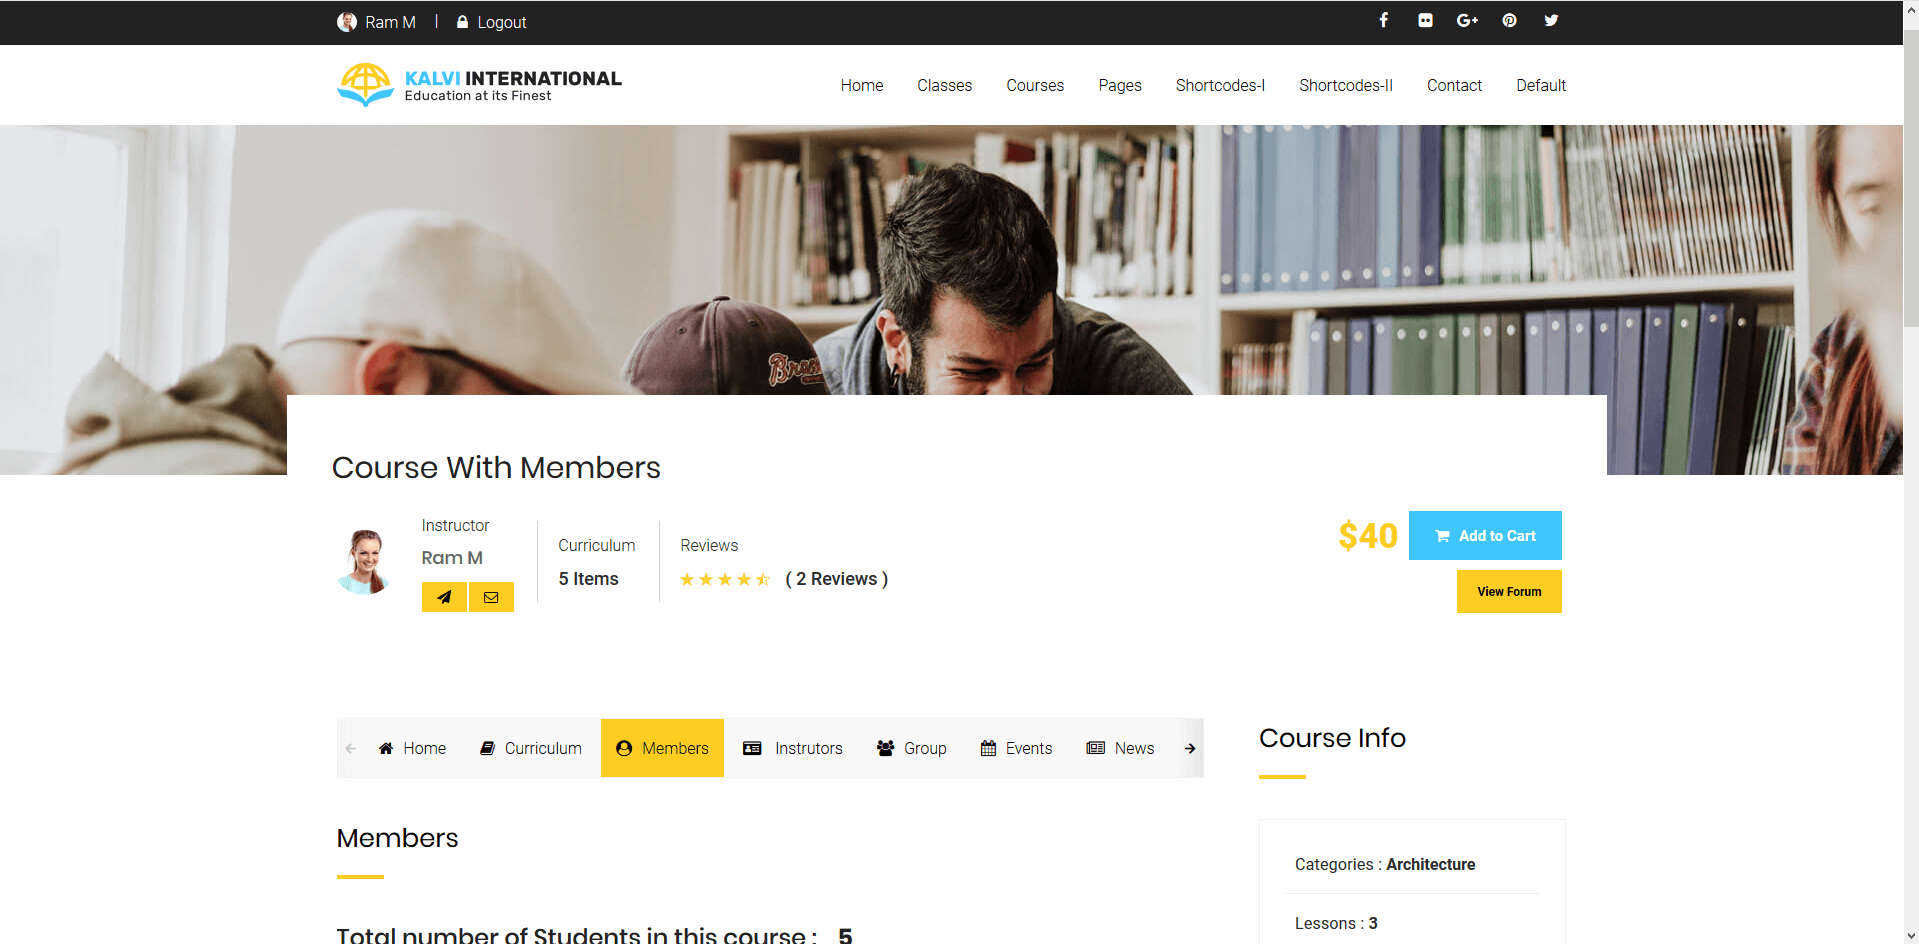
|
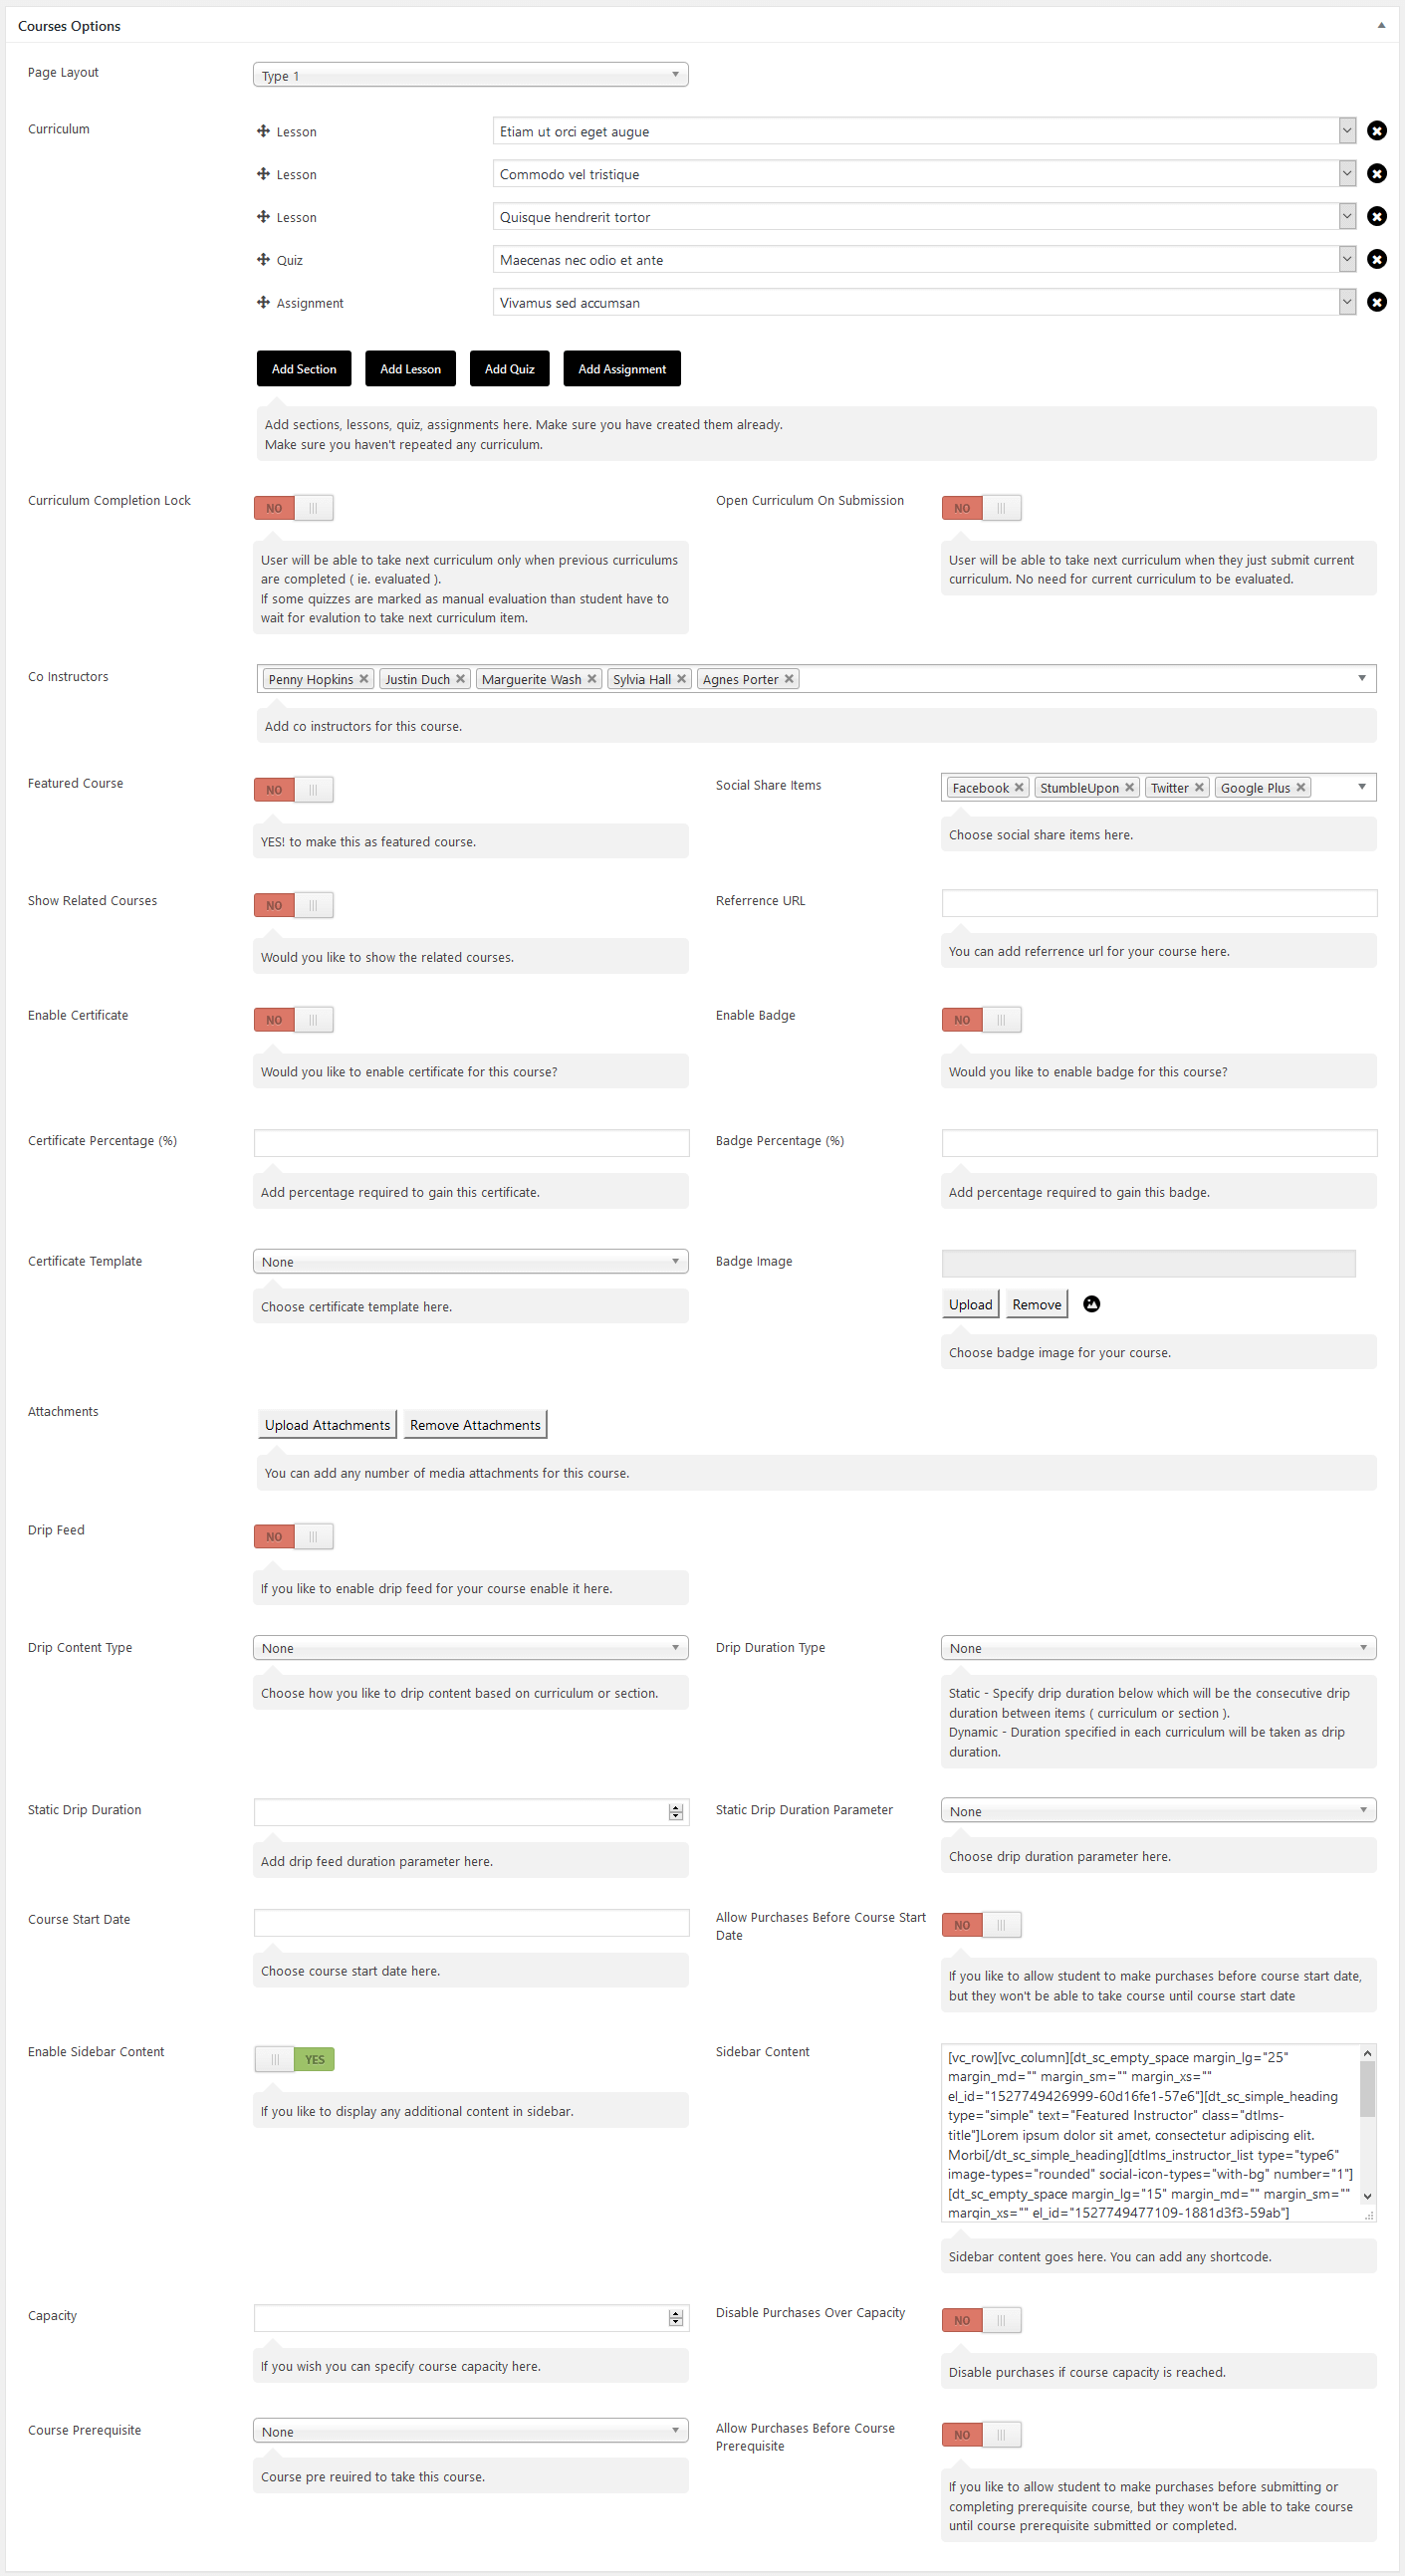
2.2.2) Curriculum
Curriculum module plays the important role here. You can assign any number of lessons, quizzes and assignments to the individual courses from this module. In this section we do have 4 buttons.
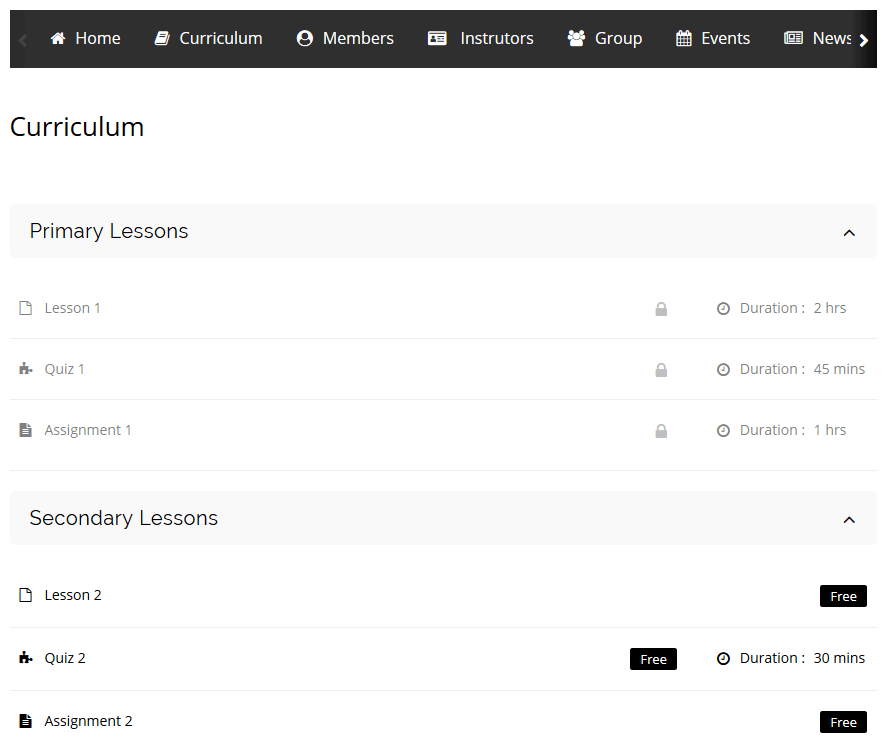
This is how the curriculum section will be seen in front end once it is added (Student view before purchase).
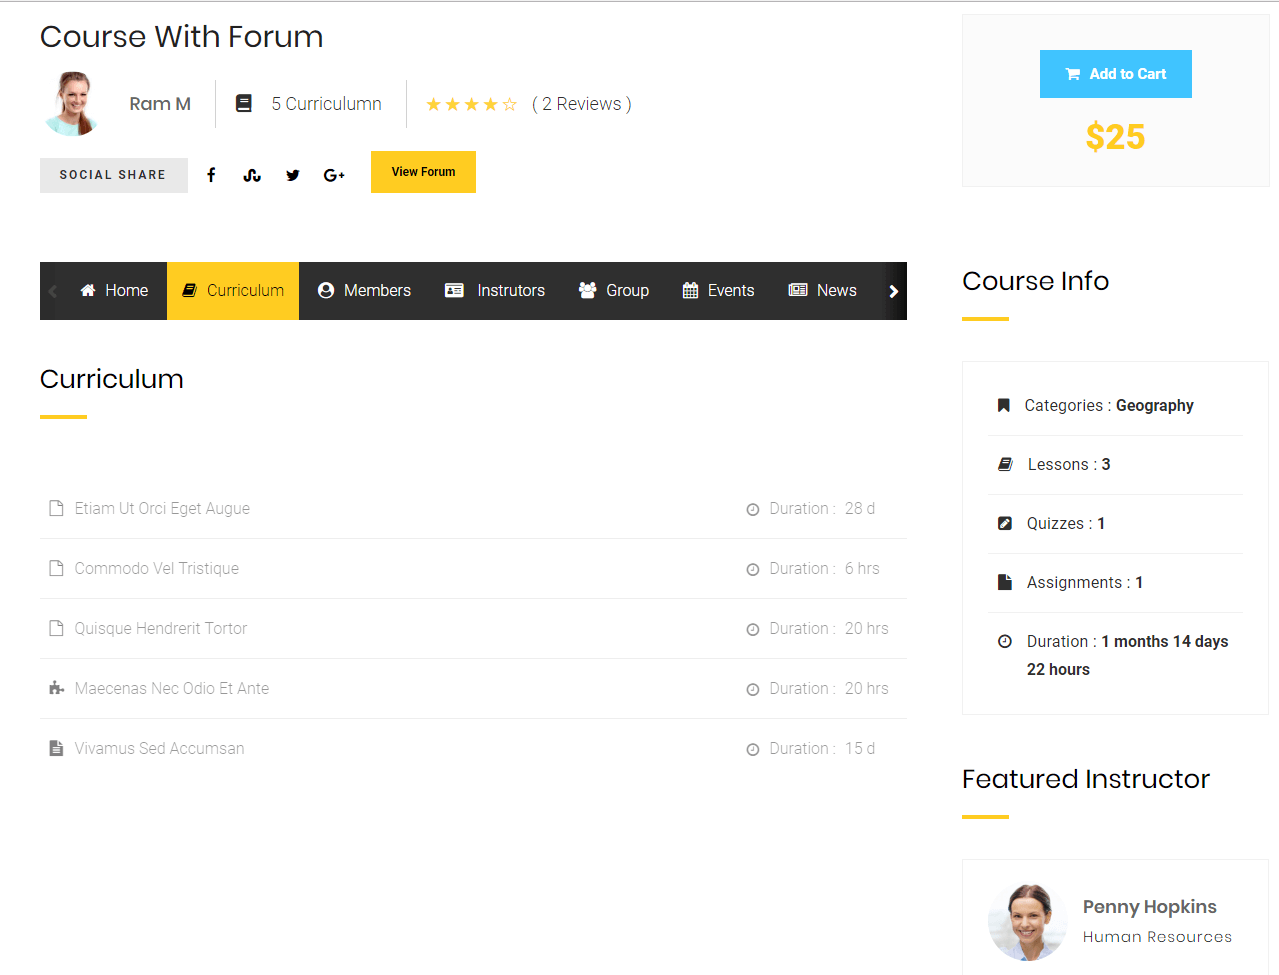
- 1. Add Section - This module will have a title option and this module will divide the added lesson, quiz and assignment section wise. That is if you have 2 sections in which there are lessons, quizzes and assignments individually in all the 2 sections, then all the 2 sections will be shown individually as shown here in this screenshot. The first section is locked and the second section is opened. We will see that concept later in this documentation.
- 2. Add Lesson - Using this you can add the required number of lessons to the course.
- 3. Add quiz - Using this you can add the required number of quizzes to the course.
- 4. Add Assignment - Using this you can add the required number of assignments to the course.
Courses Overview
Courses Options
2.2.3) Curriculum Completion Lock
If this button is enabled then the user will be able to take next curriculum only when previous curriculums are completed ( ie. evaluated ). If some quizzes are marked as manual evaluation then student have to wait for evalution to be completed by the admin to take next curriculum item.
2.2.4) Open Curriculum On Submission
If this button is enabled then the user will be able to take next curriculum when they just submit current curriculum. No need for current curriculum to be evaluated. This option works simultaneously with "Curriculum Completion Lock". Only if the "Curriculum Completion Lock" is enabled the "Open Curriculum On Submission" concept will work.
2.2.5) Co Instructors
Using this selection box option you can select "Co Instructors" to the individual course that you are editing. You can add as many as "Co Instructors" to the course.
2.2.6) Featured Course
If this button is enabled, then the course will be marked as featured and a "Featured" badge will appear in the coursed details page.
2.2.7) Social Share Items
Using this selection box option you can select "Social Share Items" to the individual course that you are editing. The available social share items are Facebook, Delicious, Digg, Stumble Upon, Twitter, Google Plus, LinkedIn, Pinterest.
2.2.8) Show Related Courses
If this button is enabled, then the "Related Courses" section will appear in the coursed details page. The related courses will be displayed based on the course category.
2.2.9) Enable Certificate
If this button is enabled, then the Certificate option will be enabled for this course. This is the certificate that the user is going to get once he completes the course successfully.
2.2.10) Enable Badge
If this button is enabled, then the Badge option will be enabled for this course. This is the badge that the user is going to get once he completes the course successfully.
2.2.11) Certificate Percentage (%)
This is the option to set the Certificate Percentage. The user will get the certificate only if he obtains this percentage overall.
2.2.12) Badge Percentage (%)
Similar to the certicate percentage, this is the option to set the Badge Percentage. The user will get the badge only if he obtains this percentage overall.
2.2.13) Certificate Template
Using this selection box option you can select Certificate template which is created from the "All Certificates" menu. You can create your own certificate or use the default template. We will explain all of them separately.
2.2.14) Badge Image
Using this option you can upload custom image to the badge of the course.
2.2.15) Attachments
From this Attachments section you can add any number media attachments for the course like word document, image files (jpeg, gif, png), ppf files, pdf files,etc. The attachment of the course can be downloaded only if the course is purchased.
2.2.16) Drip Feed
Drip Feed is an interesting concept in our LMS Addon. In general the drip feed concept is for the users to move to the next CURRICULUM (lessons, quizzes and assignments) or SECTION (group) based on the drip feed duration. We have already explained the section concept previously. Just check out here. For example if the drip feed duration is set to 10 minutes, then the next curriculum can be viewed only after that 10 mins. We have numerous options to execute the drip feed concept and we will look into it briefly now.
2.2.17) Drip Content Type
From this selection box you can choose Curriculum or Section to be drip feeded. That is, if you select curriculum, then the next item in that CURRICULUM (lessons, quizzes and assignments) will open after the duration set in the Drip Duration Type.
2.2.18) Drip Duration Type
Here you can choose the drip duration type as the following.
i. Static - Specify the drip duration in the static drip duration box which will be the consecutive drip duration between items (curriculum or section..)
ii. Dynamic - Duration specified in each CURRICULUM (lessons, quizzes and assignments). will be taken as drip duration.
2.2.19) Static Drip Duration
Add drip feed duration in numbers for course curriculum or section.
2.2.20) Static Drip Duration Parameter
Choose your static drip duration parameter in Seconds, Minutes, Hours, Days, Weeks, Months or Years.
Note: These options will work only when the Drip Feed option is enabled and the Drip Duration Type as Static.
2.2.21) Course Start Date
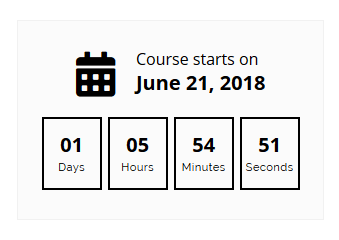
From the Course Start Date, you can set a future date for the course to start. For example you can set any date in future as start date and there will be countdown timer displayed in the course details page. Only after the time is reached, the "Add to Cart" button will appear and the course can be purchased and viewed.
2.2.22) Allow Purchases Before Course Start Date
If you like to allow student to make purchases before course start date you can choose this option, but they won't be able to take course until course start date is reached.
2.2.23) Enable Sidebar Content
With this option you can add any additional content in sidebar. You need to add the sidebar content in the format of shortcodes. You can use shortcodes from the theme. You need to add the shortcodes in "Sidebar Content" text area.
2.2.24) Capacity
Capacity of the course is that, the maximum purchases that can be allowed for the course. That is if you have set the capacity as 100, and once the 100 purchases are completed, the course will not be allowed to purchase. And another thing is that the "Disable Purchases Over Capacity" button should be enabled to "Yes". Only if this button is enabled, the course purchase will be disabled after the course capacity is reached.
2.2.25) Disable Purchases Over Capacity
This button "Disable Purchases Over Capacity" works simultaneously with Capacity option. If this button is not enabled, then even the course capacity is reached, the user will be allowed to purchase the course.
2.2.26) Course Prerequisite
You can set a Course Prerequisite from this option. That is if you want to open the current course, only if the some other course is completed. For example there are 2 courses namely Course A and Course B. If you set Course Prerequisite to Course A as Course B, then only after completing Course B, the Course A can be viewed.
2.2.27) Allow Purchases Before Course Prerequisite
If you like to allow student to make purchases before Course Prerequisite is completed you can choose this option, but they won't be able to take course until Course Prerequisite is completed.
2.3 Woocommerce Options
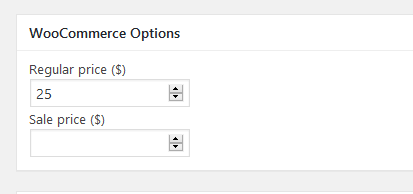
From this woocommerce metabox option you can set the Regular price and Sale price for the course item. No need to configure the price from the woocommerce plugin. Everything is done in our LMS Addon itself. This course will act as a woocommerce product and regular woocommerce method of purchasing a product can be performed. The woocommerce plugin needs to be installed and activated for this metabox to show.
2.4 Courses Sidebar Meta Box Options
We do have 6 metaboxes in our LMS Addon and we have listed them below. These 6 metaboxes are used to include some additional functionality to the courses section.
- 1. Courses Option
- 2. Featured Video
- 3. Course Group
- 4. Course News
- 5. Course Events
- 6. Course Forum

2.4.1) Courses Option
We have already explained all the features courses option metabox in section 2.2 briefly. You can check it here.
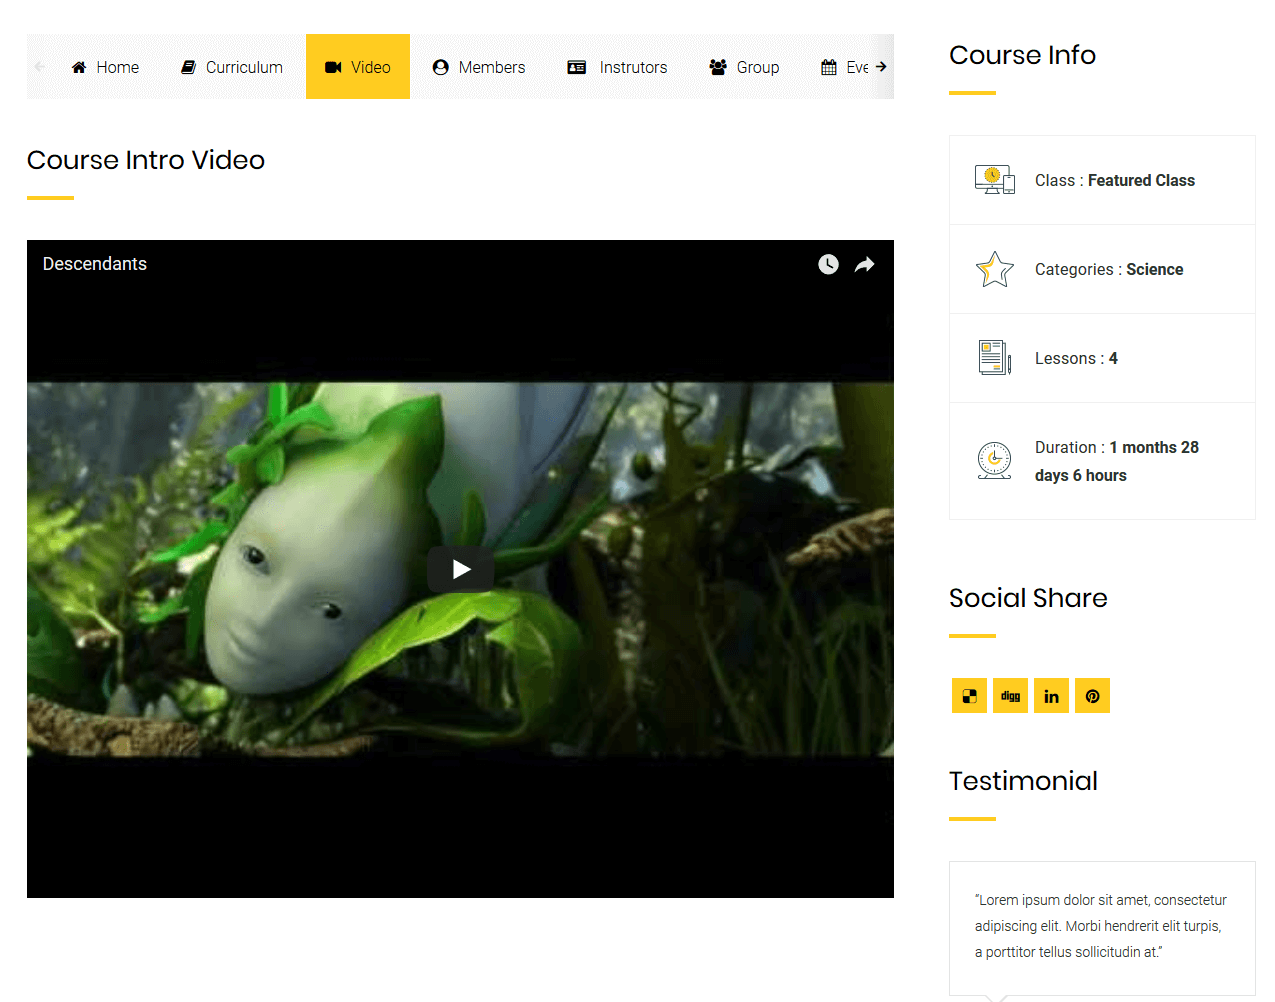
2.4.2) Featured Video
You can add featured video in this section. The video can be in the format of Youtube Video links, Vimeo Video links and Self Hosted Video links like mp4, etc...
2.4.3) Course Group
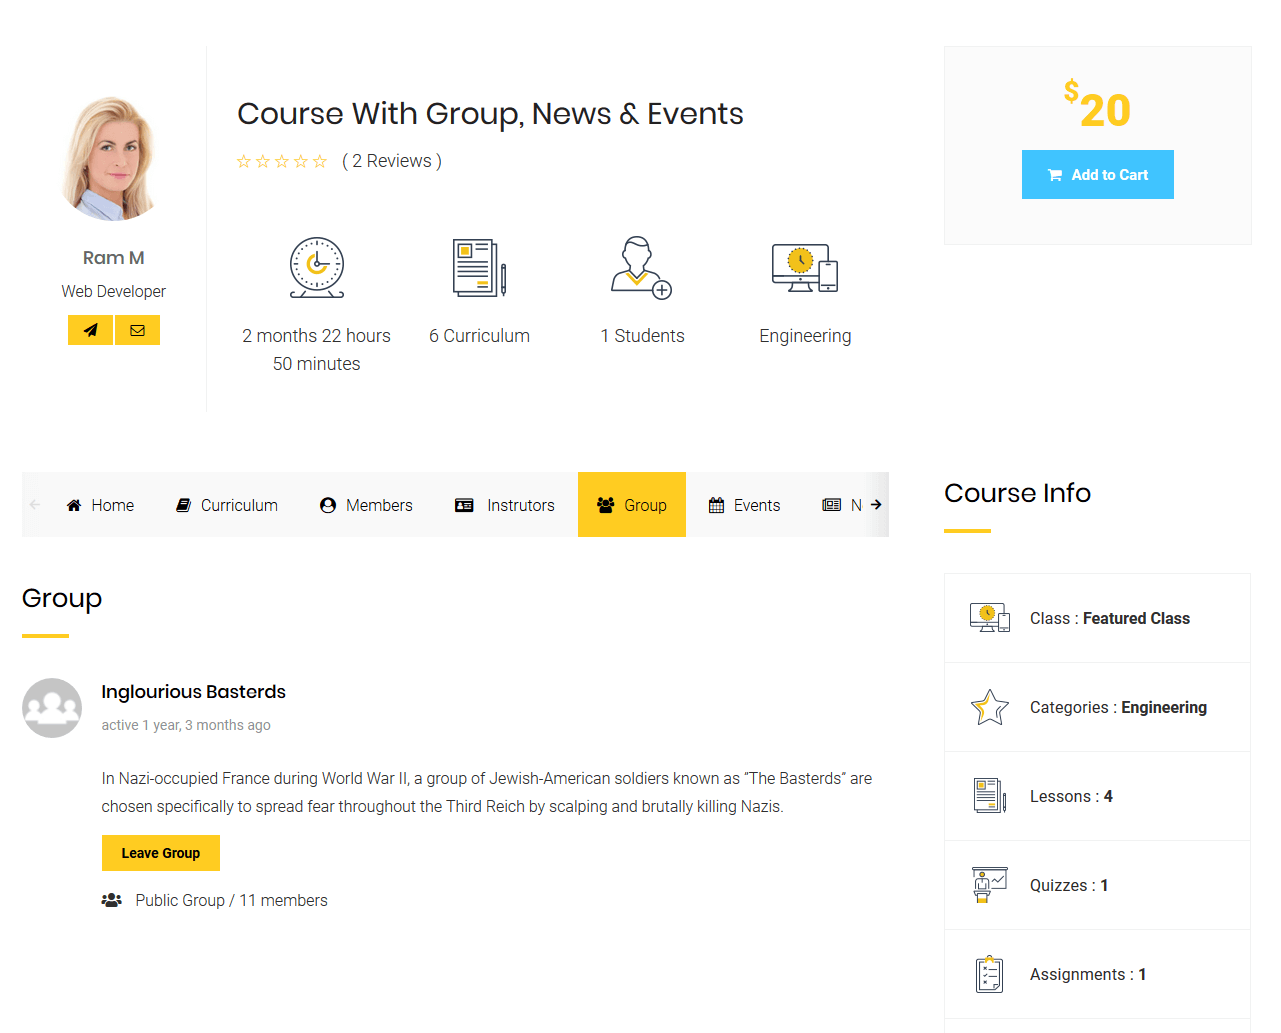
Once the buddypress plugin is activated, this option will be available. This option is used to assign any buddypress group to the course item. You can assign only 1 group to a course.
2.4.4) Course News
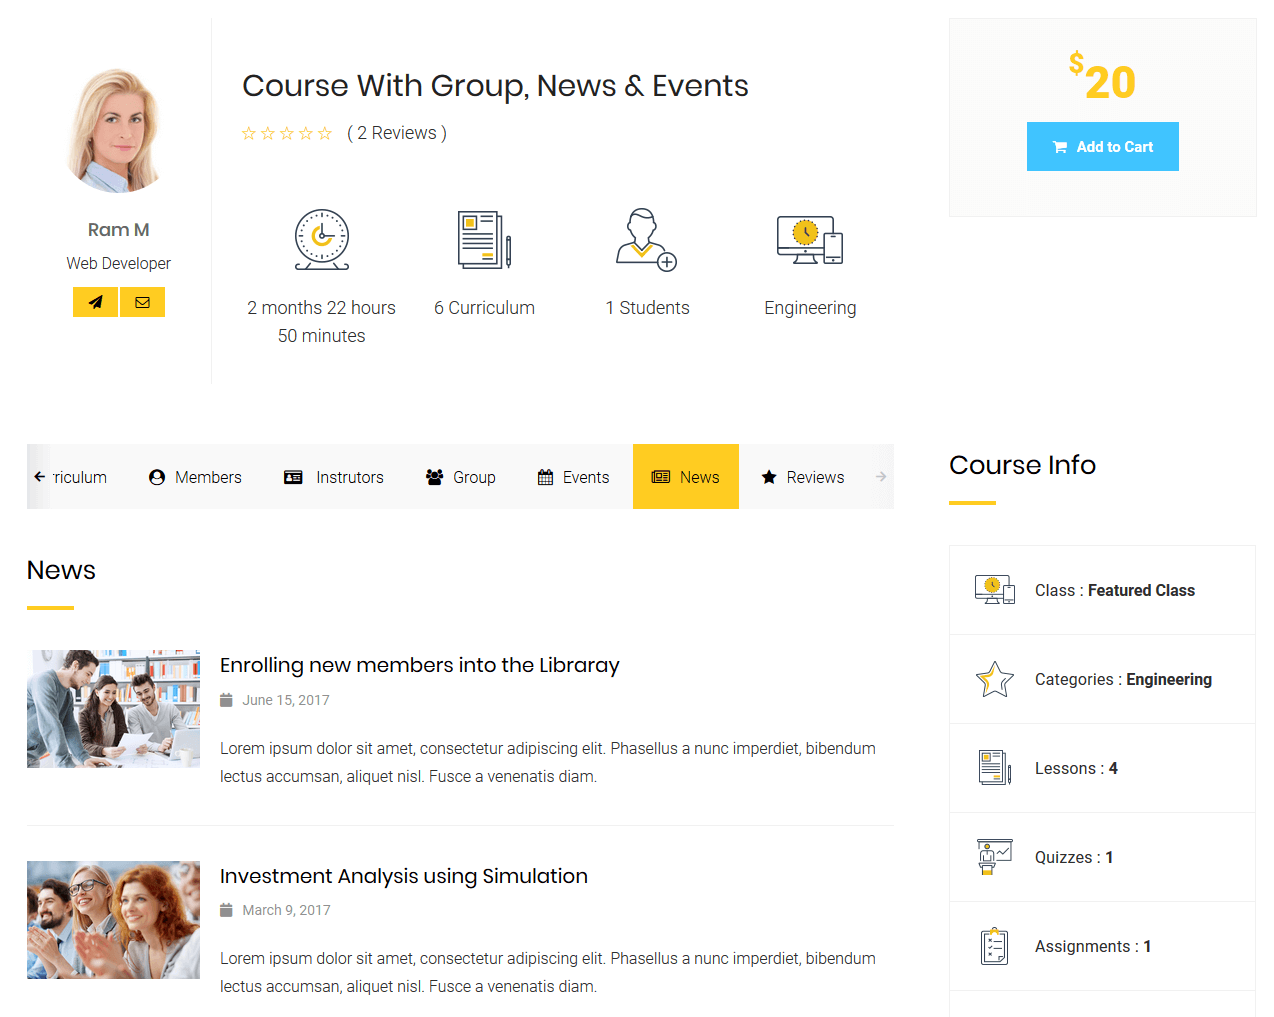
Similar to the buddypress group you can assign any blog posts to the courses. Here you can assign as many as blog posts to the courses.
2.4.5) Course Events
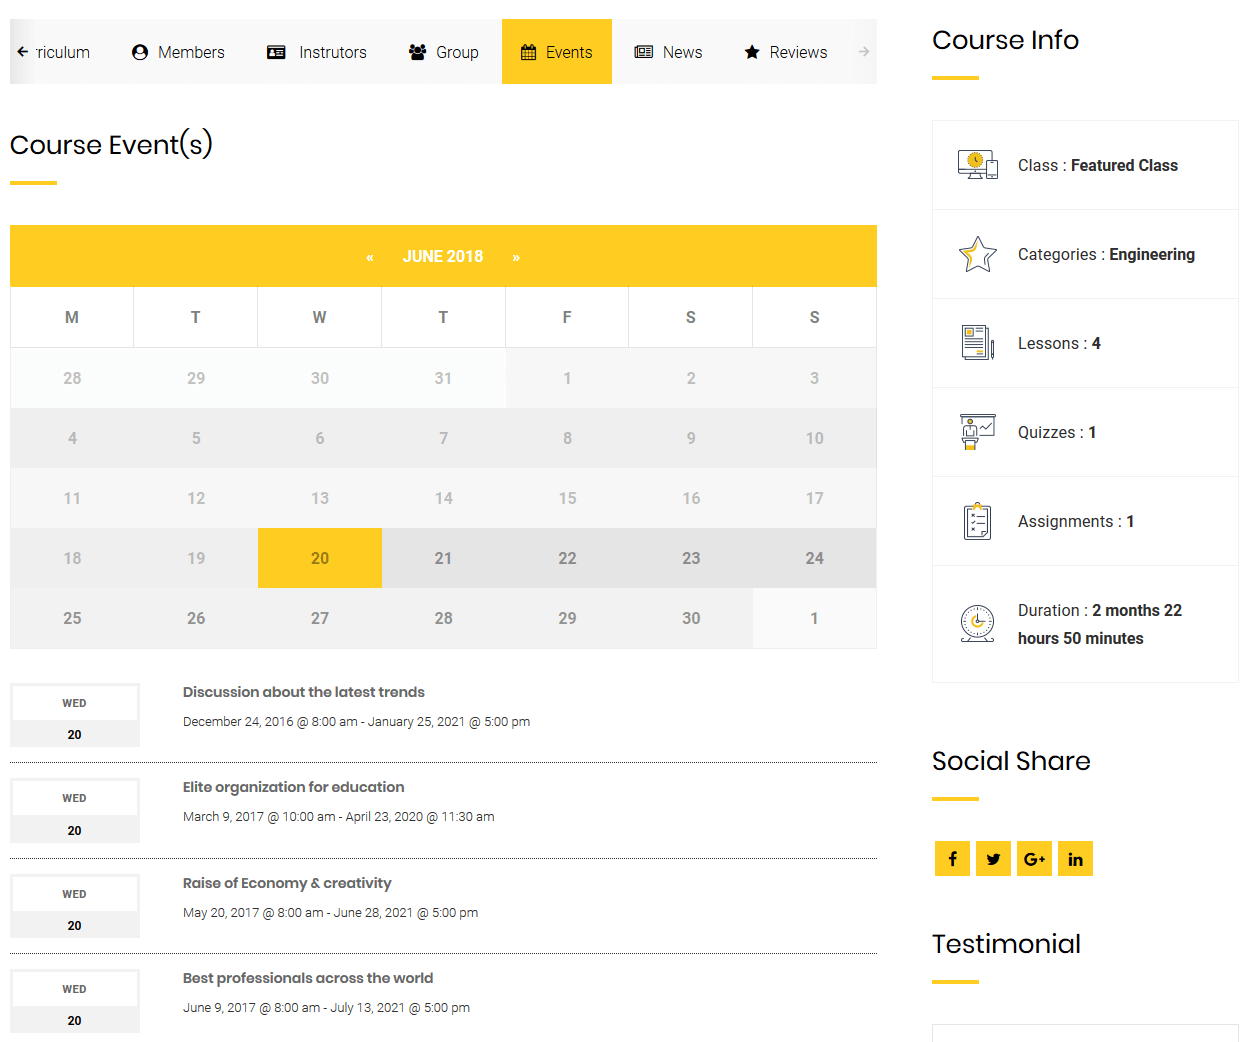
Once the "Events Calendar" is activated, this option will be available. This option is used to assign any events to the course item. Here you can assign as many as events to the courses.
2.4.6) Course Forum
Once the bbpress plugin is activated, this option will be available. This option is used to assign any bbpress forum to the course item. You can assign only 1 forum to a course.

2.4.7) Author Metabox
From this metabox you can change the author of the current course. All the authors of your site will be listed in the selection box. If the author needs to be changed, the admin can change it from this option.
3All Lessons
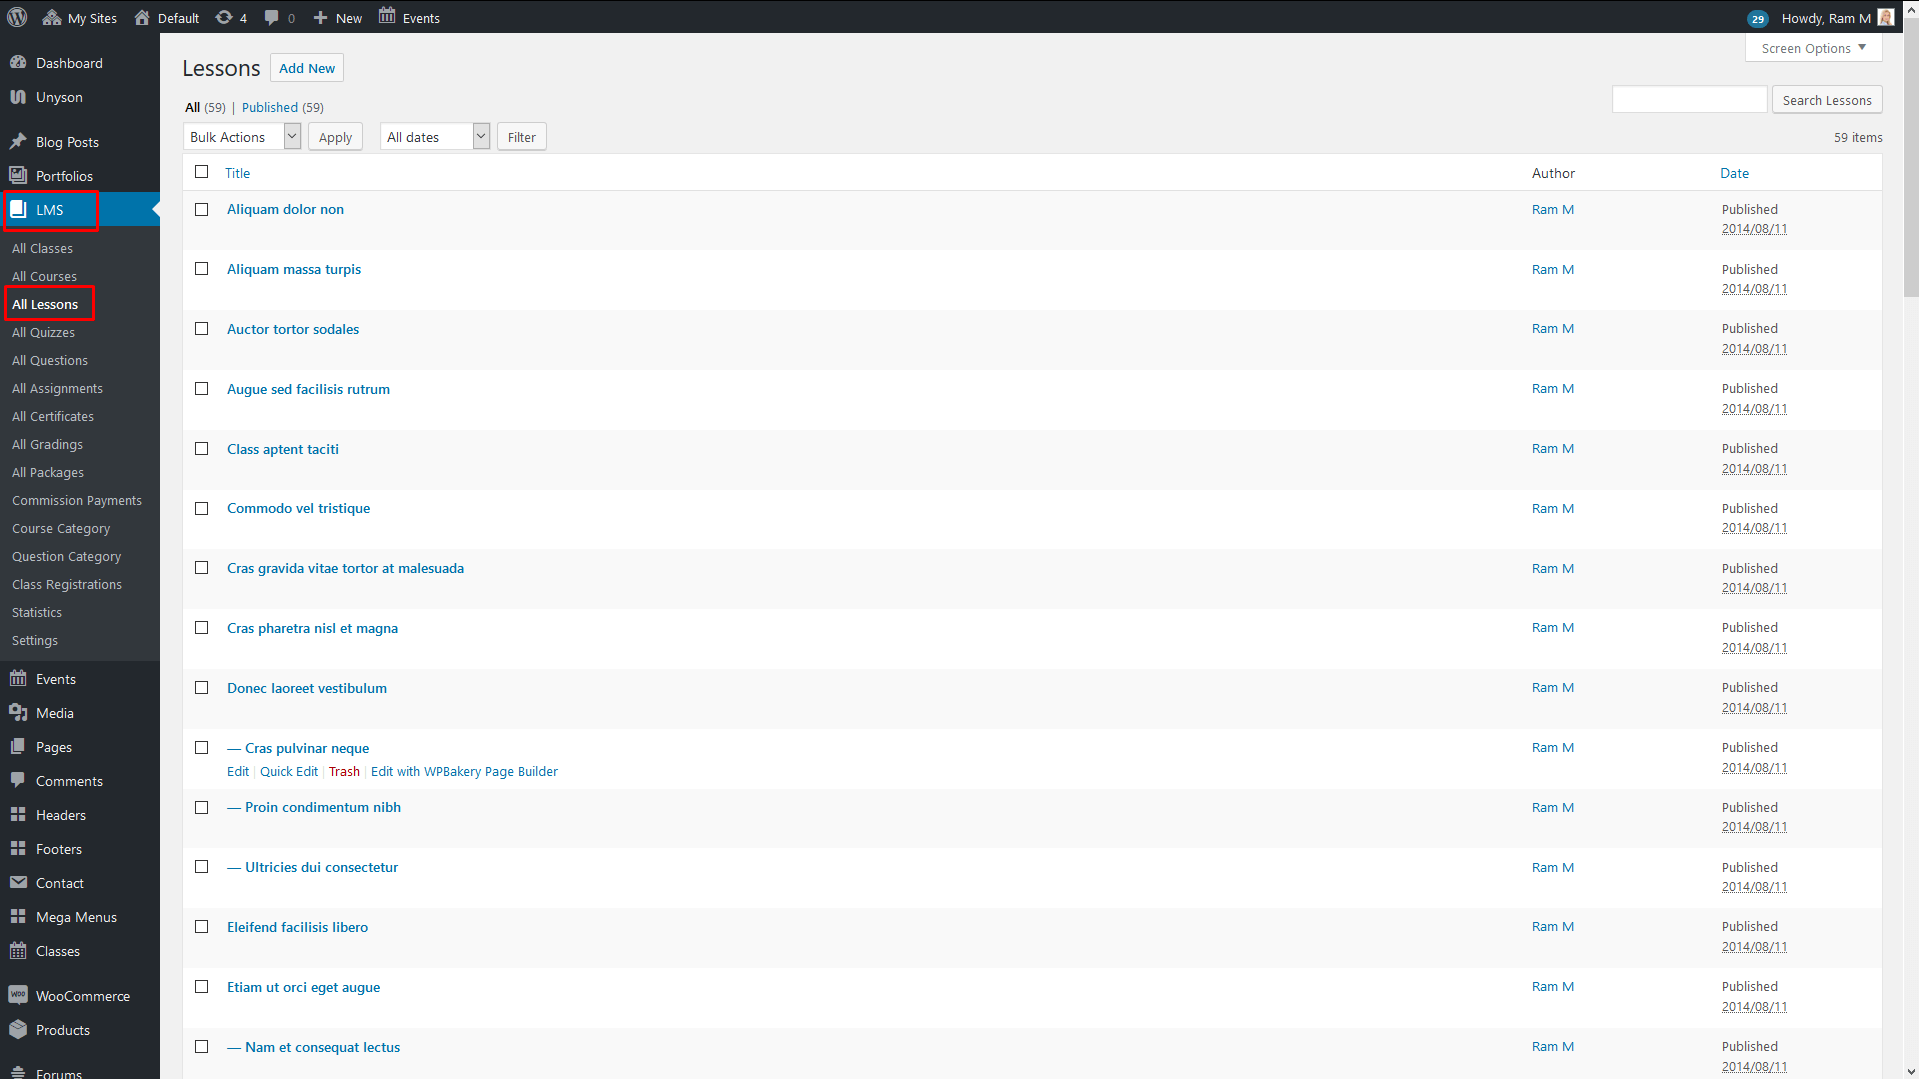
This is how the Lessons backend shows for the site administrator. Now we are going to look the options of Lessons Add New page. Once the page is opened you will have the section for the lessons contents in which you can use the Visual Composer plugin. We have numerous shortcodes for lessons and we will be explaining it in this documentation.
3.1 Lesson Options
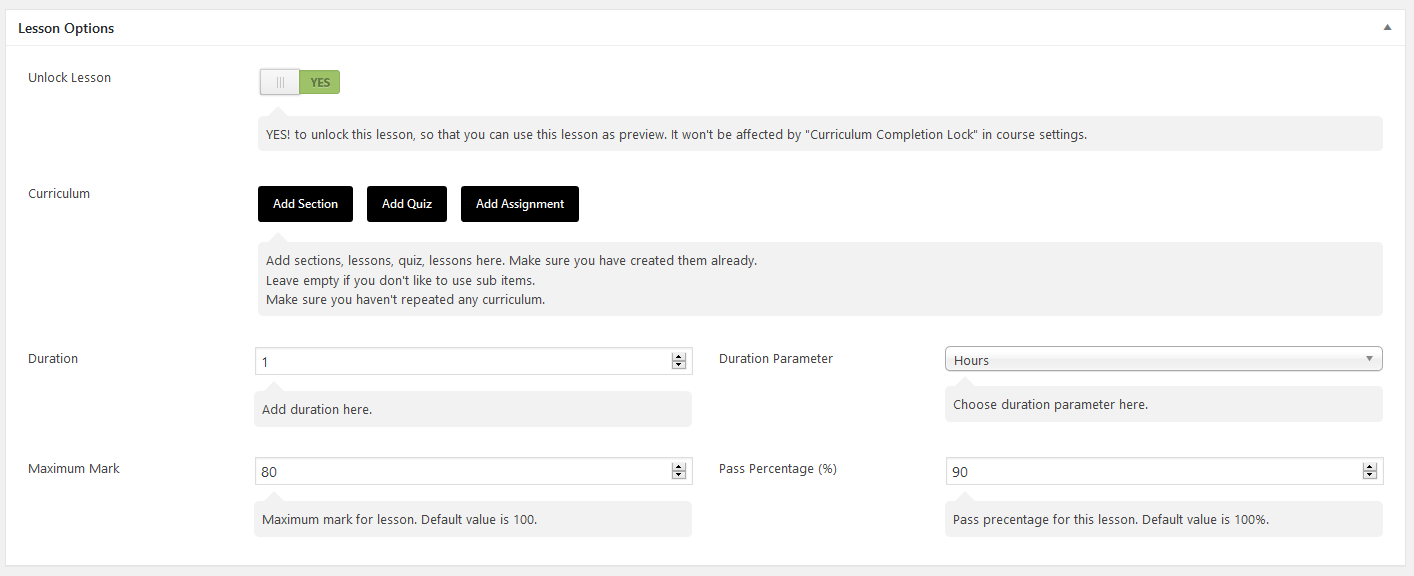
3.1.1) Unlock Lesson
This Unlock Lesson section acts as a preview section of the lesson. Whether the courses is paid or free, if you have set this option to YES! then the lesson can be viewed by anyone. It will not be affected by "Curriculum Completion Lock" in course settings.
3.1.2) Curriculum
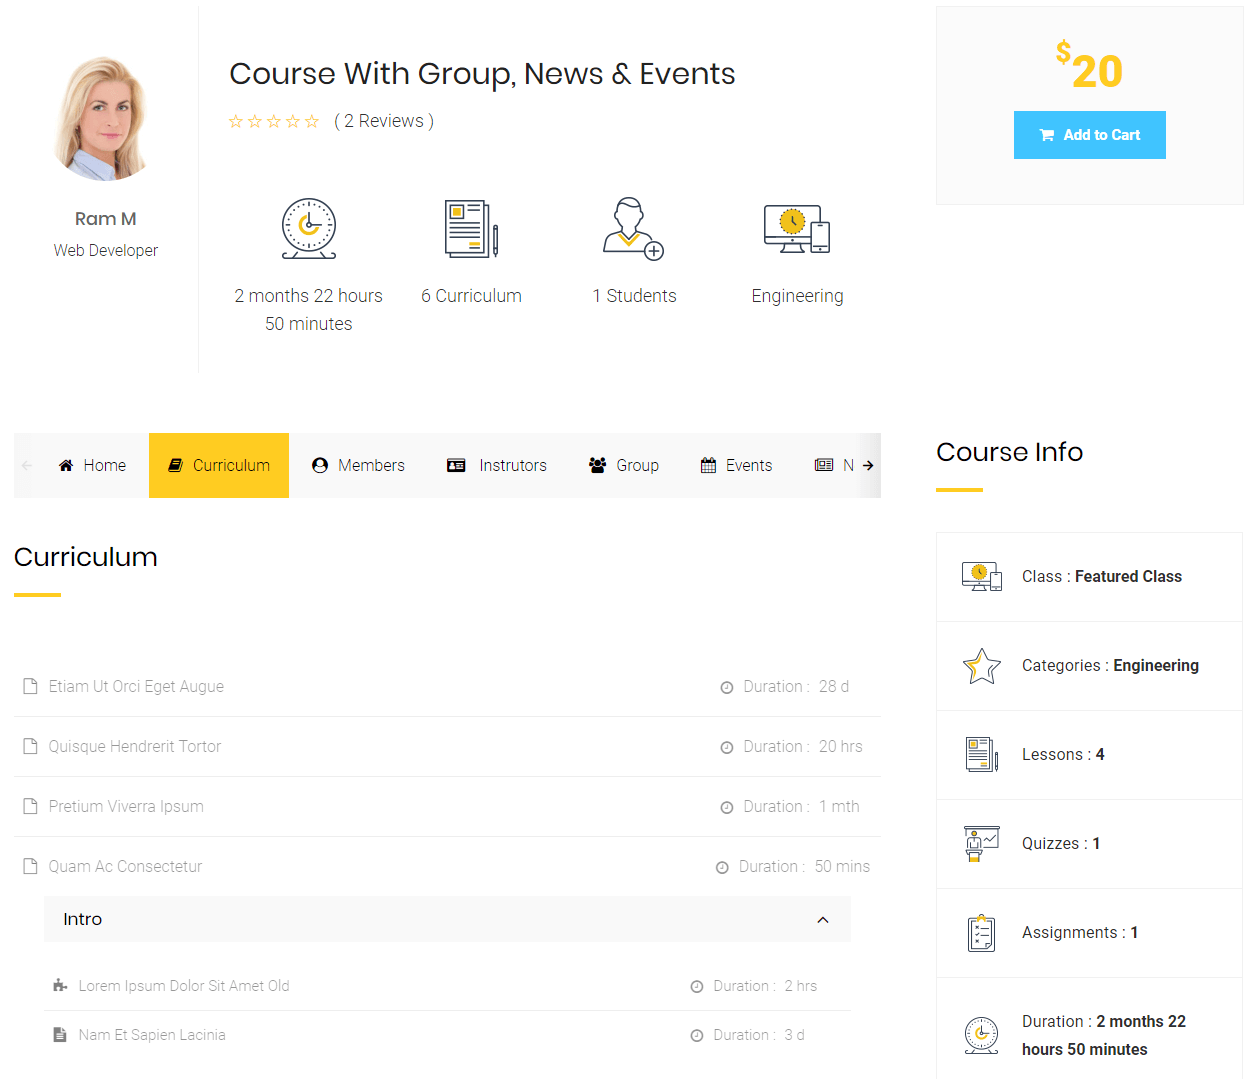
Curriculum module in the lessons is similar to the curriculum module in courses. You can assign any number of quizzes and assignments to the individual lessons from this module. In this section we do have 3 buttons. The functionality of the curriculum is similar to the courses section.
This is how the curriculum section will be seen in front end once it is added (Student view before purchase).
Lessons Overview
Lesson Options
3.1.3) Duration
From this option you can add the duration taken for the lesson to complete. Normally this duration will be displayed beside the lessons section in the course details page. But if drip feed dynamic concept is enabled for the courses in which the current lesson is included, then this duration time will be threshold time for the next curriculum to open.
3.1.4) Duration Parameter
Choose your lesson duration parameter in Seconds, Minutes, Hours, Days, Weeks, Months or Years.
3.1.5) Maximum Mark
You can set your maximum mark for lesson. The default value for the lesson is 100. While Grading the lesson from backend the maximum mark will applied to that lesson, however the admin can update the marks as per his needs while grading.
3.1.6) Pass Percentage (%)
You can set your pass percentage for this lesson. The default value is 100%. For now the pass percentage is not used anywhere in the theme. We have added this field for future purposes. Your suggestions are always welcome regarding this option.
3.1.7) Featured Video Metabox
You can add featured video in this section. The video can be in the format of Youtube Video links, Vimeo Video links and Self Hosted Video links like mp4, etc...
3.1.8) Author Metabox
From this metabox you can change the author of the current lesson. All the authors of your site will be listed in the selection box. If the author needs to be changed, the admin can change it from this option.
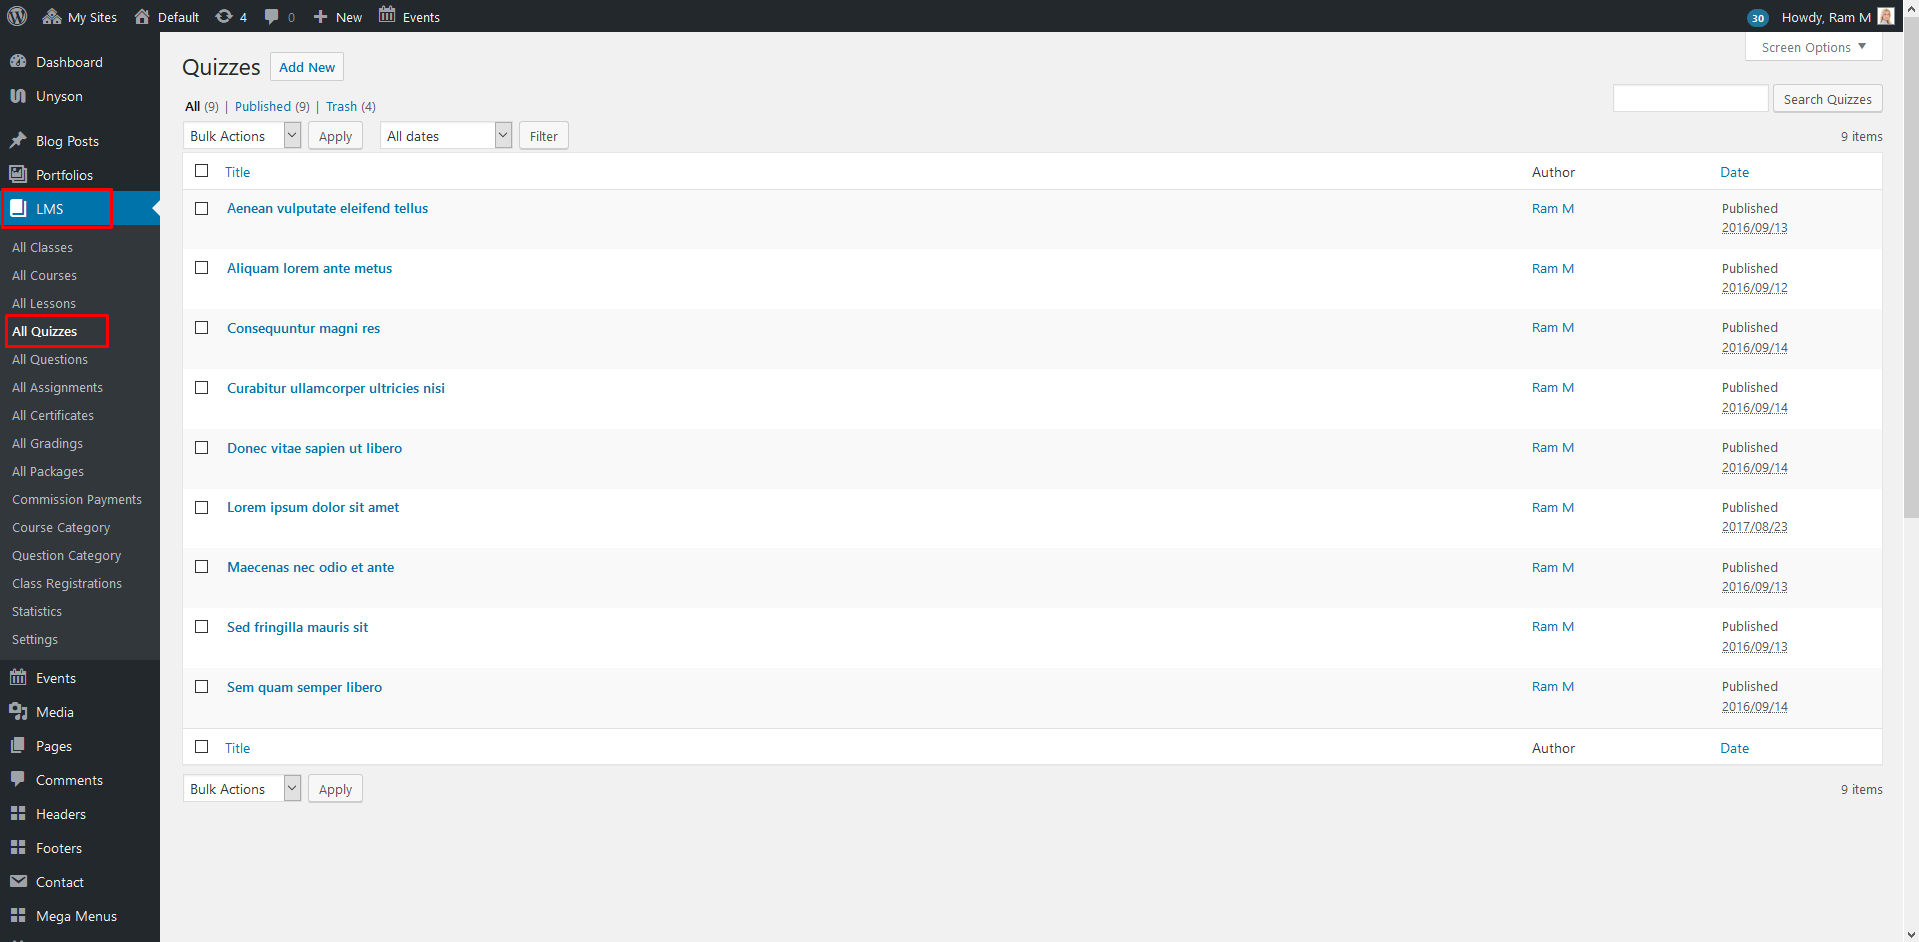
4All Quizzes
Here comes the main section in our LMS Addon, the Quizzes. From this module you can add numerous types of quizzes to the lessons using the questions sections which will be explained in our next part.
4.1 Quiz Options
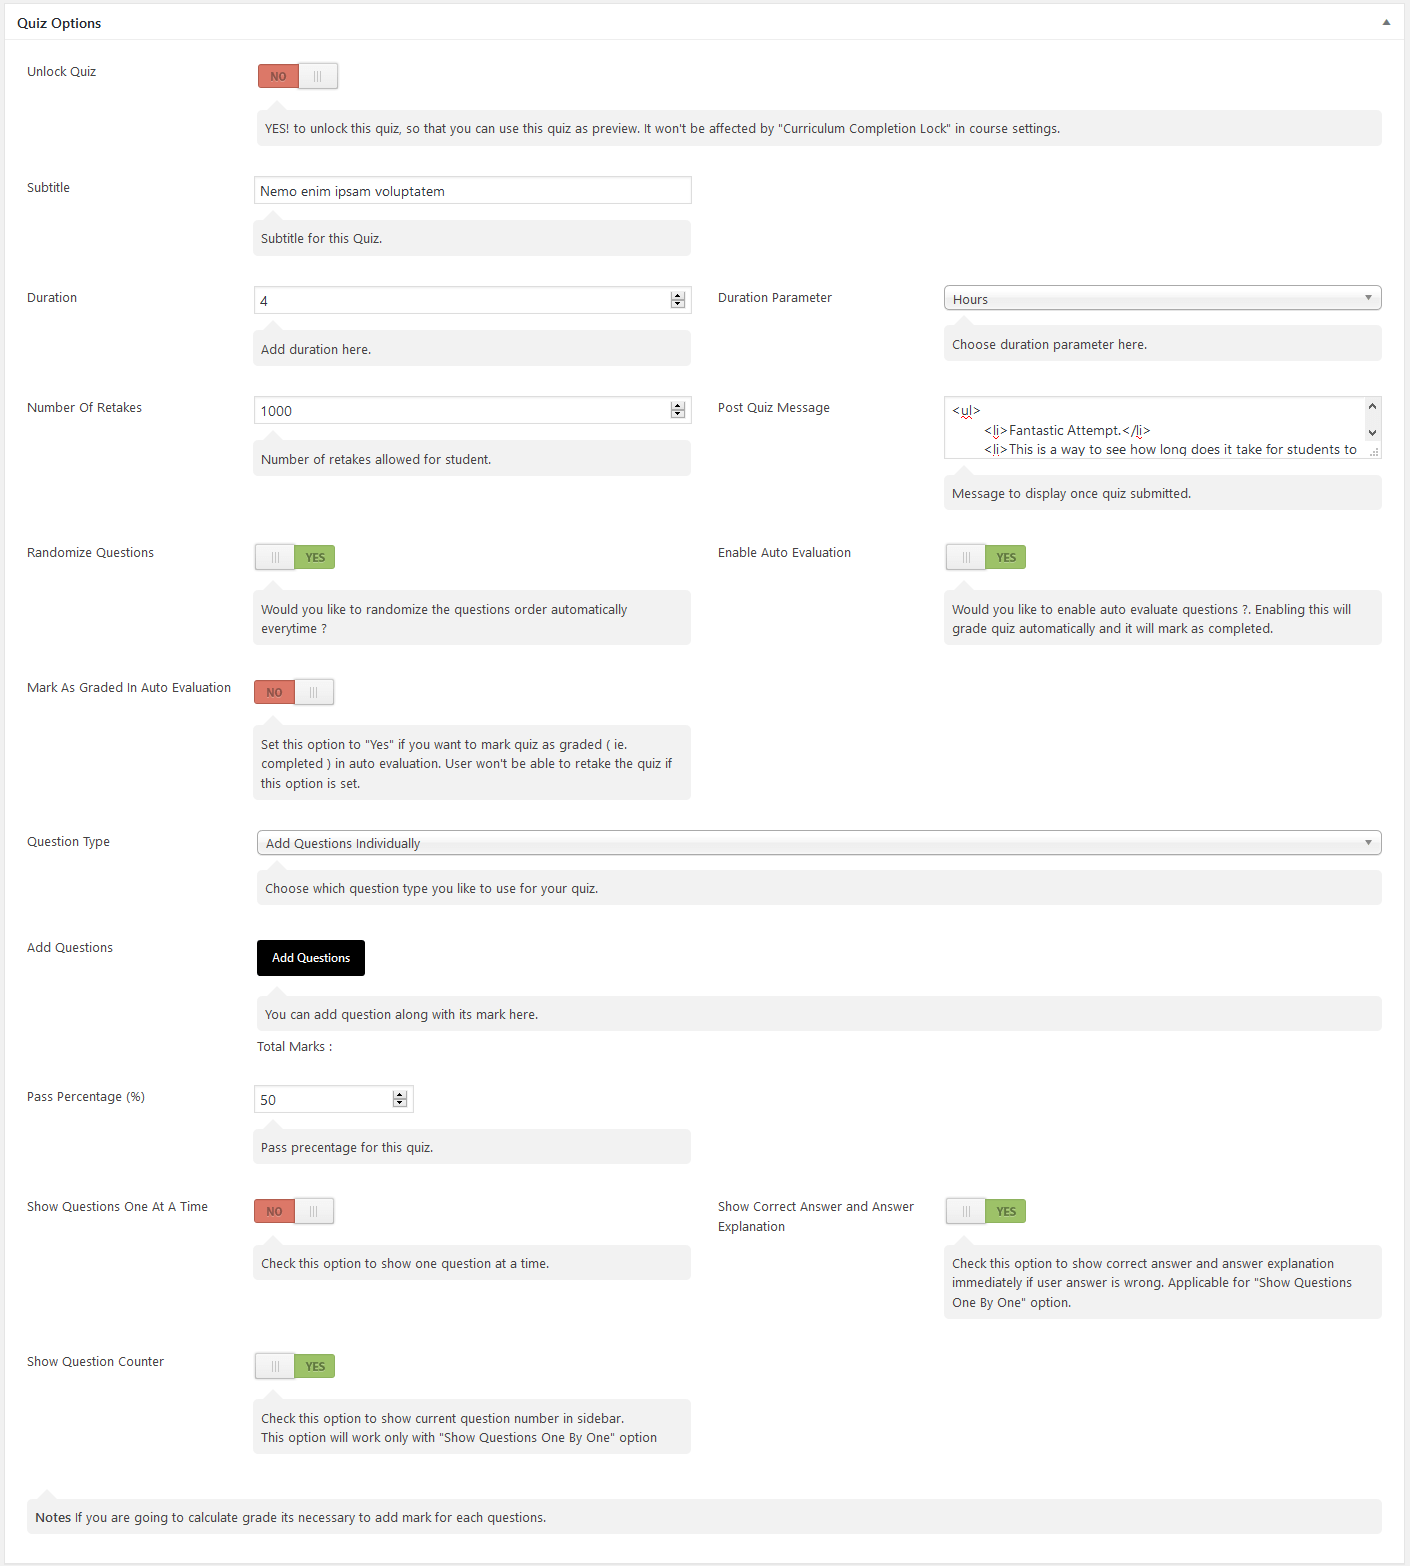
4.1.1) Unlock Quiz
This Unlock Quiz section acts as a preview section of the quiz. Whether the courses is paid or free, if you have set this option to YES! then the quiz can be viewed by anyone. It will not be affected by "Curriculum Completion Lock" in course settings.
4.1.2) Subtitle
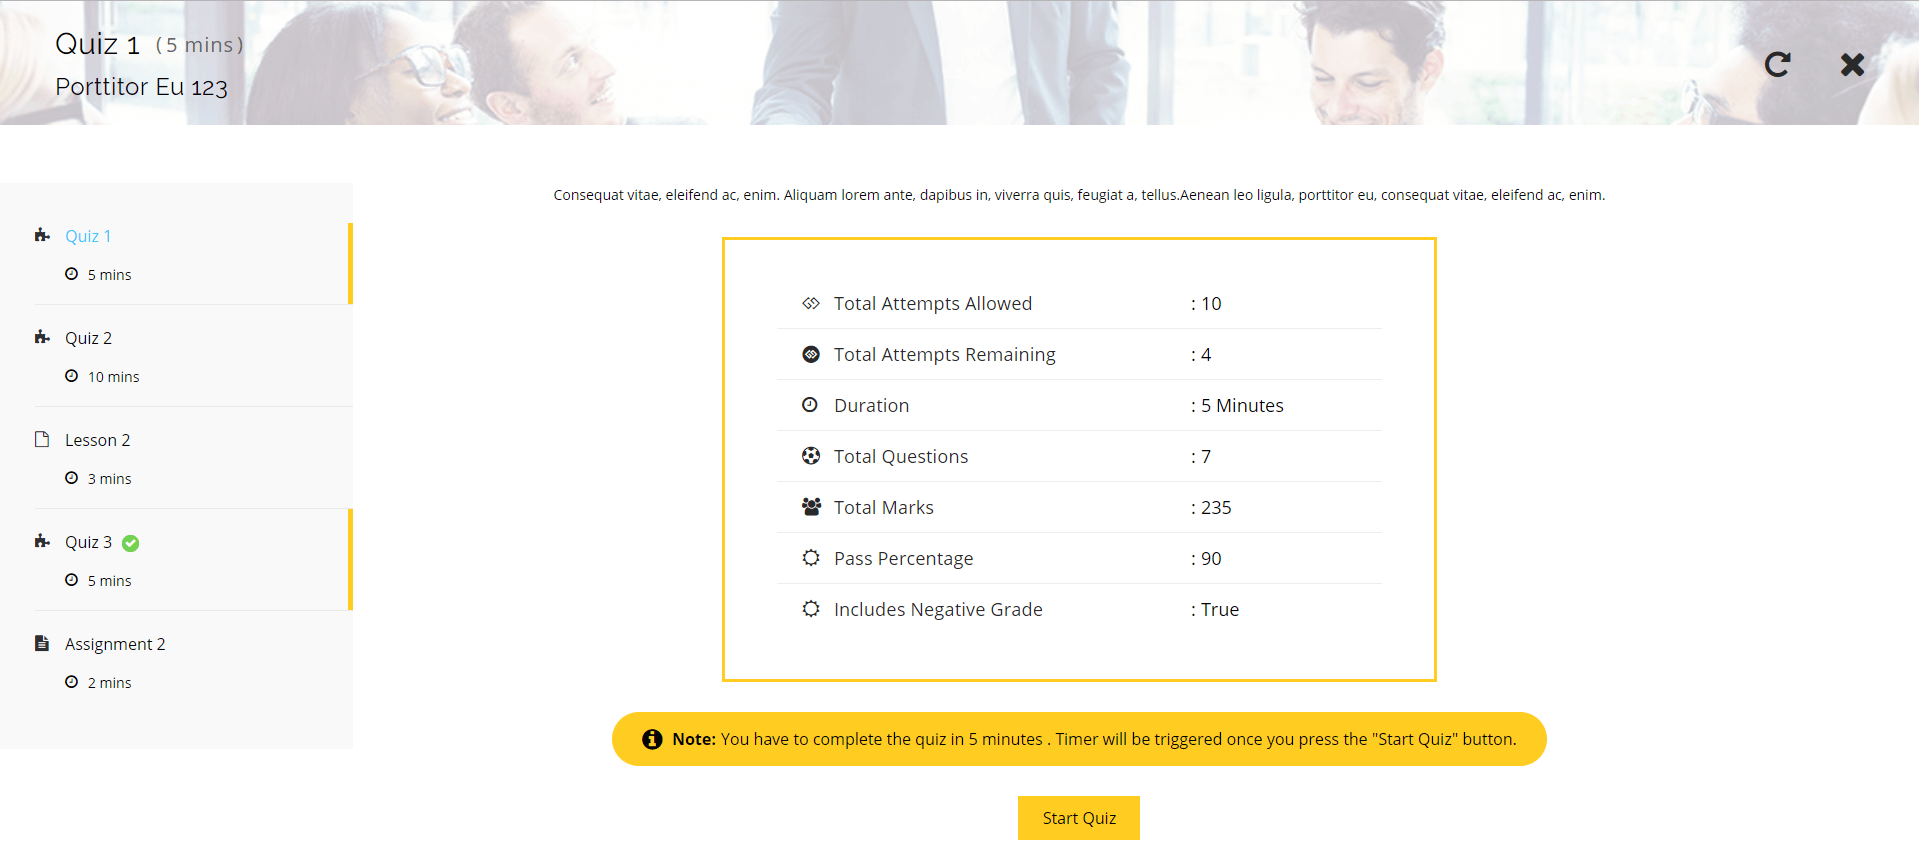
From this option you can add the Subtitle for your quiz item. This Subtitle will be shown in the quiz popup page, below the quiz title.
4.1.3) Duration
From this option you can add the duration taken for the quiz to complete. Normally this duration will be displayed in the quiz popup page. Also the quiz needs to be completed within with duration. For example if the duration is set as 10 minutes, then the current quiz needs to be completed within 10 minutes else the quiz submission will be closed automatically. And if drip feed dynamic concept is enabled for the courses in which the current quiz is included, then this duration time will be threshold time for the next curriculum to open, though you have completed the quiz.
4.1.4) Duration Parameter
Choose your quiz duration parameter in Seconds, Minutes, Hours
4.1.5) Number Of Retakes
From this option you can enter the number of Retakes a user has for the current quiz item. The user will be allowed to retake the quiz until this Retake count is equalized.
4.1.6) Post Quiz Message
Just add the message that needs to be displayed once the quiz is completed. You can add html tags as well in the text area. By default we have added unordered list item in the post quiz message section.
4.1.7) Randomize Questions
Just select this option to "Yes" if you need to randomize the questions associated with the current quiz item. That is each item when the current quiz is loaded, the questions will be in random order.
4.1.8) Enable Auto Evaluation
Would you like to enable auto evaluate questions? Enabling this option will evaluate the quiz automatically and it will be mark as completed. But the quiz will not be graded. Until the quiz is Graded the quiz retakes will be allowed.
4.1.9) Mark As Graded In Auto Evaluation
Set this option to "Yes" if you want to mark quiz as Graded ( ie., whole process completed ) in auto evaluation. Once the quiz is submitted, the quiz will be auto evaluated and graded when this option is enabled, provided the "Enable Auto Evaluation" option is enabled as well. User won't be able to retake the quiz if this option is set, since the quiz is already graded.
Quizzes Overview
Quizzes Options
4.1.10) Question Type
Choose which question type you like to use for your quiz. The questions can be added to the quiz in 2 formats.
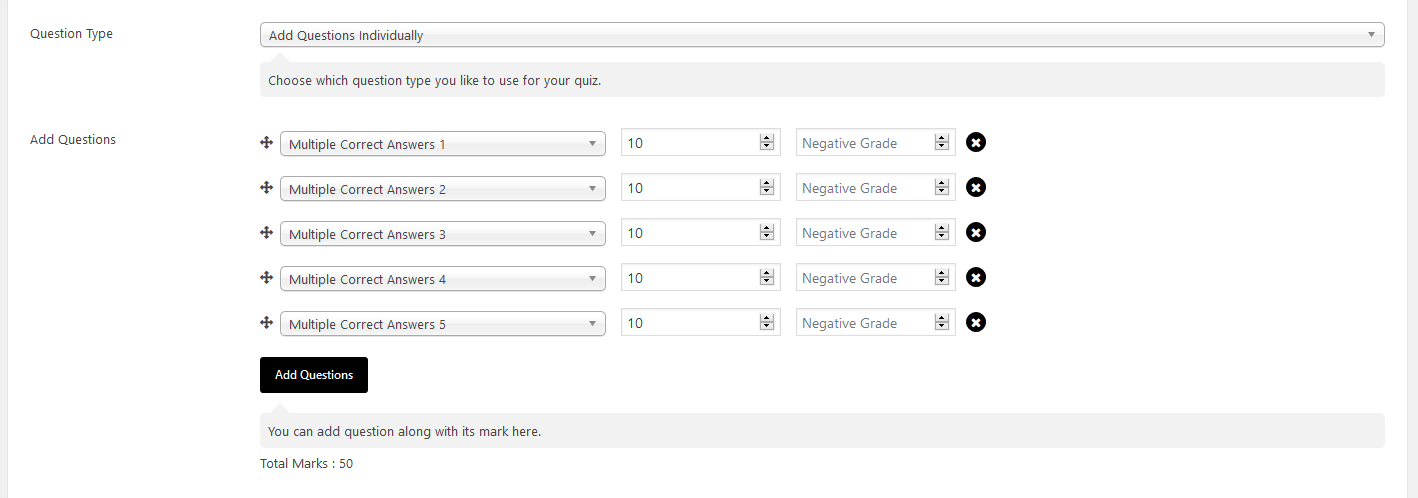
i) Add Questions Individually
Once you click the "Add Questions" button, there will be selection box loaded with all the questions, and 2 textboxes for Marks and Negative Grade. The exact question can be selected from the selection box and Marks, Negative Grade can be added in their individual text boxes. The Negative Grade values needs to be entered as positive values. It will be considered negative grade. The Total Marks will be automatically calculated by the marks that you have entered for each question.
ii) Add Questions from Categories
Once you click the "Add Questions" button, there will be selection box loaded with all the question categories, provided you should have already created questions and assigned some categories for it, and 3 textboxes for Number of Questions, Marks and Negative Grade. The exact question category can be selected from the selection box and the Number of Questions, Marks, Negative Grade can be added in their individual text boxes. The Negative Grade values needs to be entered as positive values. It will be considered negative grade. Once you have selected the question category and number of questions, the questions in that category will be loaded in the quiz. Instead of adding individual quizzes, you can select of bunch of questions from this option. The Total Marks will be automatically calculated by the marks that you have entered for each question multiplied by the number of questions.
For E.g.: You selected 5 questions from x category and the each question mark is 5 then the total mark is 25
Add Questions Individually
Add Questions from Categories

4.1.11) Pass Percentage (%)
Depending upon the total marks set for the question and the total marks obtained by the student the pass percentage of the student will be calculated. And if you have set this field as 90%, then the user needs to get 90% marks to reach the pass percentage in quiz. But if the student has not reached that percentage, but if the overall percentage of is equal or greater than Certificate Percentage or badge Percentage, he is eligible to get the Certificate or badge.
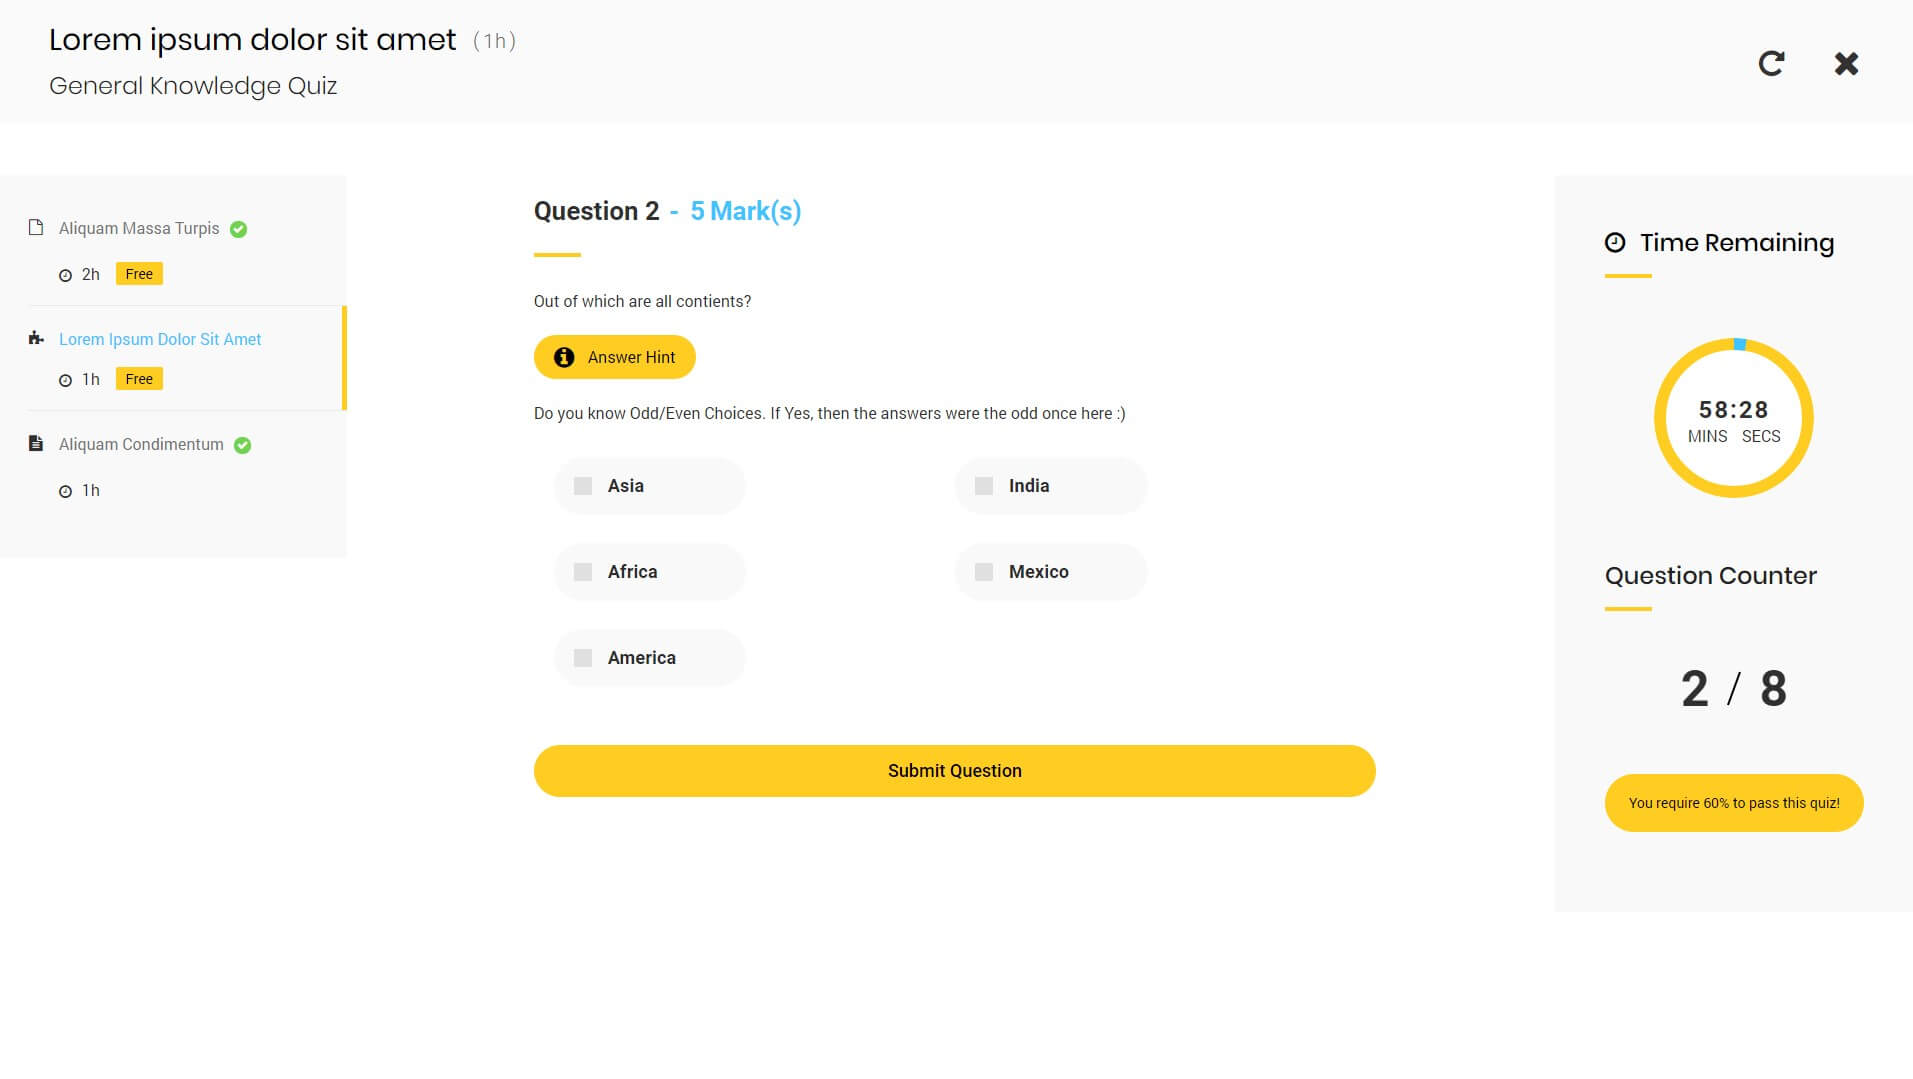
4.1.12) Show Questions One At A Time
If this option is enabled, the quiz questions will be loaded one by one, else all the questions that are selected for this quiz will be loaded in the same page.
4.1.13) Show Correct Answer and Answer Explanation
Check this option to show correct answer and answer explanation immediately if user answer is wrong. Applicable for "Show Questions One By One" option.
4.1.14) Show Question Counter
Check this option to show current question number in sidebar. This option will work only with "Show Questions One By One" option
Quiz Start Popup
Quiz Front End
5Questions
Here comes the Questions section in our LMS Addon. From this module you can add different types of questions which can be assigned to the quizzes section. You can create a Question from Dashboard > LMS > All Question > Add New.
5.1 Questions Options
5.1.1) Question Type
We do have 7 Questions types in our LMS Addon through which the quiz section can be designed for almost all of our needs. These are all the famous questions types which are used in all the popular learning management sites and we have integrated everything in our Addon.
- Multiple Choices
- Multiple Choices - Image
- Multiple Correct
- True / False
- Gap Fill
- Single Line
- Multi Line
Now we will checkout each and every question types in detail.
Questions Overview
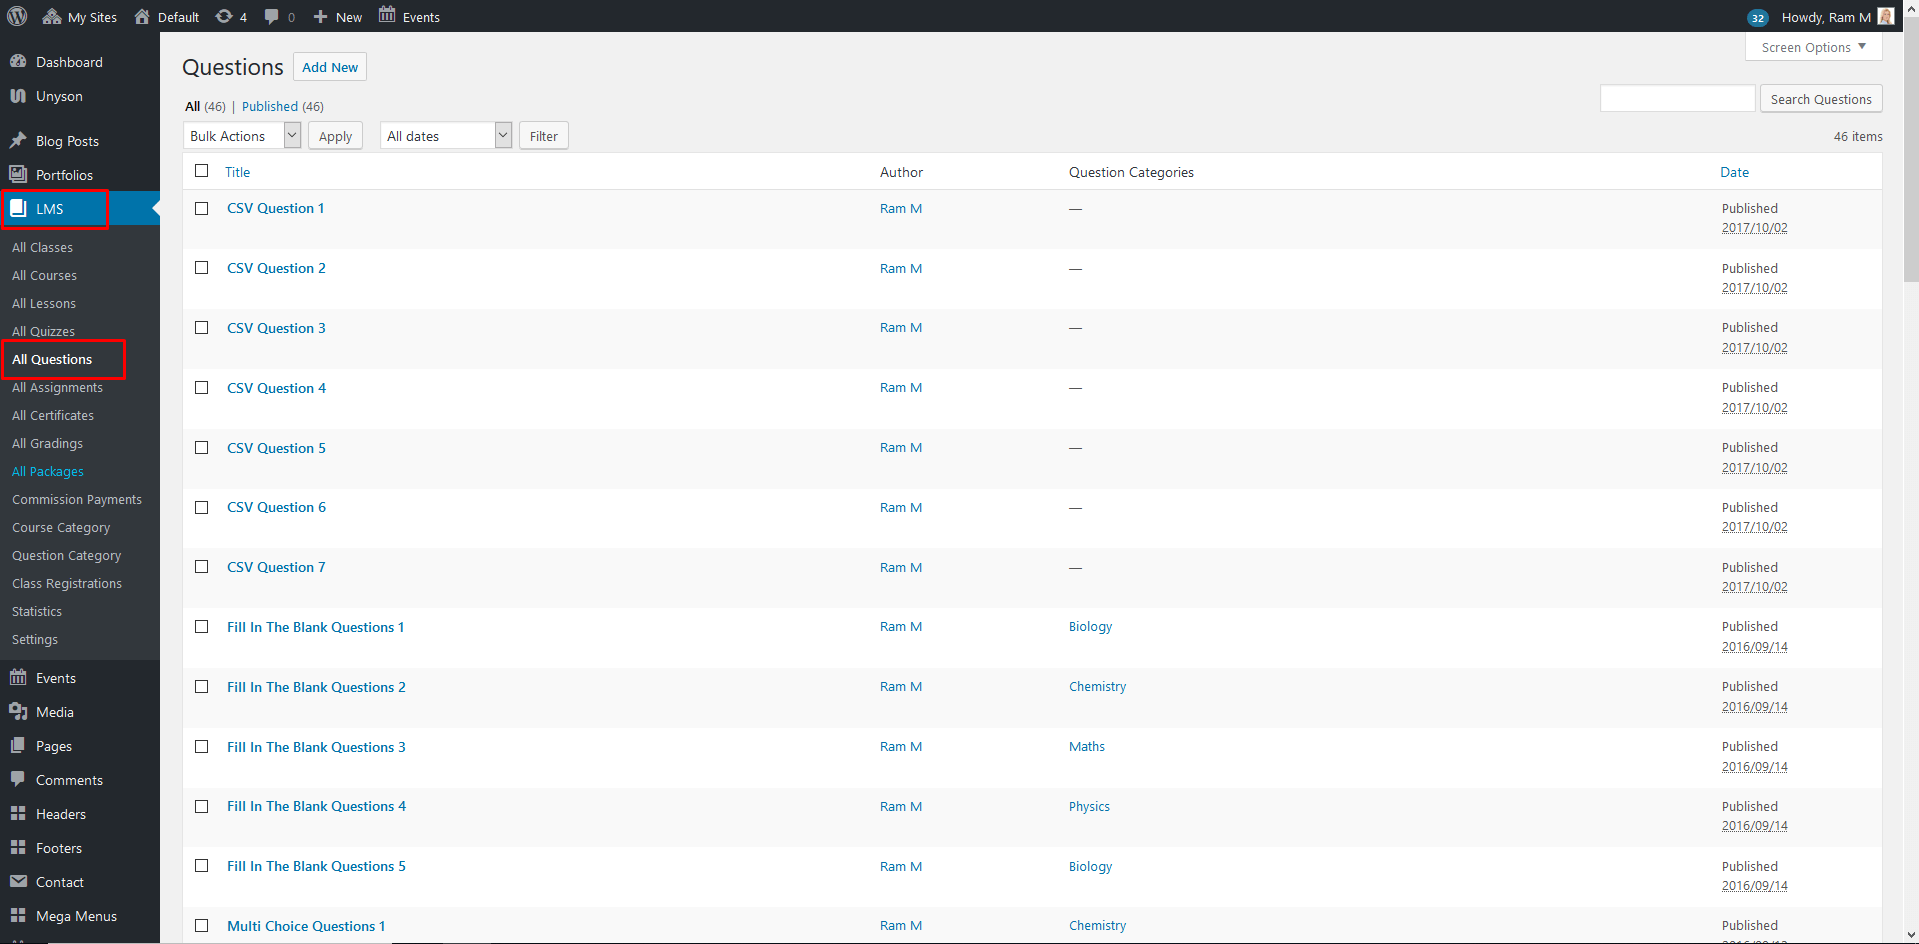
Questions Options
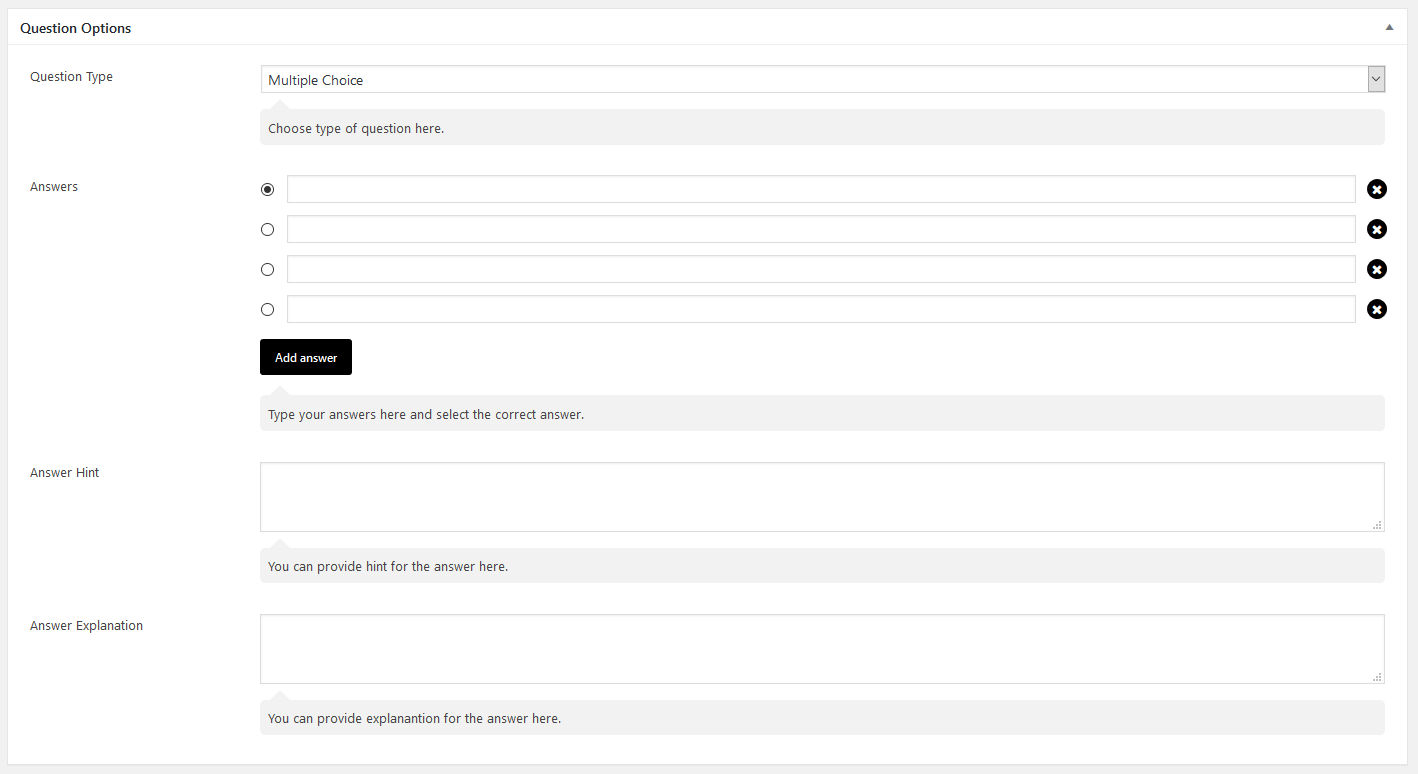
1) Multiple Choices
Multiple choice questions are fundamental survey questions which provides respondents with multiple answer options. Primarily, multiple choice questions will have single select answer options. These are the most fundamental questions of a survey or questionnaire where the respondents are expected to select one option from the multiple answer options.
If you select a question type as Multiple Choices then you can give your answers in answers textbox by clicking Add answer button to add your answers and you can select the correct answer for this question with option button. And you can give your answer as text or audio or video and also you can provide your answer hint and answer explanation for your answer which will be displayed in the frontend of the quiz. If you need to remove your answer, then click the close button (X symbol) to remove your answer to this question.You can add any number of answers for this questions type.
Multiple Choice Question

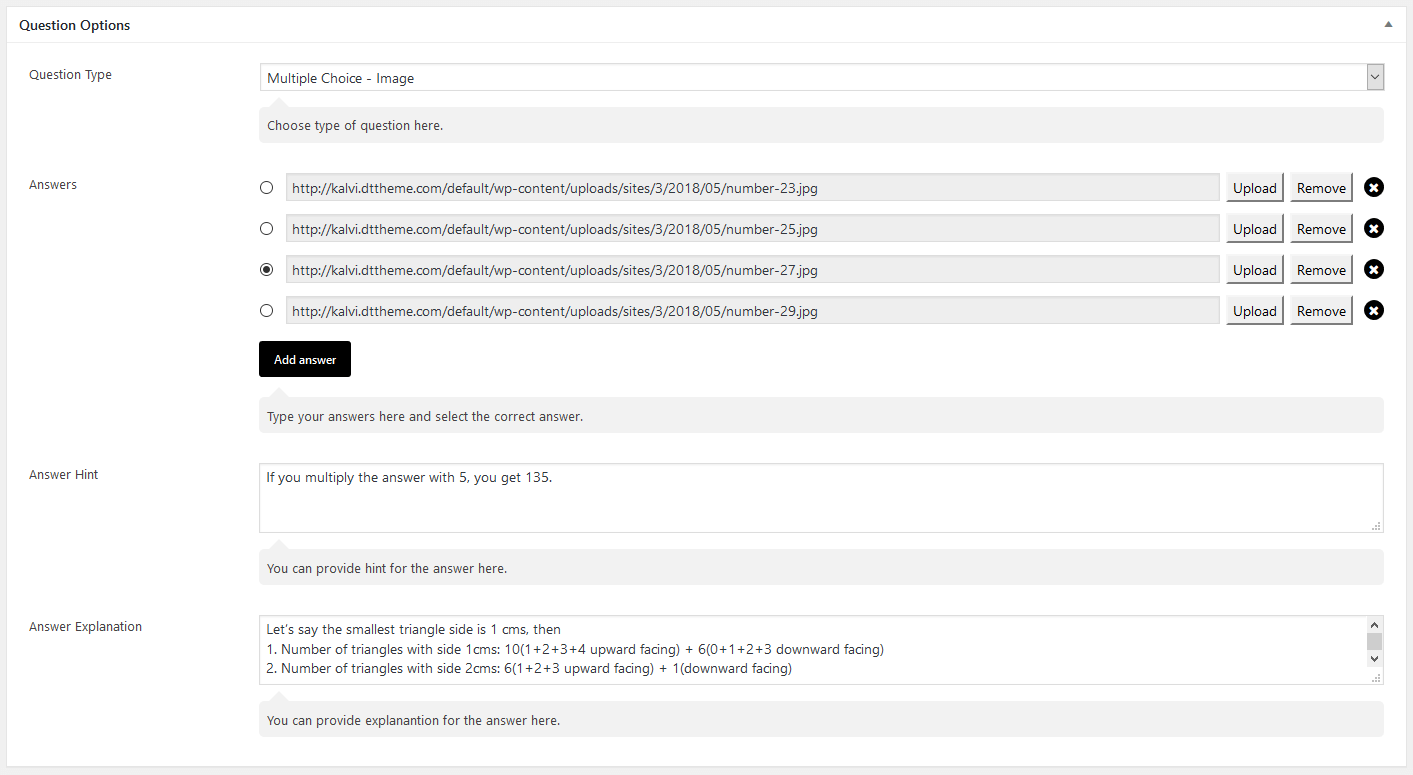
2) Multiple Choices - Image
If you select a question type as Multiple Choices - Image then you can give your answers as images by clicking upload button to upload your answers as image from your media library and you can select the correct answer for this question with option button. And also you can provide your answer hint and answer explanation for your answer. If you need to remove your answer, then click the close button (X symbol) to remove your answer to this question.
Multiple Choice Images Questions
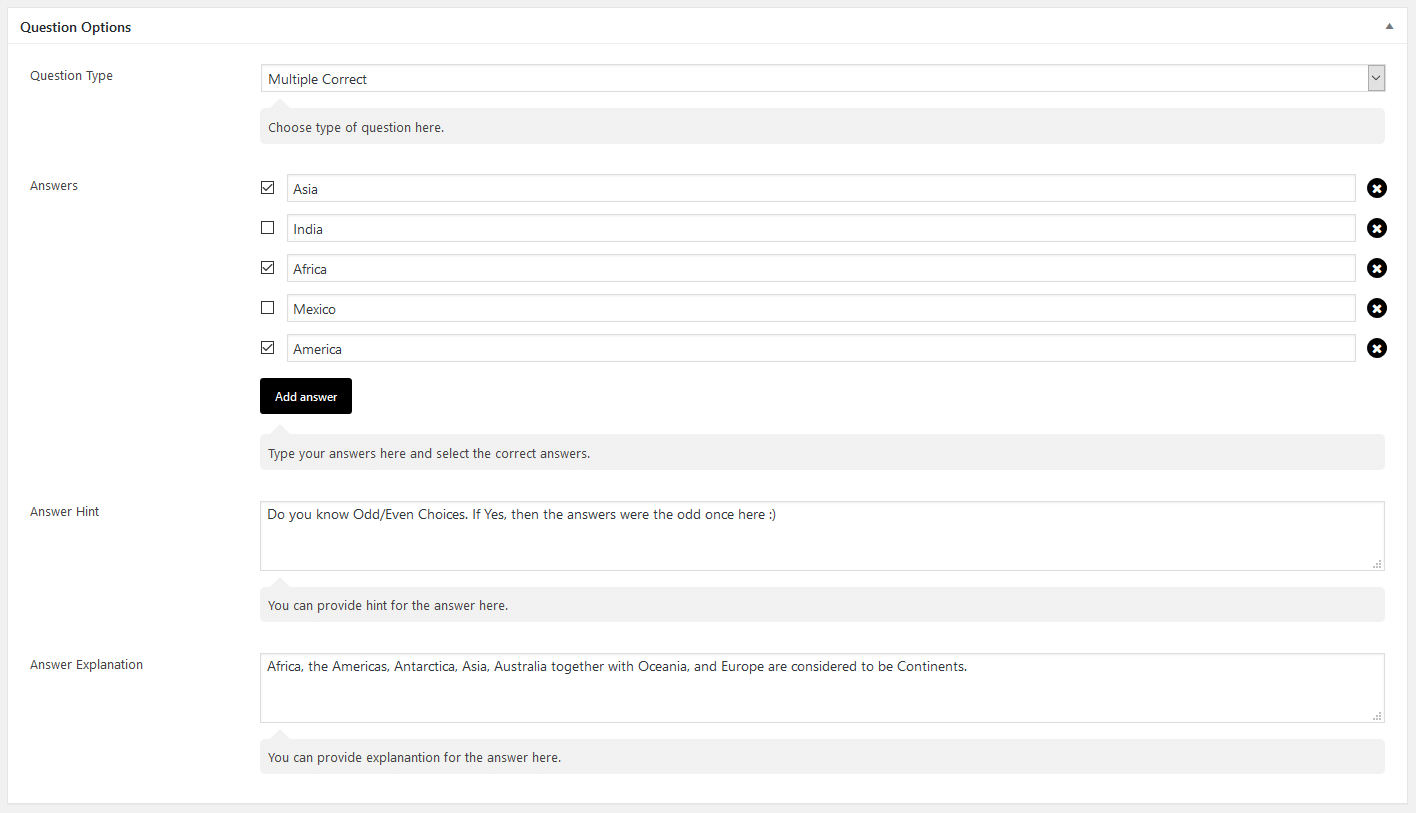
3) Multiple Correct
If you select a question type as Multiple Correct then you can give your answers in answers textbox by clicking Add answer button to add your answers and you can select the correct answer for this question with check boxes. And you can give your answer as text or audio or video and also you can provide your answer hint and answer explanation for your answer. If you need to remove your answer, then click the close button (X symbol) to remove your answer to this question.
Multiple Correct Questions
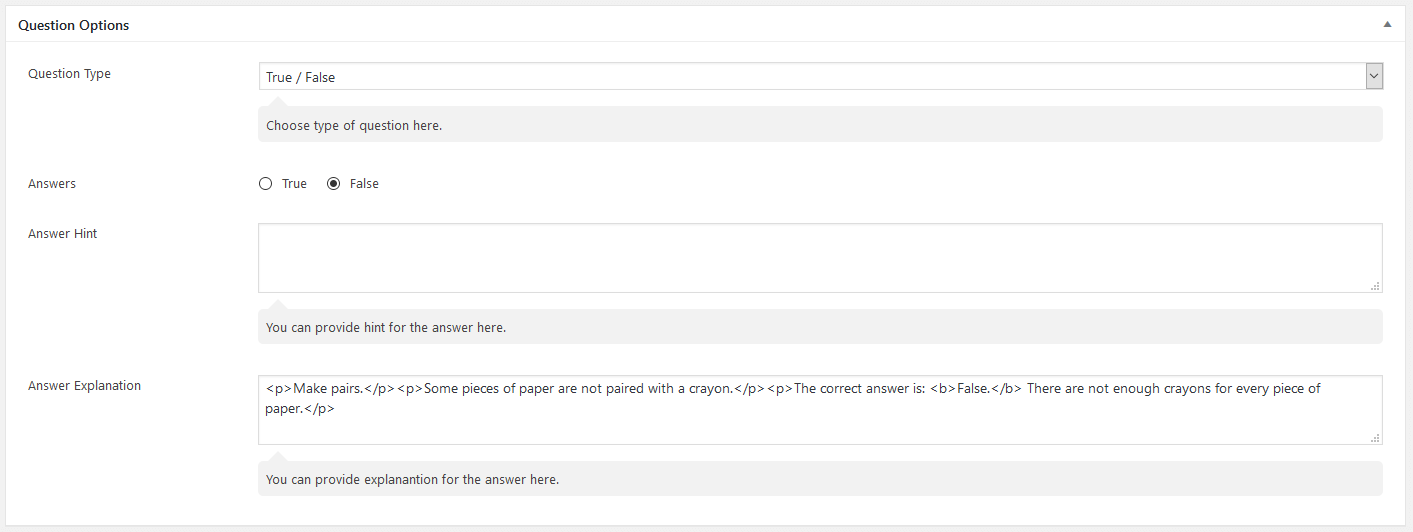
4) True / False
If you select a question type as True / False then you can select your correct answer for this question with option button (True / False). And also you can provide your answer hint and answer explanation for your answer.
True/False Questions
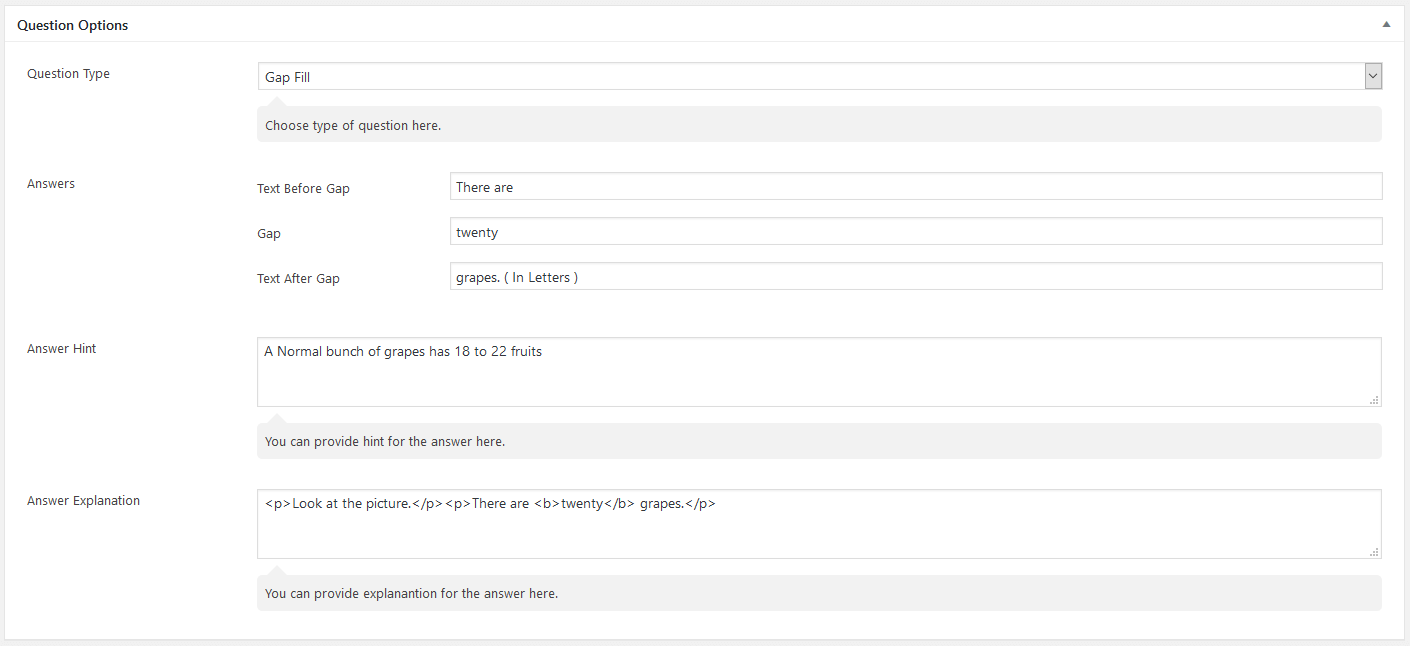
5) Gap Fill
If you select a question type as Gap Fill then you can give your answer as Text before Gap, Gap and Text after Gap textboxes. The answer given in the "Gap Textbox" will be hided and shown as Gap in the frontend which needs to be answered by the student. And also you can provide your answer hint and answer explanation for your answer.
Gap Fill Questions
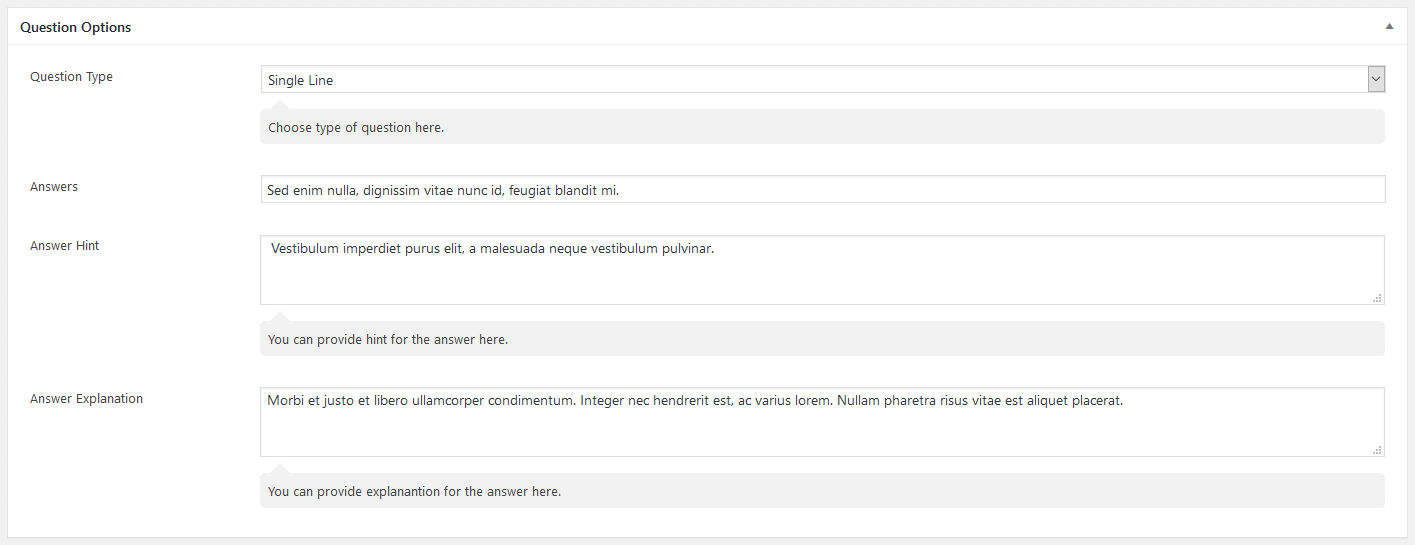
6) Single Line
If you select a question type as Single Line then you can give your answers as single line in answers textbox. And also you can provide your answer hint and answer explanation for your answer.
Single Line Questions
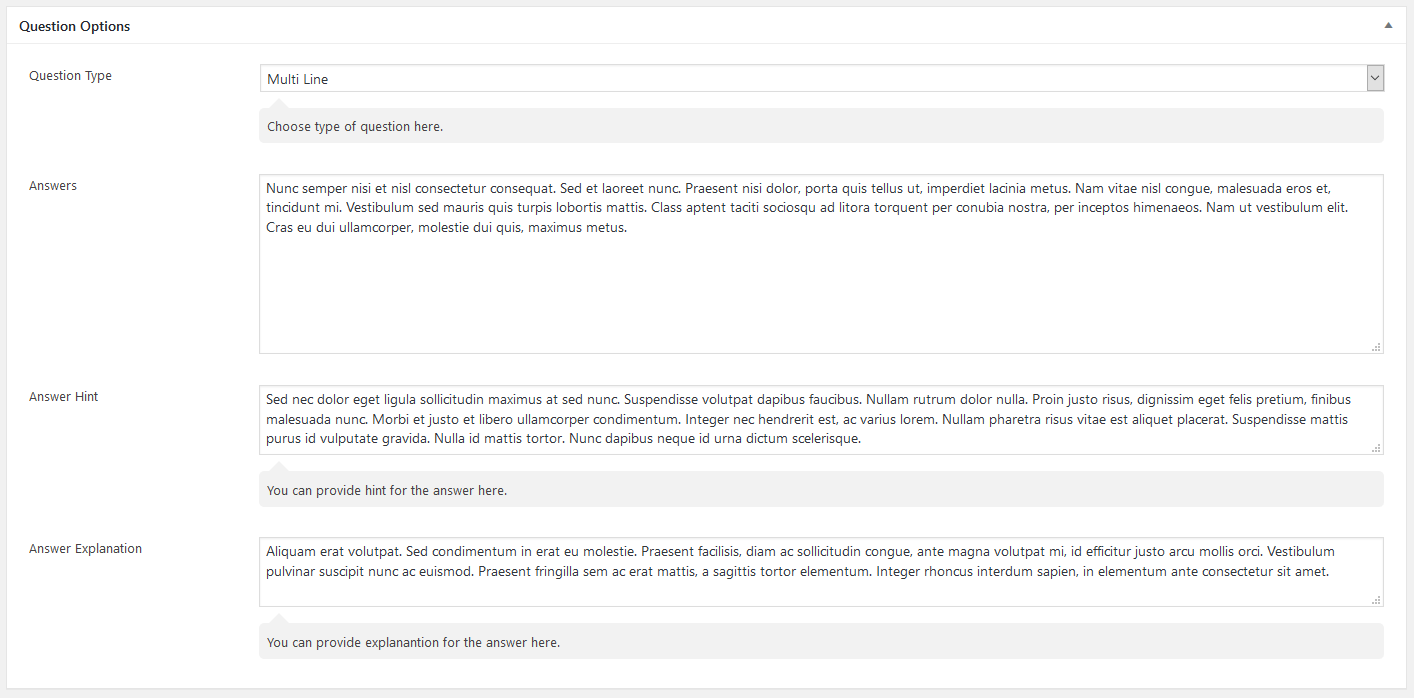
7) Multi Line
If you select a question type as Multi Line then you can give your answers as multi line in answers textbox. And also you can provide your answer hint and answer explanation for your answer.
5.1.2) Answers
The answer field is where you will have a option to select the correct answer for the question and all the answer choices needs to be filled up. Type all your answers choice in answers text box and select the correct answer for your question with option button. You can add any number of answers choices with this field. The correct answer option will vary like radio button, check box, gap fill, etc depending upon the question type that you select.
5.1.3) Answer Hint - You can provide your answer hint for your answer. This answer hint will be displayed below the answer options. The answer hint will be displayed if the field is not empty else it will not be displayed.
5.1.4) Answer Explanation - You can provide your answer explanation for your answer. For example, if you are having some mathematical problems as questions, then there should be explanation for that answer. Similiarly you can use this field for many other purposes.
Multi Line Questions
6Assignments
This is the section where you can add some assignment work to the students. That is, you can give any type of assignment work to the student and you can include this assignment in the course section. You can even provide marks for this assignment work. You can create a Assignment from Dashboard > LMS > All Assignments > Add New.
6.1 Assignments Options
6.1.1) Unlock Assignments
This Unlock Assignments section acts as a preview section of the assignments. Whether the courses is paid or free, if you have set this option to YES! then the assignments can be viewed by anyone. It will not be affected by "Curriculum Completion Lock" in course settings.
6.1.2) Subtitle
From this option you can add the Subtitle for your assignment item. This Subtitle will be shown in the quiz assignment page, below the assignment title.
6.1.3) Maximum Mark
You can set your maximum mark for assignment. The default value for the assignment is 100. While Grading the assignment from backend the maximum mark will applied to that lesson, however the admin can update the marks as per his needs while grading.
6.1.4) Pass Percentage (%)
You can set your pass percentage for this assignment. The default value is 100%. For now the pass percentage is not used anywhere in the theme. We have added this field for future purposes. Your suggestions are always welcome regarding this option.
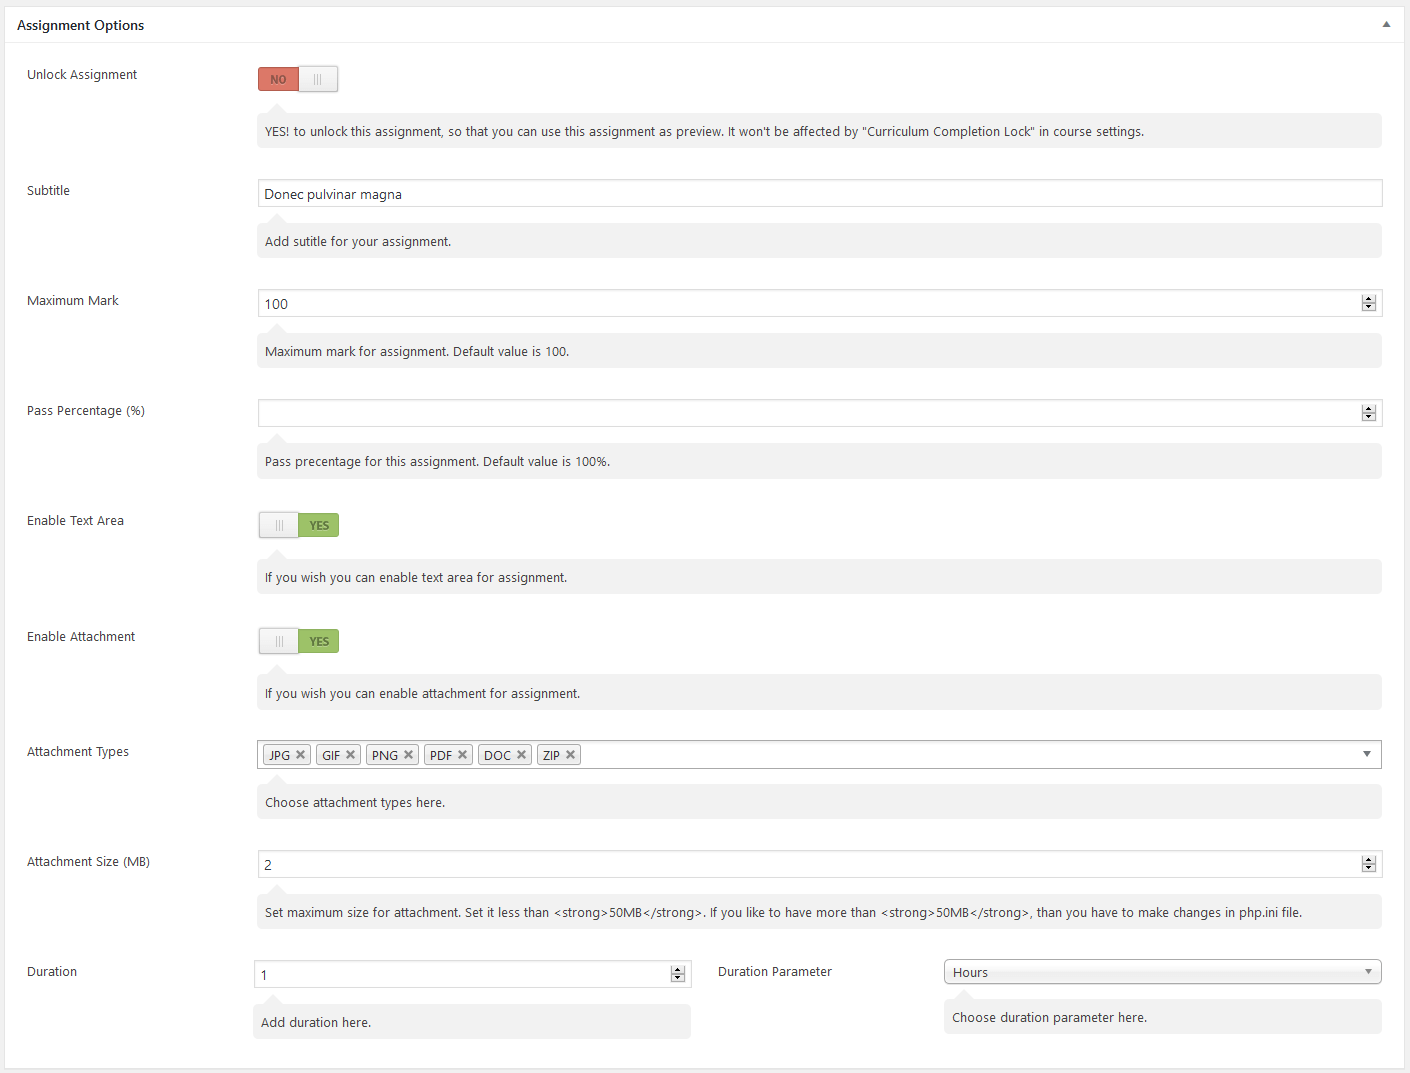
6.1.5) Enable Text Area
While uploading the assignment items, if you like to get some notes from the student about the assignment, then you can enable this field. The student can add whatever notes that needs to be shared to the instructor about the assignment using thie field.
6.1.6) Enable Attachment
You can enable/disable attachments to the assignement using this field.
Assignment Overview

Assignment Options
6.1.7) Attachment Types
There are several types of files that a student is allowed to attach as assignment. These are the following types of files that our Addon allows to attach JPG, GIF, PNG, PDF, DOC, DOCX, PPT, PPTX, PPS, PPSX, ODT, XLS, XLSX, MP3, M4A, OGG, WAV, WMA, MP4, M4V, MOV, WMV, AVI, MPG, OGV, 3GP, 3G2, FLV, WEBM, APK, RAR and ZIP. But if you like to allow only few items, you can choose only those types.
6.1.8) Attachment Size (MB)
Set maximum size for your attachment. Set it less than 50MB. If you like to have more than 50MB, than you have to make changes in php.ini file.
6.1.8) Attachment Size (MB)
Set maximum size for your attachment. Set it less than 50MB. If you like to have more than 50MB, than you have to make changes in php.ini file.
6.1.9) Duration
From this option you can add the duration taken for the assignment to complete. Normally this duration will be displayed beside the assignment section in the course details page. But if drip feed dynamic concept is enabled for the courses in which the current assignment is included, then this duration time will be threshold time for the next curriculum to open.
6.1.10) Duration Parameter
Choose your assignment duration parameter in Seconds, Minutes, Hours, Days, Weeks, Months or Years.
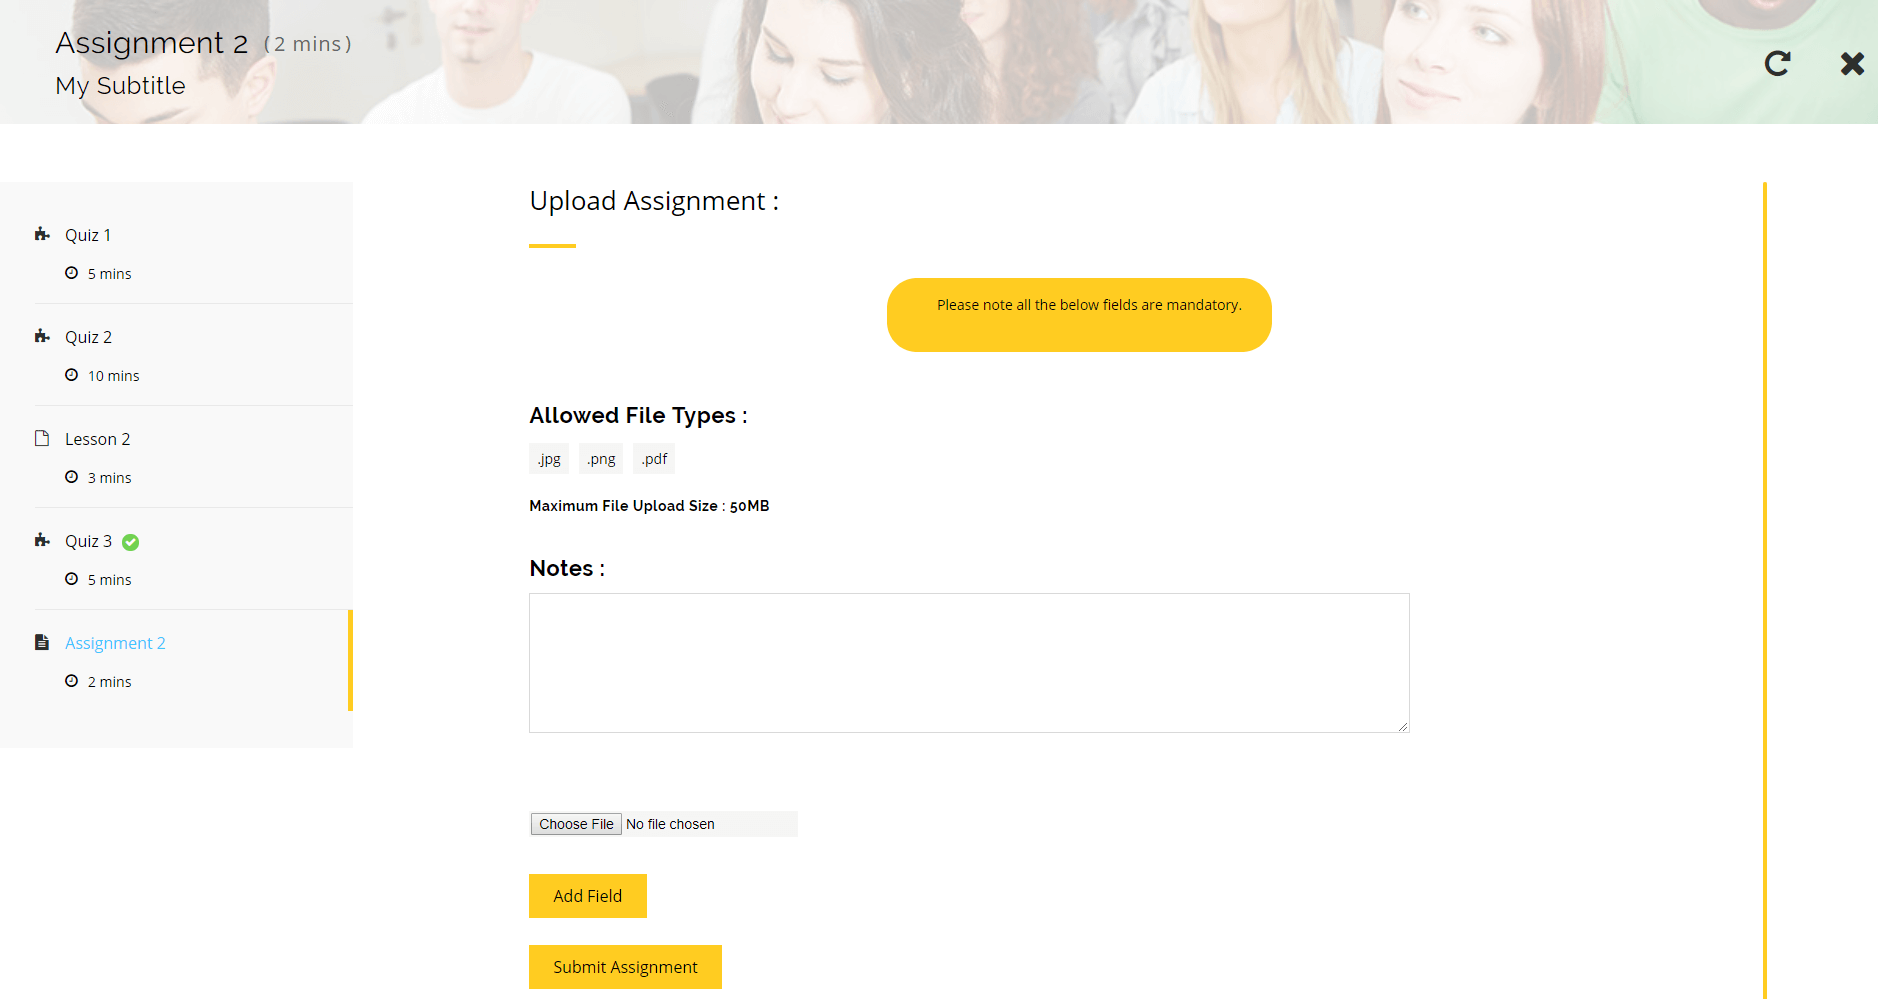
Assignment Front End
7Certificates
Certificates section is the final stage in the Class or Course process. You can add certificates from Dashboard > LMS > All Certificates > Add New
Now we are going to look the options of Certificates Add New page. Once the page is opened you will have the section for the Certificates contents in which you can use the Visual Composer plugin. We have numerous shortcodes for Certificates and we will be explaining it in this documentation. Now lets see the Certificate Options.
7.1 Certificate Options
You can choose certificate options for your Certificate as follows.
1) Enable Print - You can enable or disable this option. Would you like to enable print button for your certificate? Then enable print button option so that downloading the certificate will lead to the print page directly.
2) Shortcode – You can use the below shortcode to add certificate content dynamically where you want.
[dtlms_certificate_details item_type="*" /]
Instead of "*" you can use the below keywords to create a certificate as per your needs.
- student_name - To display student name.
- item_name - To display corresponding class name or course name.
- student_percent - To display student percentage.
- date - To display certificate date.
Just have a look at the certificates that can seen in the frontend. This is our default design and the admin can design the certificate as per his own needs.
Certificates Overview
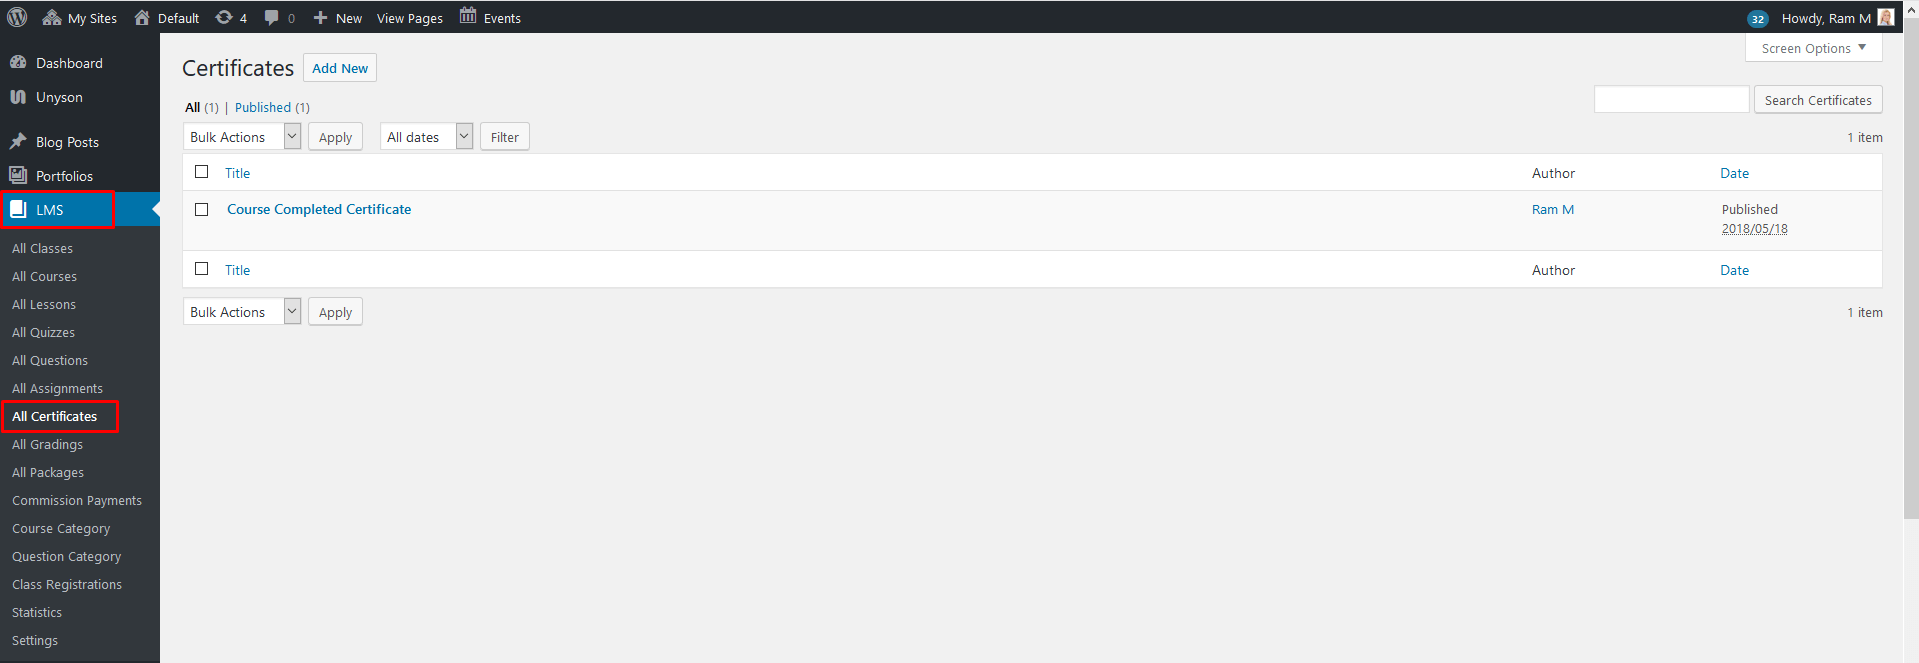
Certificates Options

Certificates Frontend

8Gradings
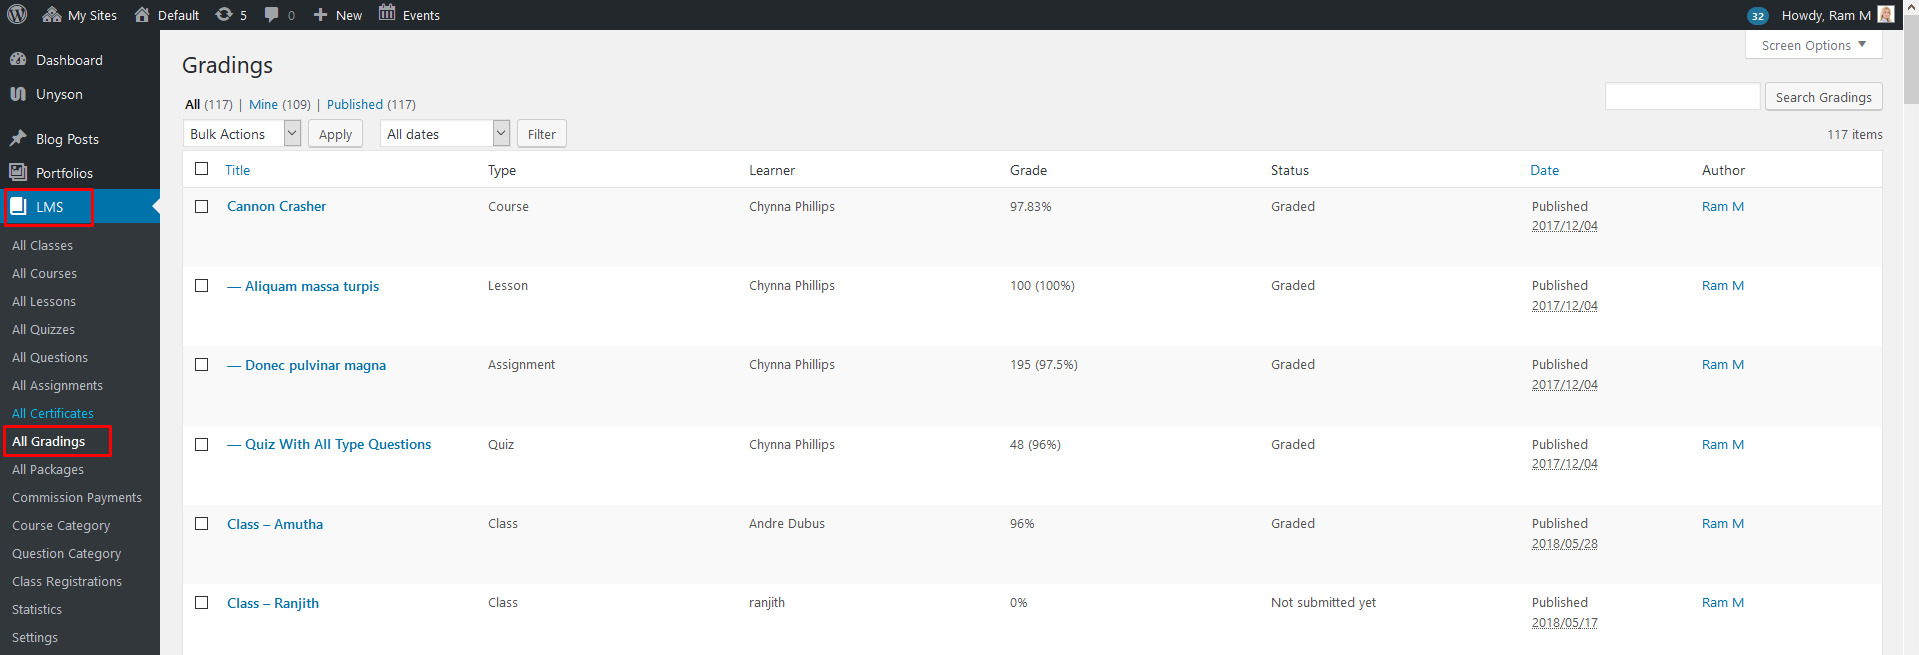
The Gradings section in our LMS Addon is the section which is used the evaluate the class, course, lesson, quiz and assignment submitted by the student. The Gradings section can be accessed from Dashboard > LMS > All Gradings.
In grading page it shows the details of the above items with title, type, learner, grade, status, date and author. You can find the graded item with the item title, item type, learner’s name, grade value in percentage, status of the item like Not submitted yet, Ungraded, Submitted for evaluation or Graded, Date of the item published for the item is Not submitted yet, Ungraded, Submitted for evaluation or Graded and the item author detail.
You need to edit the above items to grading. In every item it will have specific grading options. The Gradings option is only visible to the administrator and instructor of that course.
There are 5 types of gradings in our LMS Addon.
Gradings Overview
8.1) Class Gradings
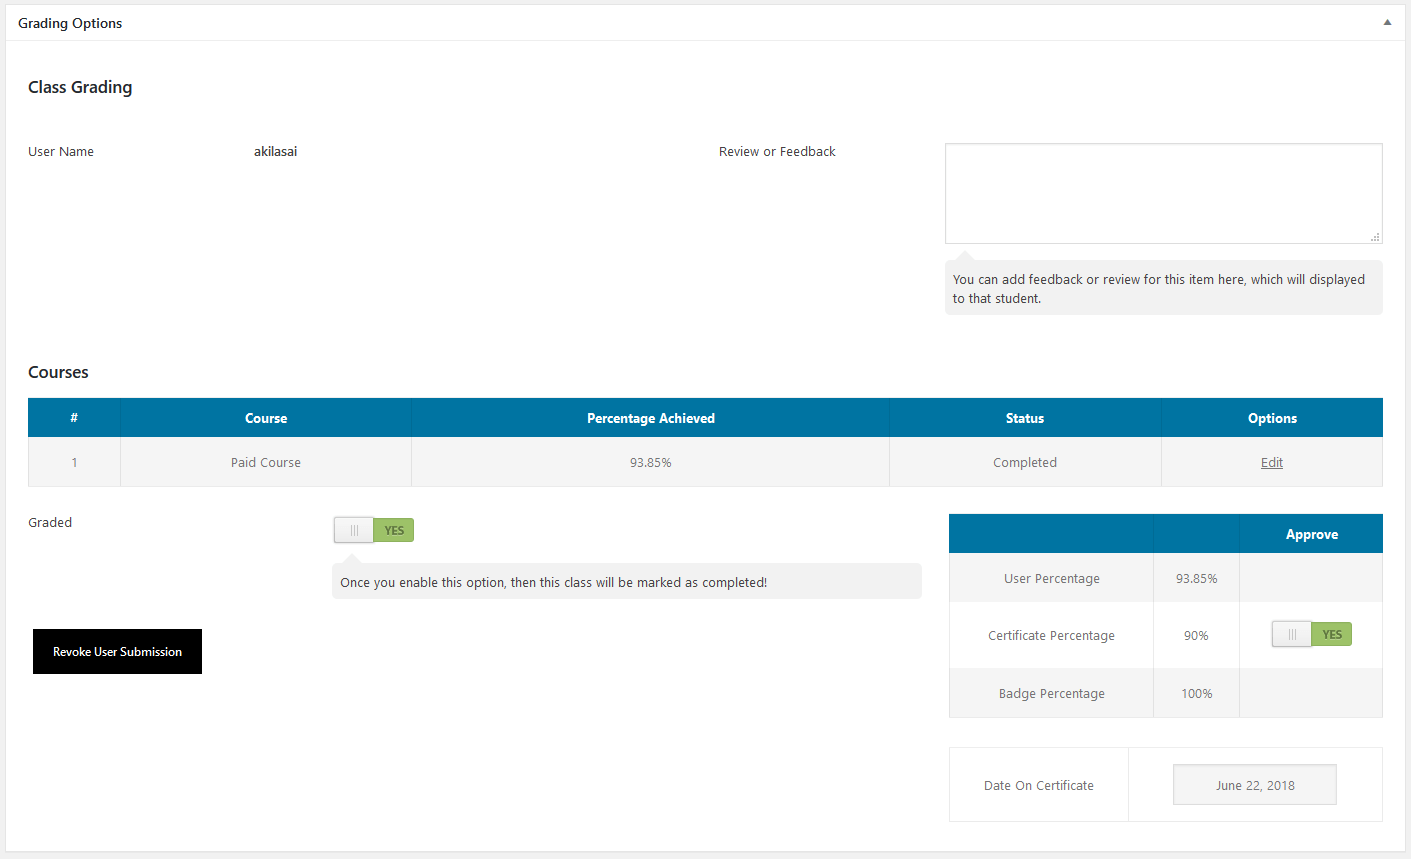
Once the student submits the class that he is looking at, there will be record added automatically in the "All Gradings" sections. The submitted class needs to be graded by admin or class author.
User Name- The user name field shows the username of the student who submitted the class.
Review or Feedback – The Admin or Instructor can add the feedback or review for this class into review or feedback textbox, it will display in the student dashboard grading section.
Courses - Here you can find the courses included in this class with the details to display course name, course percentage achieved, course status and options to edit the course grading with Edit link. This link goes to the specified course grading page. The admin or instructor can edit the class included course from here also.
Graded – You can enable or disable this option to grade the class as graded or not. Once you enable this option, then this class will be marked as completed. And you can see the User Percentage, Certificate Percentage, Badge Percentage and Date on Certificate for this class. And also you can enable or disable the option to approve the class Certificate and Badge for the student.
Revoke User Submission – This button is used to allow the student to submit the class again. That is if the class status is "Submitted for evaluation" and if the admin thinks to allow the student to re-submit the class again, then enabling this button will change the status of the class to "Not submitted yet", so that the user will be allowed to re-submit the class again. This "Revoke User Submission" button will only work, if the class is not graded.
Class Gradings
8.2) Course Gradings
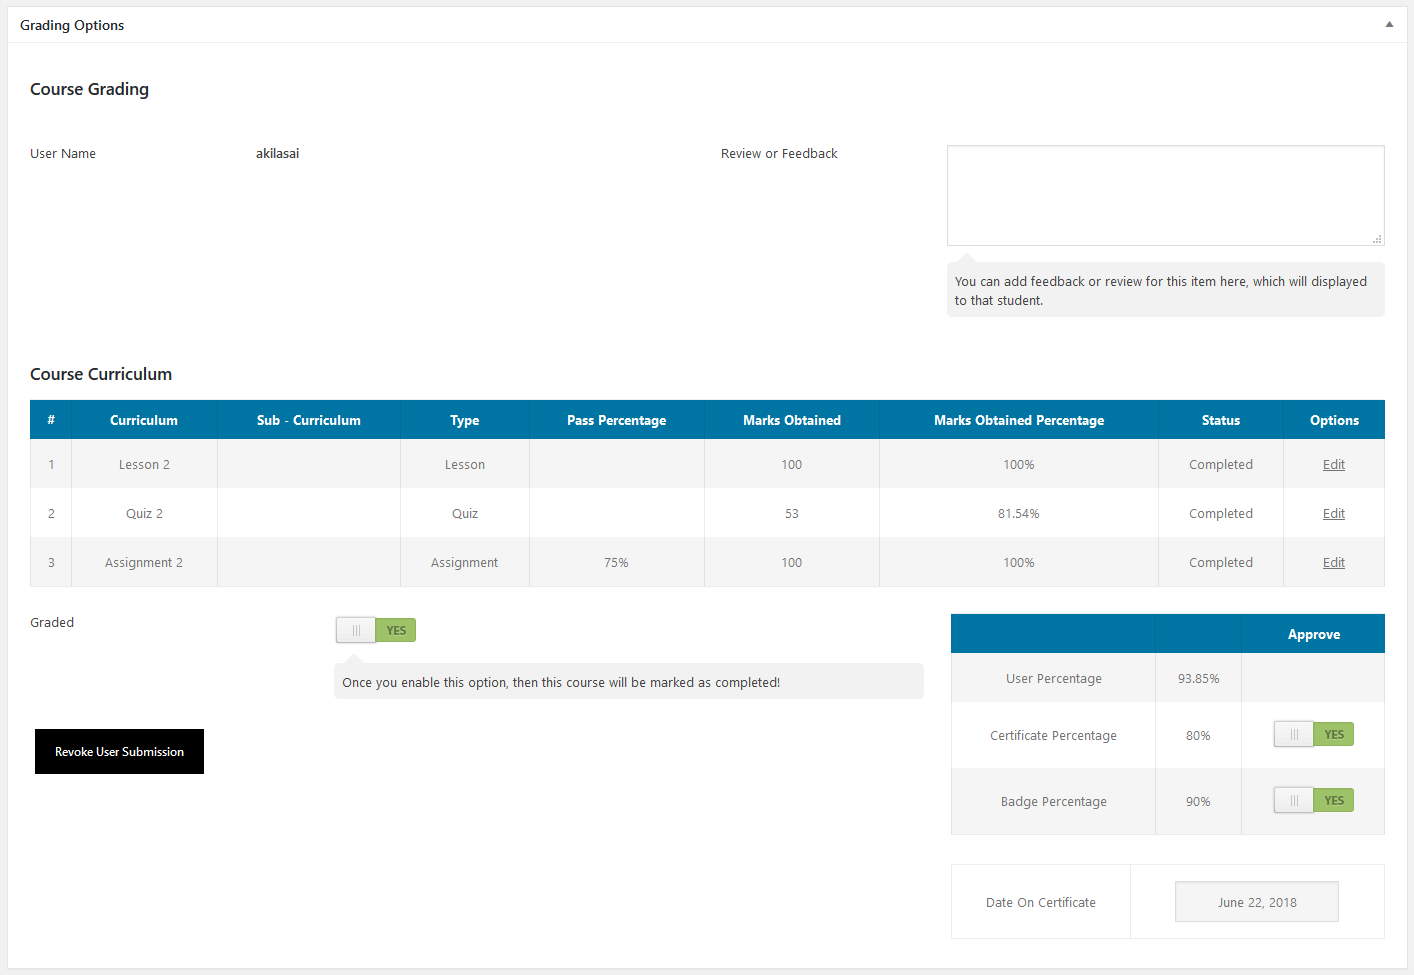
Once the student submits the course that he is looking at, there will be record added automatically in the "All Gradings" sections. The submitted course needs to be graded by admin or class author.
User Name- The user name field shows the username of the student who submitted the course.
Review or Feedback – The Admin or Instructor can add the feedback or review for this course into review or feedback textbox, it will display in the student dashboard grading section.
Courses Curriculum - Here you can find the Lessons, Quizzes and Assignments included in this Course with the details to display Curriculum, Sub-Curriculum, Type, Pass Percentage, Marks Obtained, Marks Obtained Percentage, Status and Options to edit the course grading with Edit link. This link goes to the specified Lesson, Quiz and Assignment grading page.
Graded – You can enable or disable this option to grade the class as graded or not. Once you enable this option, then this course will be marked as completed. And you can see the User Percentage, Certificate Percentage, Badge Percentage and Date on Certificate for this course. And also you can enable or disable the option to approve the class Certificate and Badge for the student.
Revoke User Submission – This button is used to allow the student to submit the course again. That is if the course status is "Submitted for evaluation" and if the admin thinks to allow the student to re-submit the class again, then enabling this button will change the status of the course to "Not submitted yet", so that the user will be allowed to re-submit the course again. This "Revoke User Submission" button will only work, if the course is not graded.
Course Gradings
8.3) Lesson Gradings
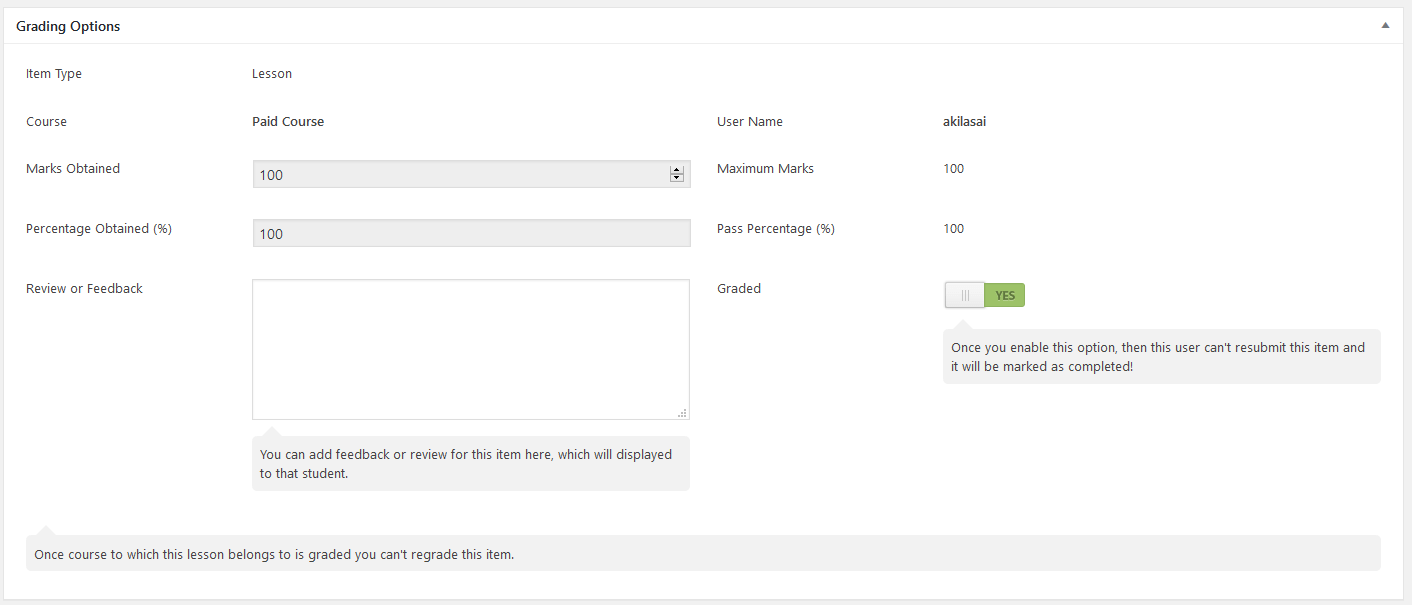
Once the student submits the lesson that he is looking at, there will be record added automatically in the "All Gradings" sections. The submitted lesson needs to be graded by admin or class author.
Item Type- The item type will show whether the graded item is a lesson or quiz or assignment. In this section it will show as lesson.
Courses - Here you can find the Course name in which the lesson is included.
User Name- The user name field shows the username of the student who submitted the lesson.
Marks Obtained- This field shows the marks obtained by the student in the current lesson. The default value is 100, however the instructor or administrator is allowed to edit the marks obtained by the student. If the course to which the particular lesson belongs to is graded, then the instructor or administrator cannot edit the marks obtained by the student.
Maximum Marks- This is the Maximum Marks set for the particular lesson while creating it.
Percentage Obtained (%)- This percetage will be calculated depending upon the marks obtained by the student for the lesson.
Pass Percentage (%)- This is the Pass Percentage set for the particular lesson while creating it.
Review or Feedback – The Admin or Instructor can add the feedback or review for the lesson into review or feedback textbox, it will display in the student dashboard grading section.
Graded – You can enable or disable this option to grade the lesson as graded or not. Once you enable this option, then this user can't resubmit this item and it will be marked as completed!
Lesson Gradings
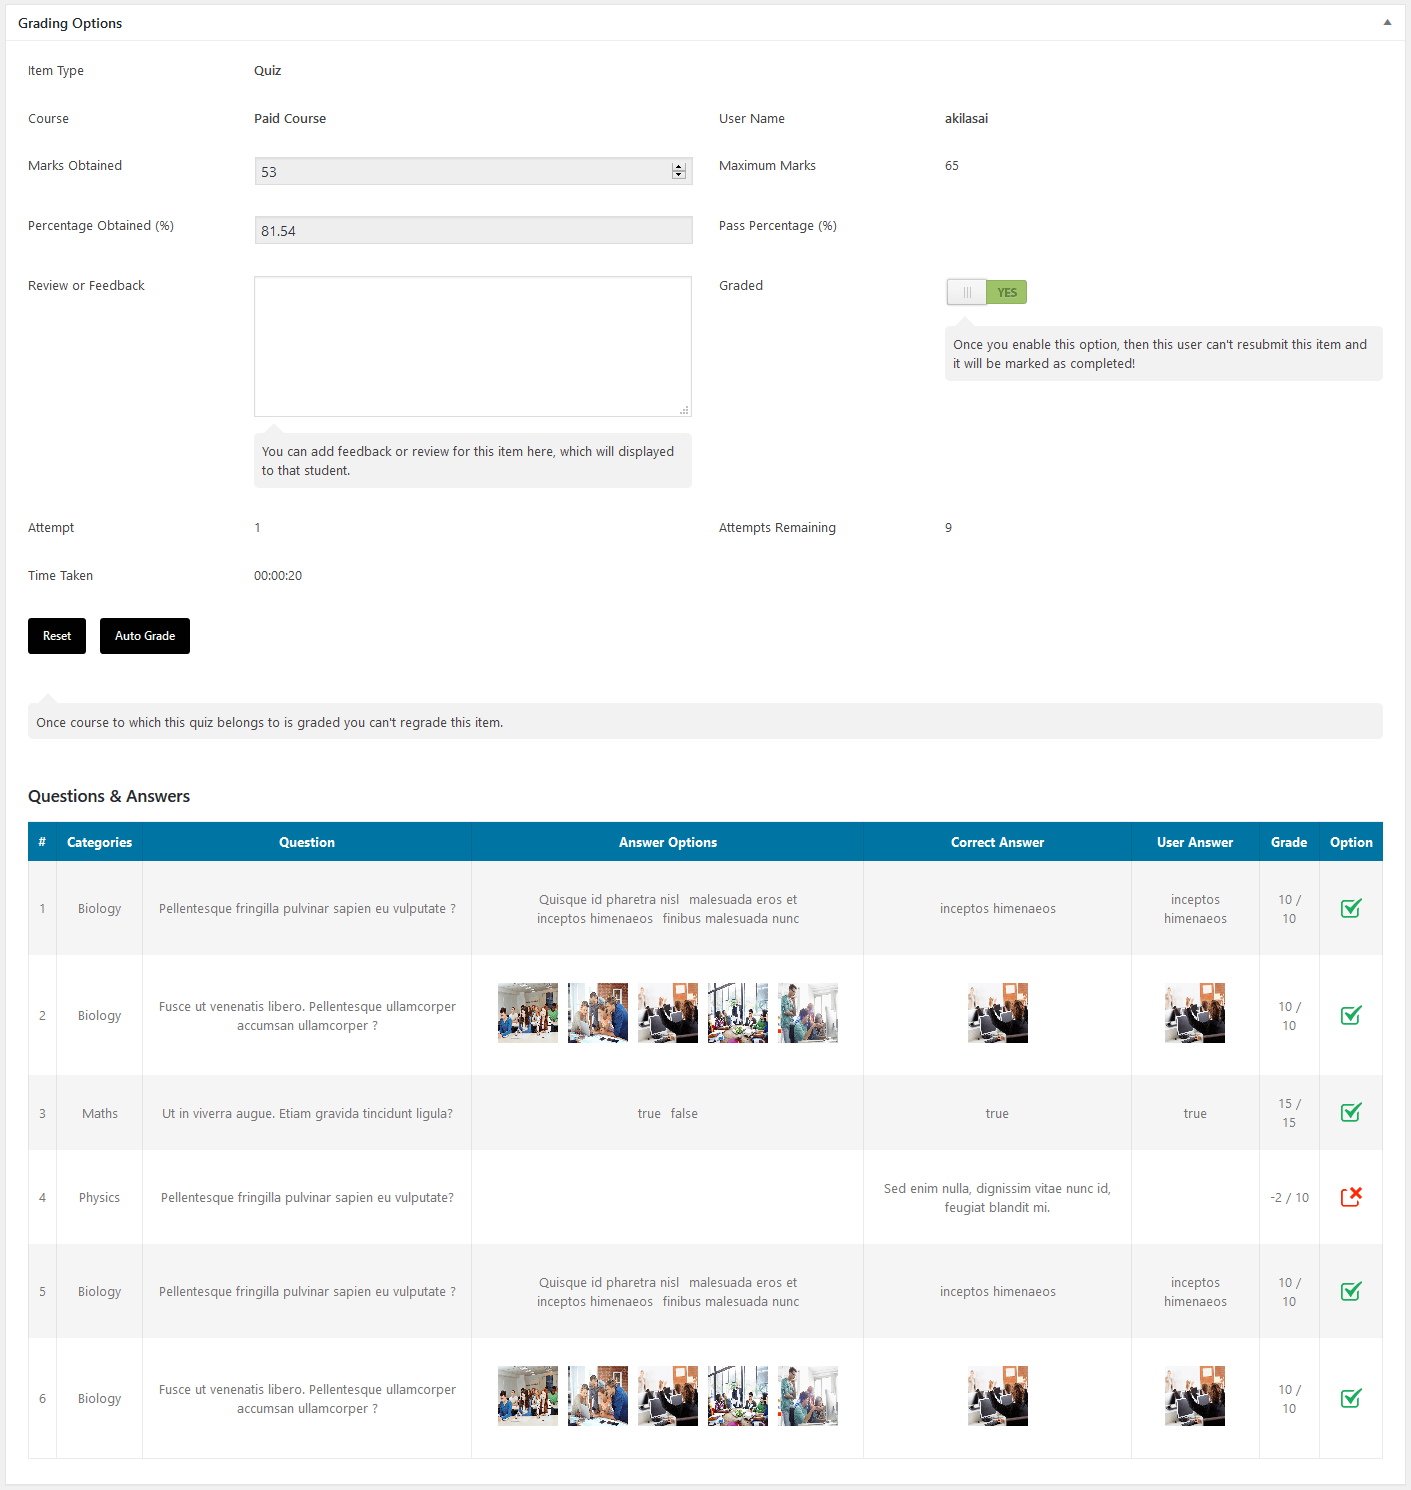
8.4) Quiz Gradings
Once the student submits the quiz that he is looking at, there will be record added automatically in the "All Gradings" sections. The submitted quiz needs to be graded by admin or class author or can be automatically graded.
Item Type- The item type will show whether the graded item is a lesson or quiz or assignment. In this section it will show as Quiz.
Courses - Here you can find the Course name in which the lesson is included.
User Name- The user name field shows the username of the student who submitted the quiz.
Marks Obtained- This field shows the marks obtained by the student in the current quiz. The instructor or administrator is allowed to edit the marks obtained by the student. If the course to which the particular quiz belongs to is graded, then the instructor or administrator cannot edit the marks obtained by the student.
Maximum Marks- This is the Maximum Marks set for the particular quiz while creating it. The maximum marks is calculated by the total marks of each question assigned to the quiz item.
Percentage Obtained (%)- This percetage will be calculated depending upon the marks obtained by the student for the quiz.
Pass Percentage (%)- This is the Pass Percentage set for the particular quiz while creating it.
Review or Feedback – The Admin or Instructor can add the feedback or review for the quiz into review or feedback textbox, it will display in the student dashboard grading section.
Graded – You can enable or disable this option to grade the quiz as graded or not. Once you enable this option, then this user can't resubmit this item and it will be marked as completed!
Attempt- This shows the number of attempts that has been made by the student for the particular quiz item.
Attempts Remaining- This shows the remaining attempts for the particular quiz item for that student.
Time Taken- This shows the total time taken by the student to complete the particular quiz.
Reset- If this reset button is clicked the graded quiz will be reset and it needs to be graded again.
Auto Grade- If this button is clicked, then the ungraded quiz items will be graded automatically.
Questions & Answers- This table will show the Questions & Answers of the particular quiz. It will display Categories, Question, Answer Options, Correct Answer, User Answer, Grade, Option
Quiz Gradings
8.5) Assignment Gradings
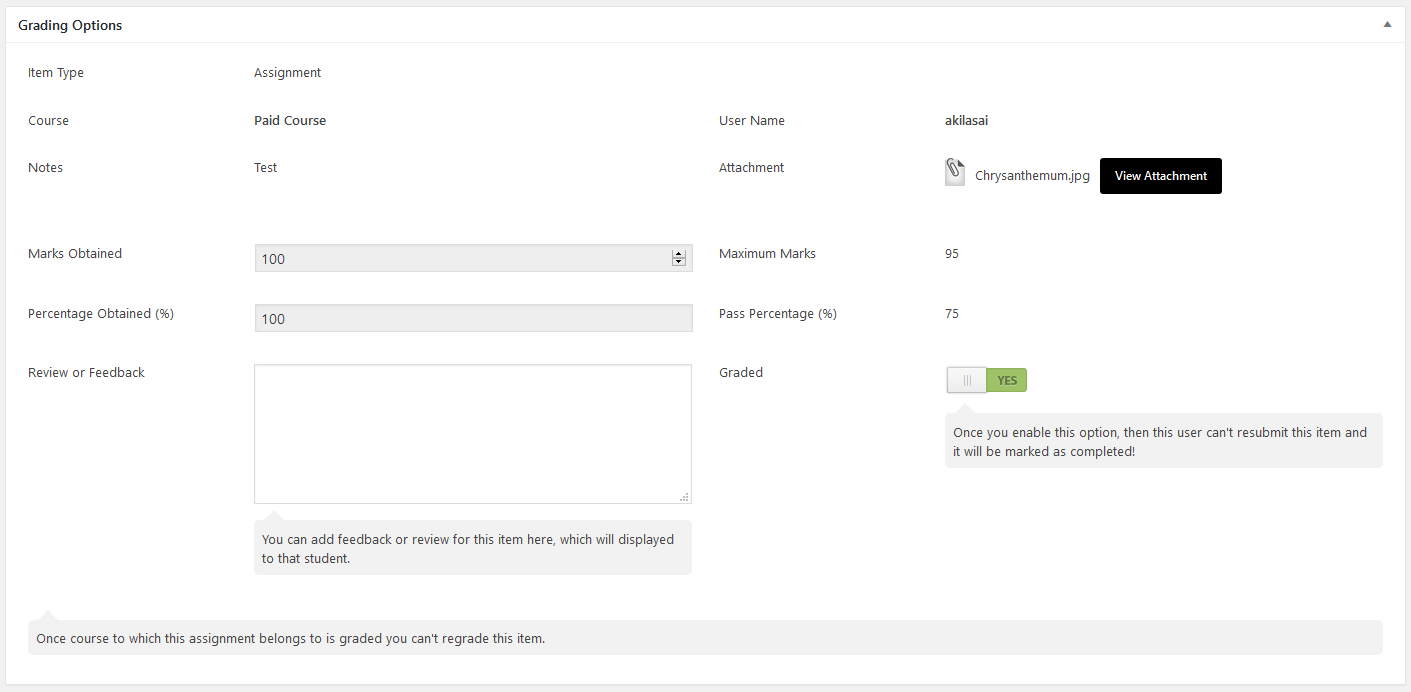
Once the student submits the assignment that he is looking at, there will be record added automatically in the "All Gradings" sections. The submitted assignment needs to be graded by admin or class author.
Item Type- The item type will show whether the graded item is a lesson or quiz or assignment. In this section it will show as assignment.
Courses - Here you can find the Course name in which the assignment is included.
Notes - This field will display the notes sent by the student. This notes section is for the administrator or the instructor to view the notes from the student.
Attachment - From this field you can download the attachment that is sent by the student by clicking the "View Attachment" button to evaluate it.
User Name- The user name field shows the username of the student who submitted the assignment.
Marks Obtained- This field shows the marks obtained by the student in the particular assignment. The default value is 100, however the instructor or administrator is allowed to edit the marks obtained by the student. If the course to which the particular lesson belongs to is graded, then the instructor or administrator cannot edit the marks obtained by the student.
Maximum Marks- This is the Maximum Marks set for the particular assignment while creating it.
Percentage Obtained (%)- This percetage will be calculated depending upon the marks obtained by the student for the assignment.
Pass Percentage (%)- This is the Pass Percentage set for the particular assignment while creating it.
Review or Feedback – The Admin or Instructor can add the feedback or review for the assignment into review or feedback textbox, it will display in the student dashboard grading section.
Graded – You can enable or disable this option to grade the assignment as graded or not. Once you enable this option, then this user can't resubmit this item and it will be marked as completed!
Assignment Gradings
9Packages
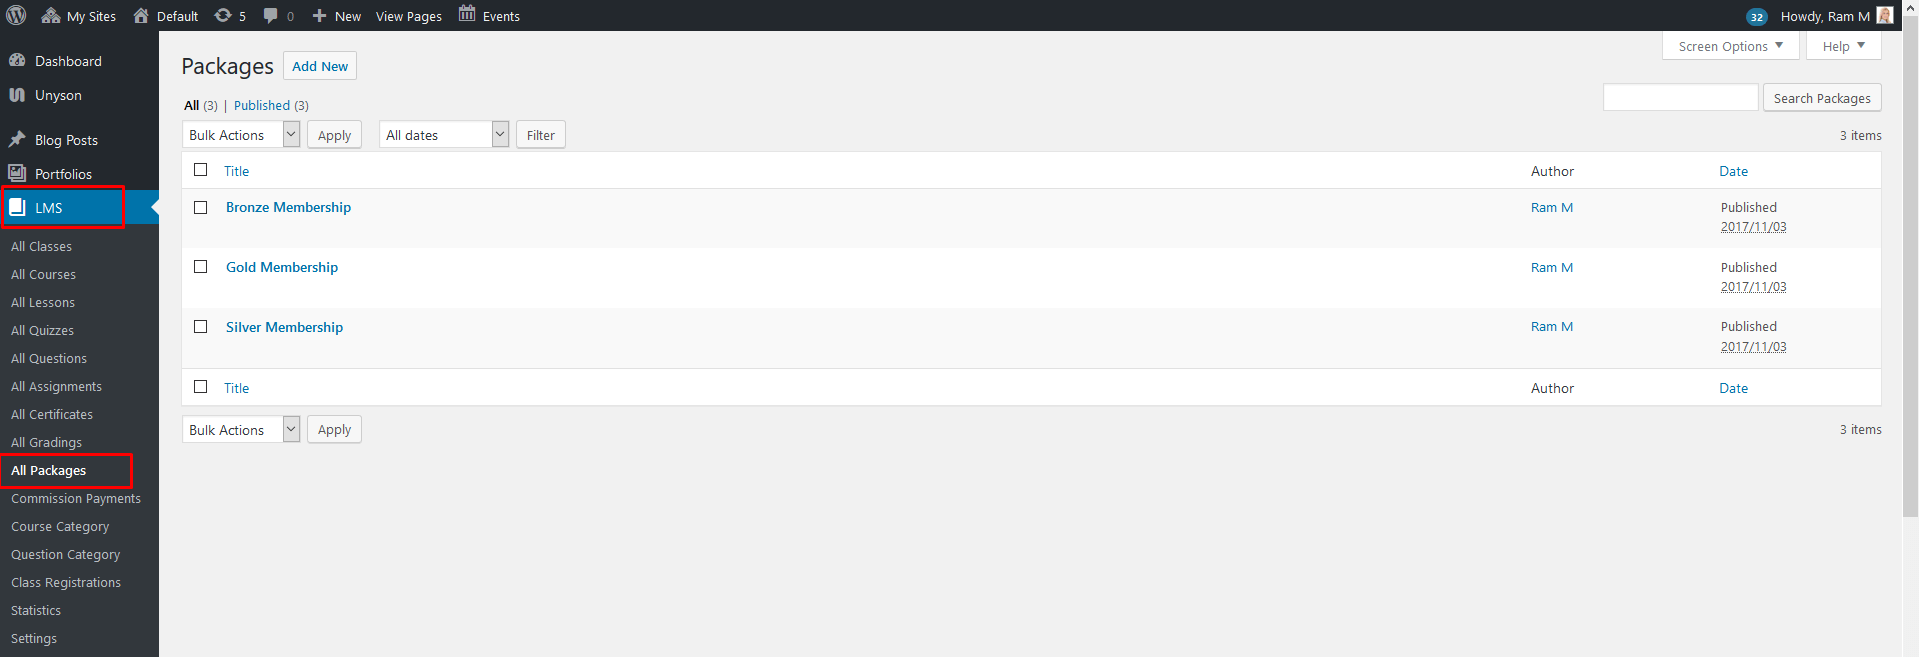
Packages section plays an important role in our LMS Addon. The Classes and Courses can be combined using this packages section and regular woocommerce method of purchasing a product can be performed. The Packages section can be accessed from Dashboard > LMS > All Packages > Add New.
Now we are going to look the options of Packages Add New page. Once the page is opened you will have the section for the packages contents in which you can use the Visual Composer plugin. We have numerous shortcodes and we will be explaining it in this documentation. Now lets see the Breadcrumb Options
9.1 Breadcrumb Options
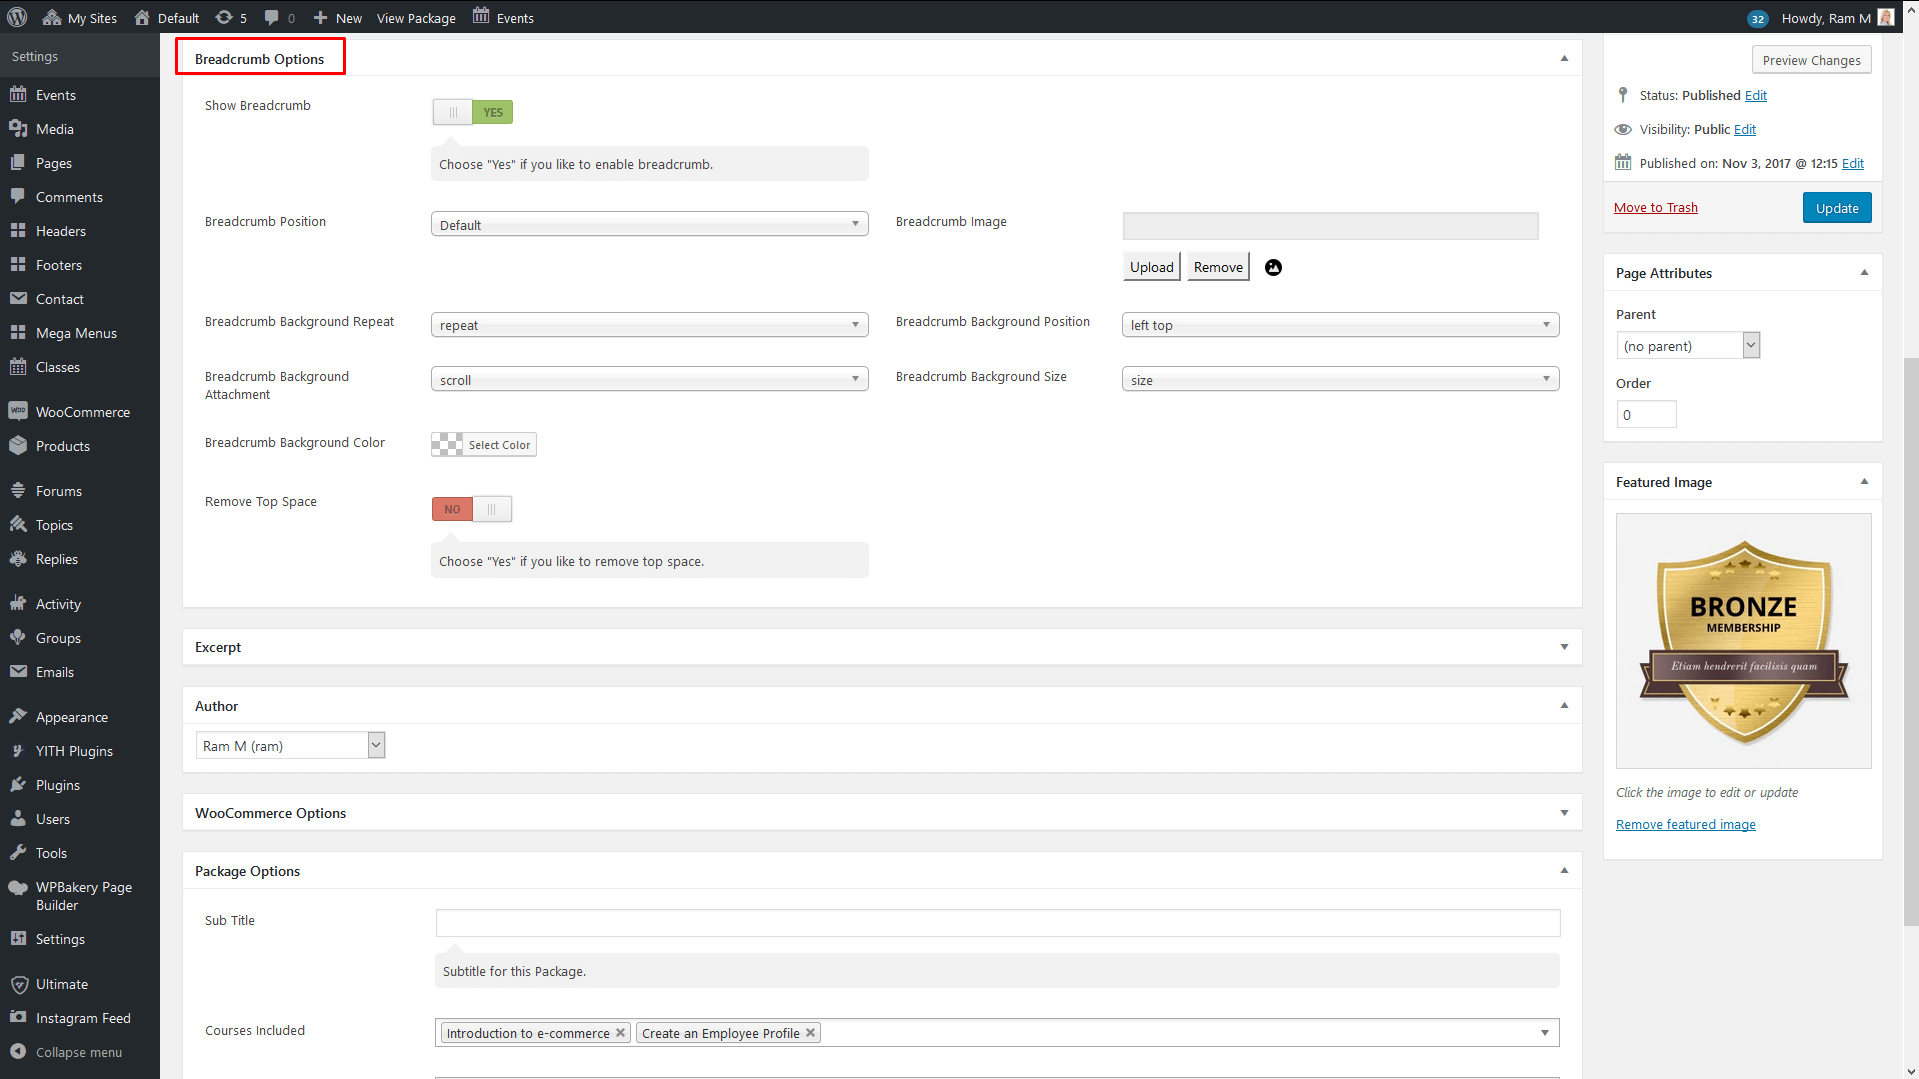
With the Breadcrumb option metabox you can enable/disable the breadcrumb, set the position of breadcrumb, set background image, set background position, set background repeat, set background color and remove the top space if needed.
Packages Overview
9.2 Package Options
9.2.1) Subtitle
Just enter the subtitle of the packages section which will be displayed below the packages main title in the front end.
9.2.2) Courses Included
You can select the courses included in this package from the Courses Included drop down. And also you can select more than one course for the particular package.
9.2.3) Classes Included
You can select the courses included in this package from the Classes Included drop down. And also you can select more than one course for the particular package.
9.2.4) Period
You can add your period of time for you package in Day(s), Week(s), Month(s), Year(s) or Lifetime. It will work like the subscription method. If an item is purchased for 1 month, then after 1 month, the item access will be blocked. It needs to be purchased again to get the access.
9.3 Woocommerce Options
From this woocommerce metabox option you can set the Regular price and Sale price for the Package item. No need to configure the price from the woocommerce plugin. Everything is done in our LMS Addon itself. This Package will act as a woocommerce product and regular woocommerce method of purchasing a product can be performed. The woocommerce plugin needs to be installed and activated for this metabox to show.
Package Options

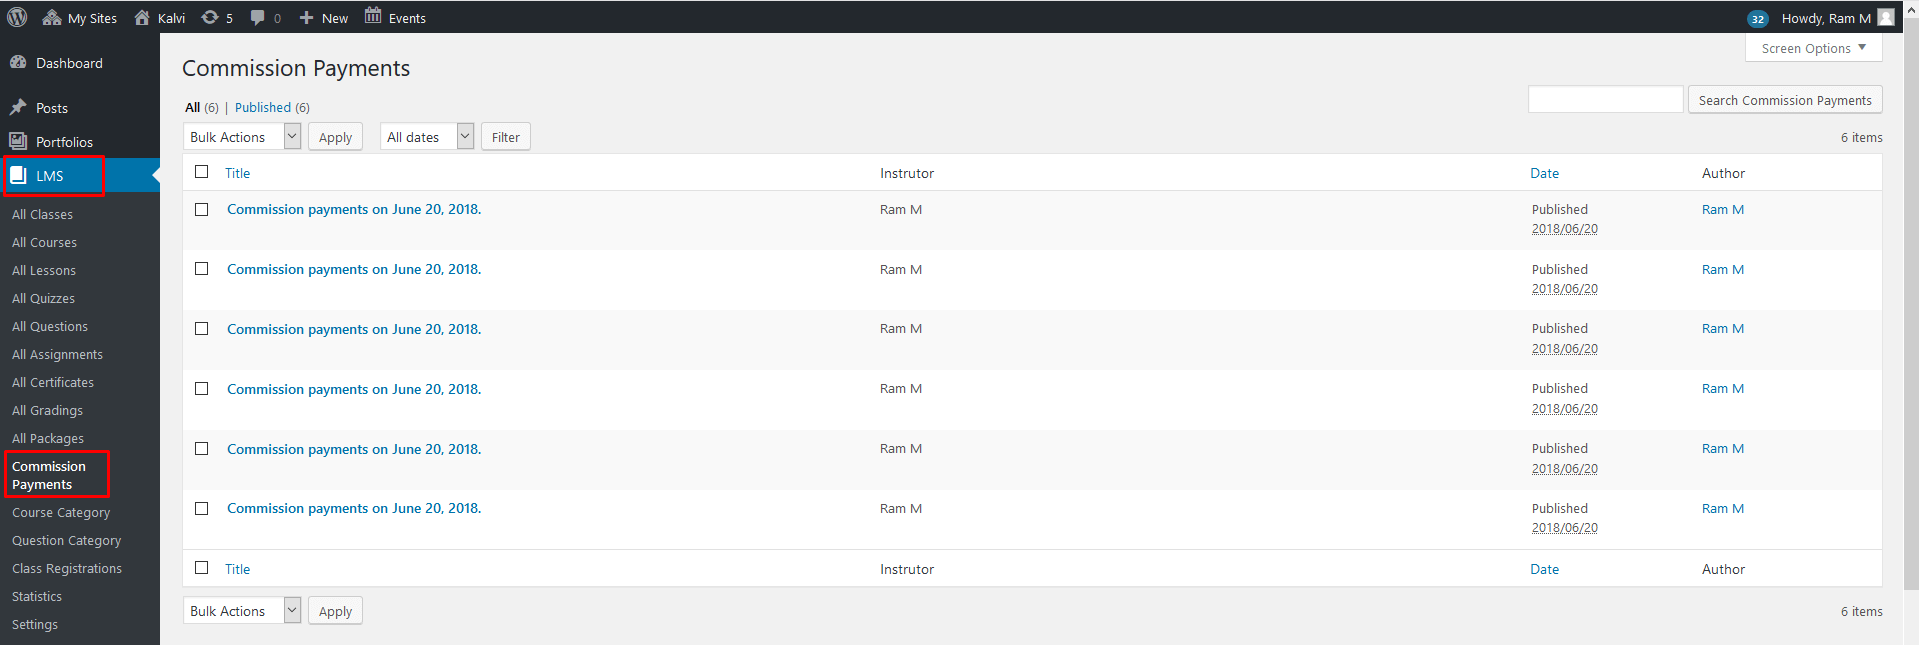
10Commission Payments
The Commission payments entry will be generated automatically when a payment is done for the intructor from admin. The Commission can be set from Dashboard > LMS > Settings > Commission > Set Commission. And the Commission can be paid from Dashboard > LMS > Settings > Commission > Pay Commission.
Once a payment is made from the admin, a record will be inserted in Commission Payments with all the details of it. We will see about "Set Commission" and "Pay Commission" in detail in the upcoming topics in this document.
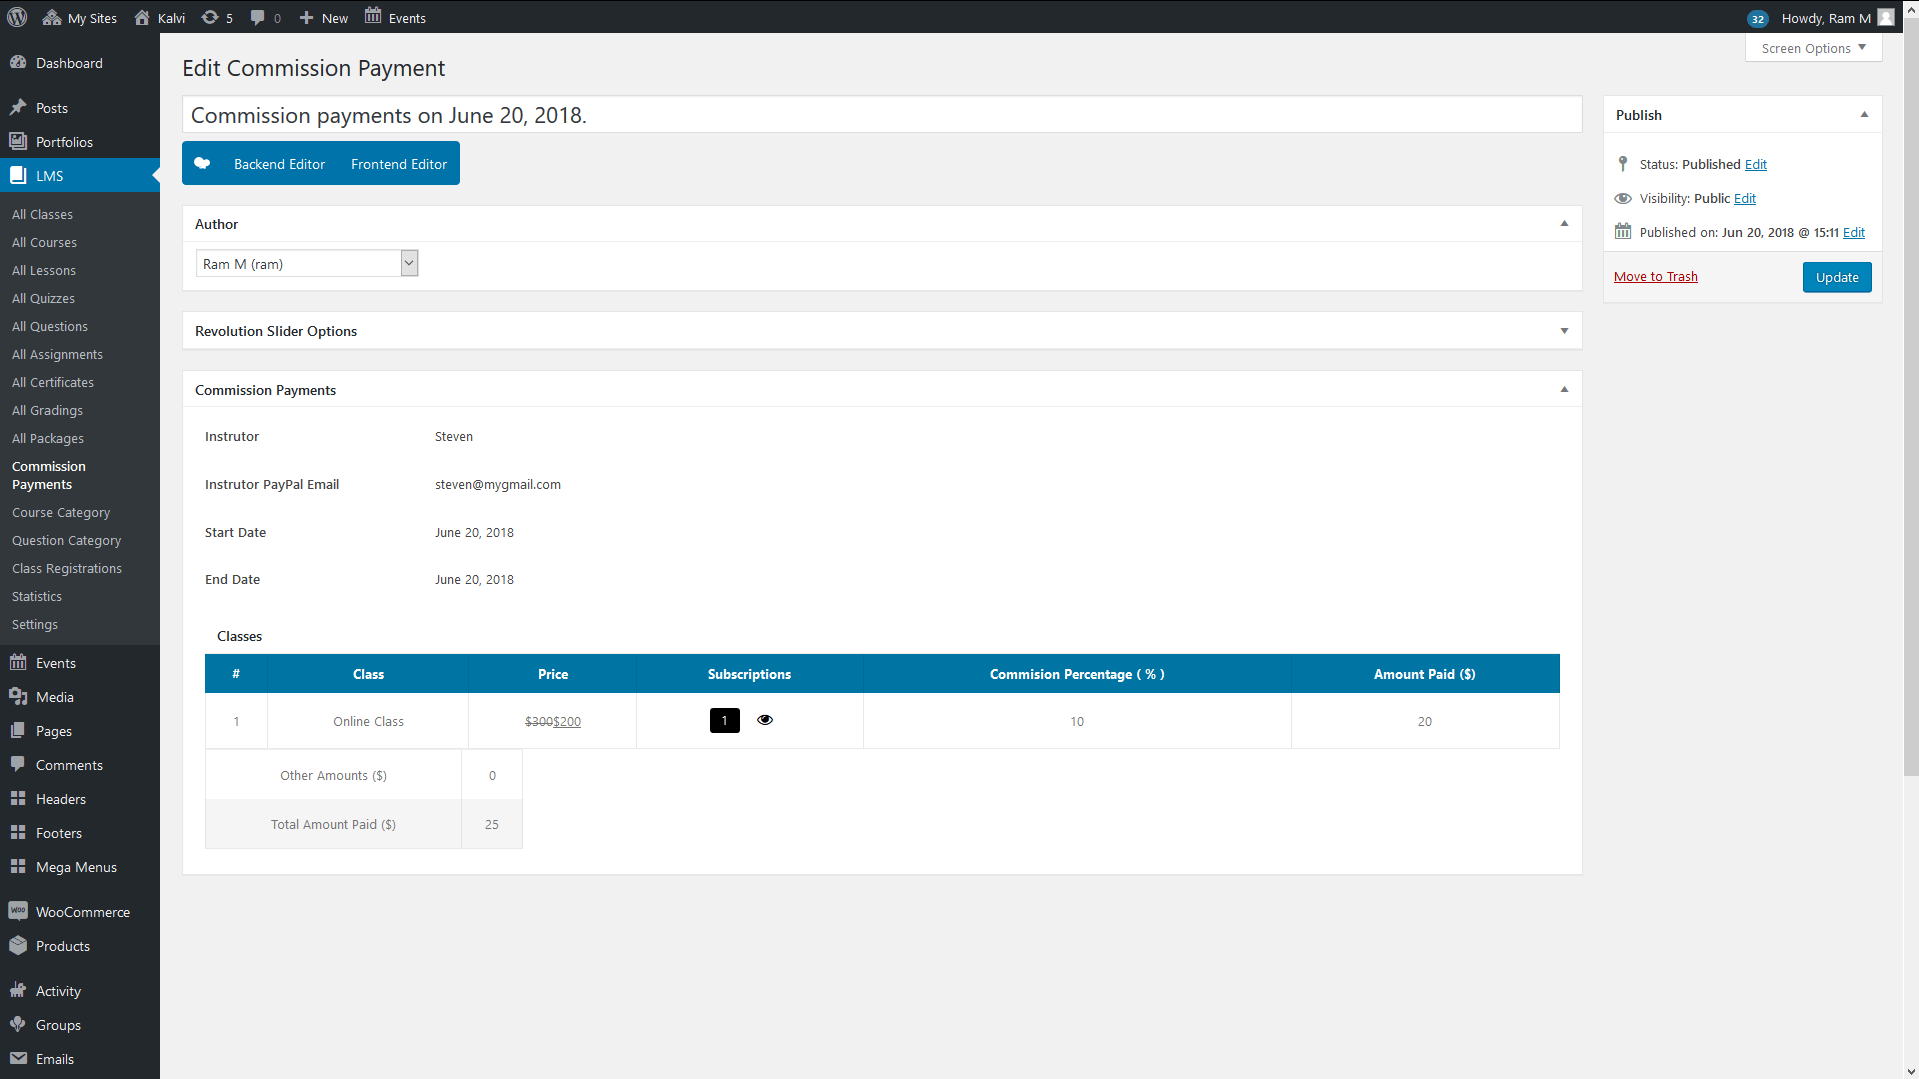
10.1 Commission Payments
Instructor - This section shows the Instructor to which the commission is made.
Instructor PayPal Email - This section shows the Instructor PayPal Email to which the commission is made.
Start Date & End Date - Total number of commissions paid between those dates.
Classes or Courses - In this section the details of the class or course for which the payment is made is shown. The following details are shown in this section Class, Price, Subscriptions, Commision Percentage ( % ) and Amount Paid ($)
And the page shows the Other Amounts ($) and Total Amount Paid ($) in numbers with the currency you have selected in WooCommerce > Currency options. The Commission Payments detail will be derived from Settings > Commission > Pay Commission > here the admin can choose the instructor and select the From Date and To Date and click the Load button to load the instructor commission detail for the period. Then, enable the option for the course or class Amount to pay value with the Commission Percentage, then click “Pay via PayPal” button to pay the commission amount for the selected instructor for the select amount of the course or class commission amount for the specified commission percentage.
Commission Overview
Commission Payments
11Course Category
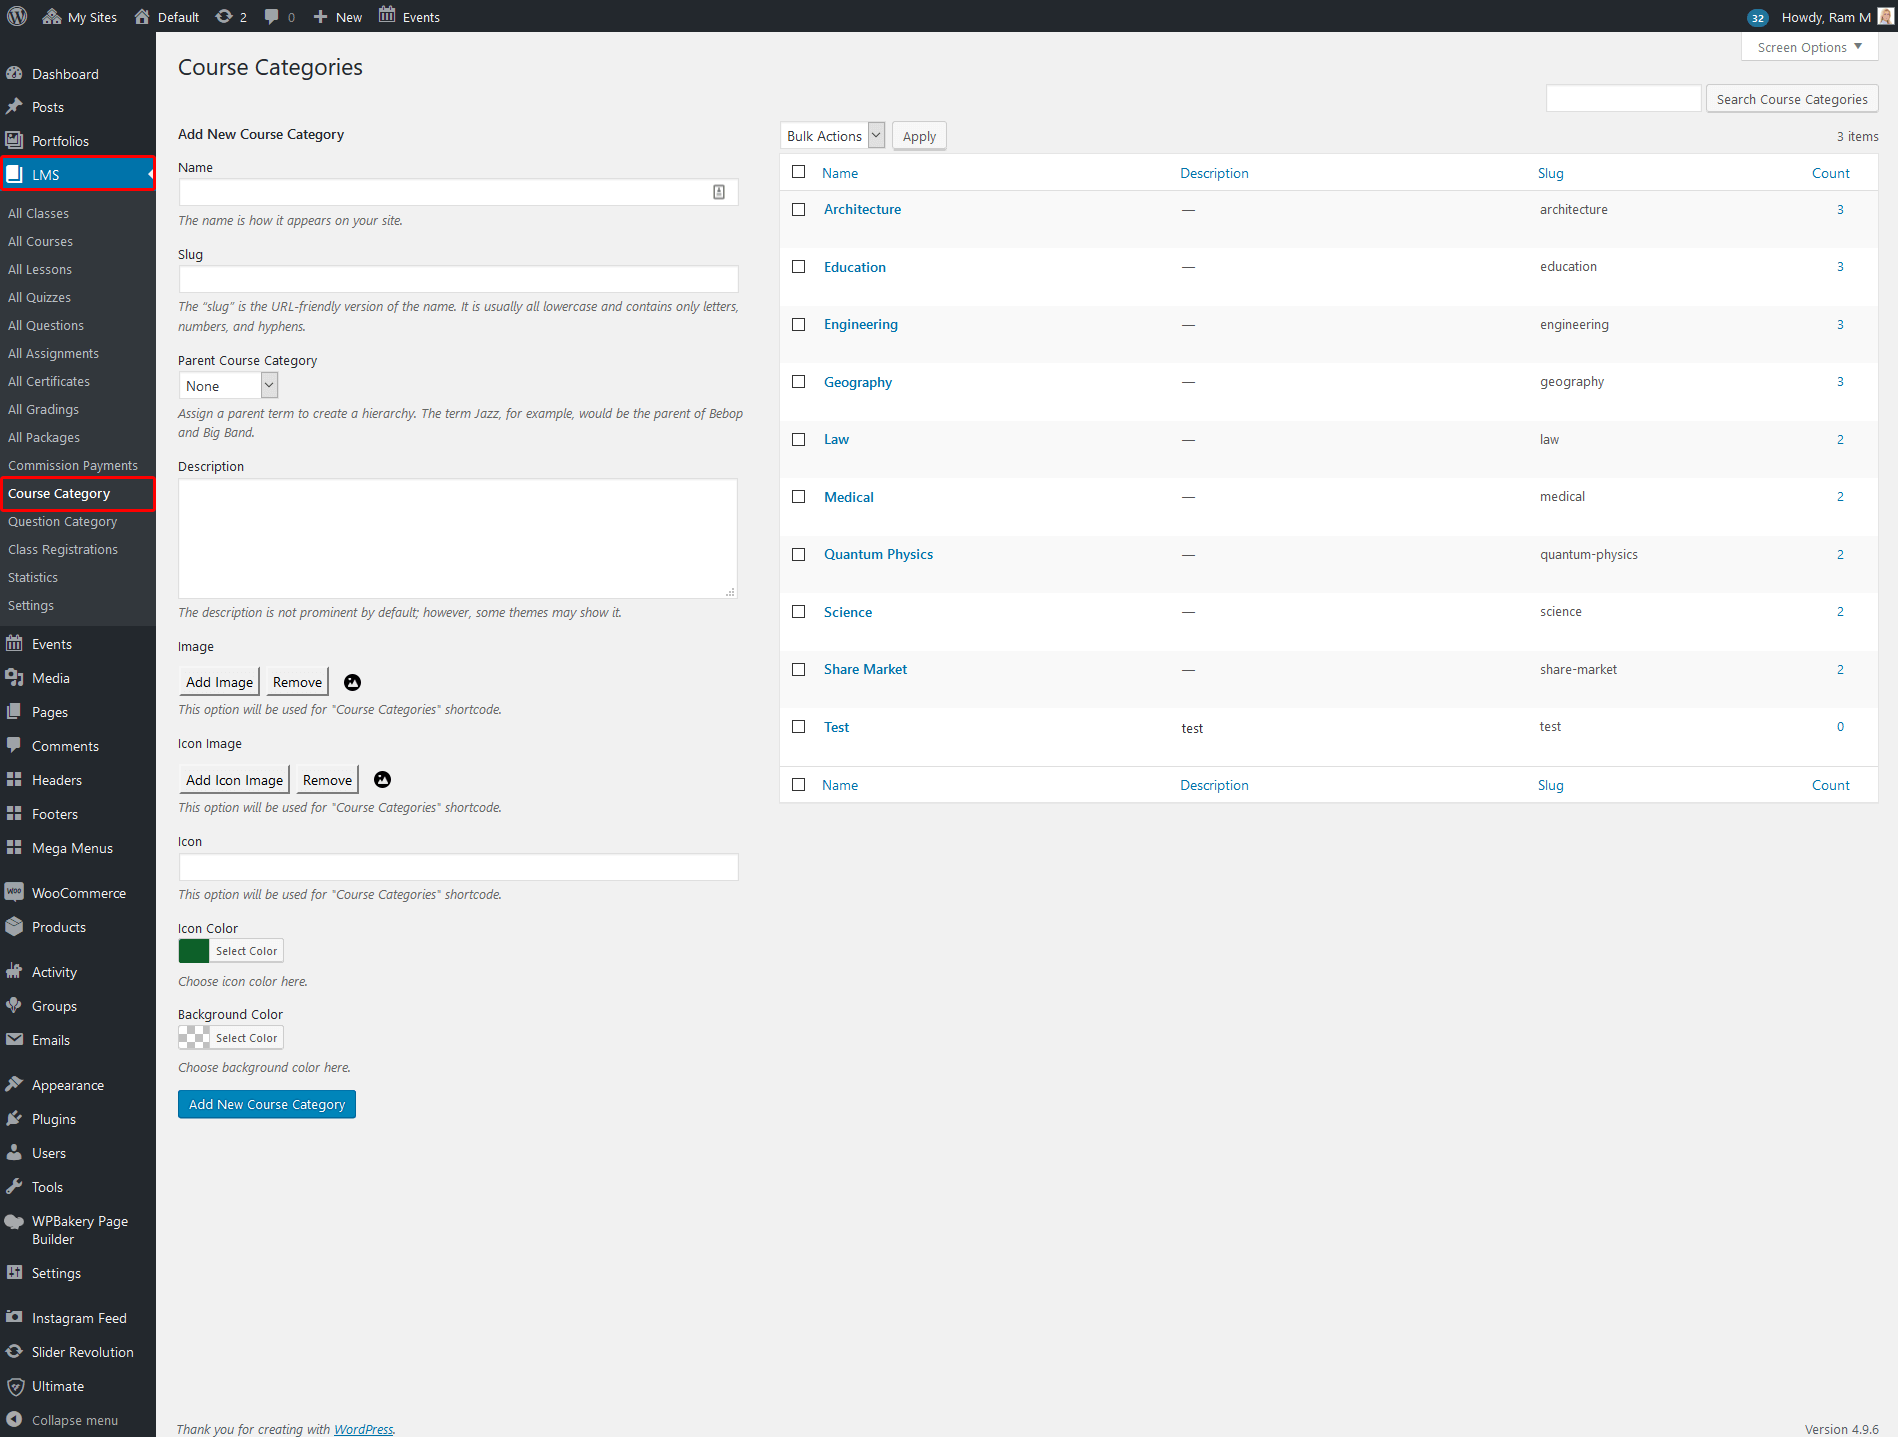
The Course categories page shows the Course category details with Category Name, Category Description, Category Slug and Category Count. And you can add your new course category with Add New Course Category button with the following fields.
Name – You can enter your category name is how it appears on your site.
Slug - You can enter your slug name. The “slug” is the URL-friendly version of the name. It is usually all lowercase and contains only letters, numbers, and hyphens.
Parent Course Category - You can assign a parent term to create a hierarchy.
Description - The description is not prominent by default; however, some themes may show it.
Image - You can add image from media to the category item that you are adding from this option. This image will be used for "Course Categories" shortcode.
Icon Image - You can add icon image from media to the category item that you are adding from this option. This image will be used for "Course Categories" shortcode.
Icon - You can add font awesome icons to the category item that you are adding from this option. The font awesome icon format will be like "fa fa-hourglass-half". This image will be used for "Course Categories" shortcode.
Icon Color - If you are adding font awesome icon from the previous option, then you can set the Color of that icon from this option.
Background Color - If you are adding font awesome icon from the previous option, then you can set the Background Color of that icon from this option.
Course Category
12Question Category
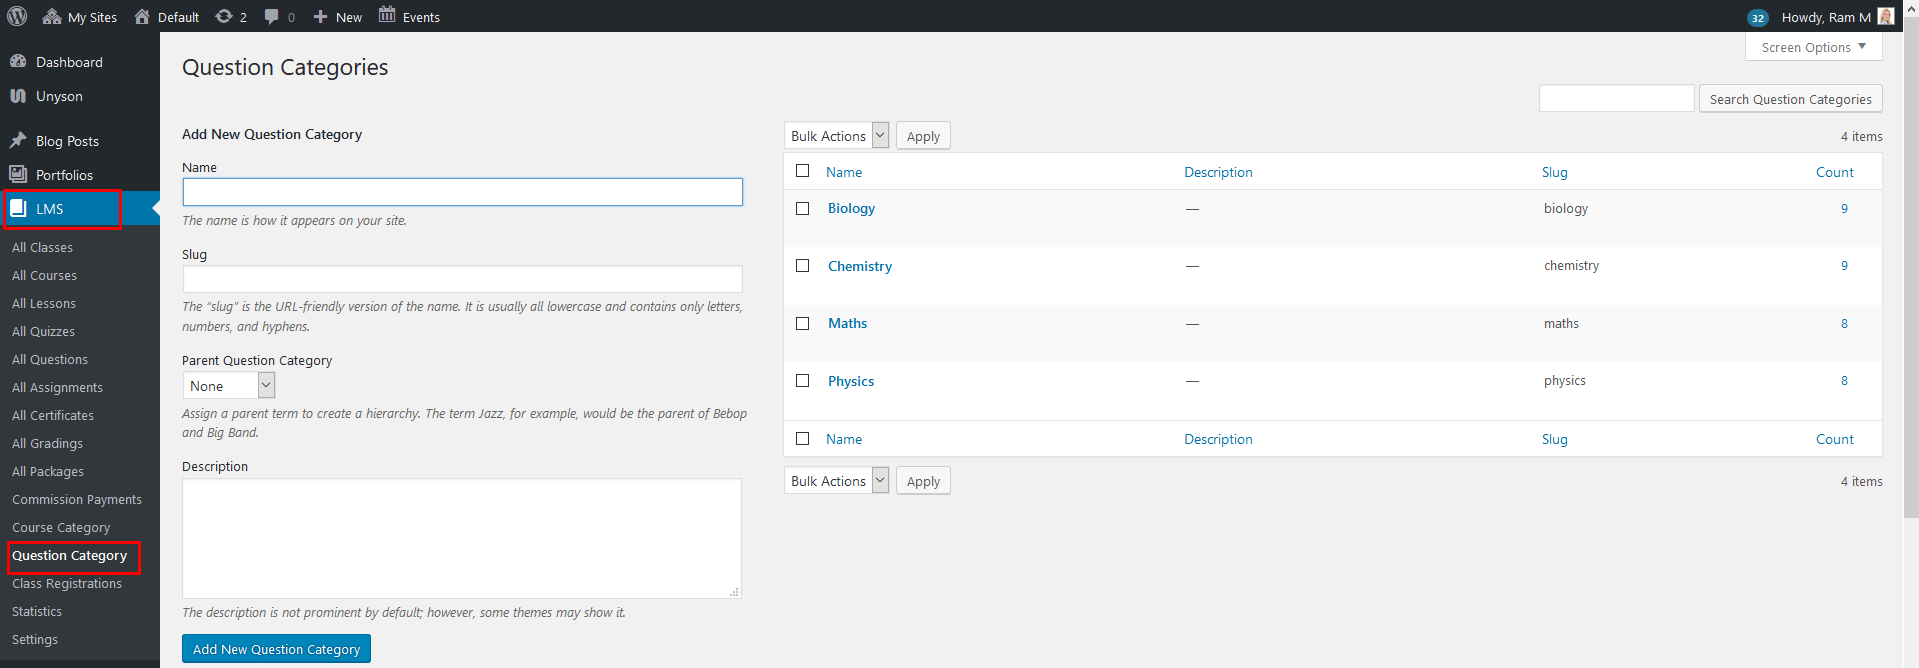
The question categories page shows the question category details with Category Name, Category Description, Category Slug and Category Count. And you can add your new course category with Add New Question Category button with the following fields.
Name – You can enter your category name is how it appears on your site.
Slug - You can enter your slug name. The “slug” is the URL-friendly version of the name. It is usually all lowercase and contains only letters, numbers, and hyphens.
Parent Course Category - You can assign a parent term to create a hierarchy.
Description - The description is not prominent by default; however, some themes may show it.
Question Category
13Class Registrations
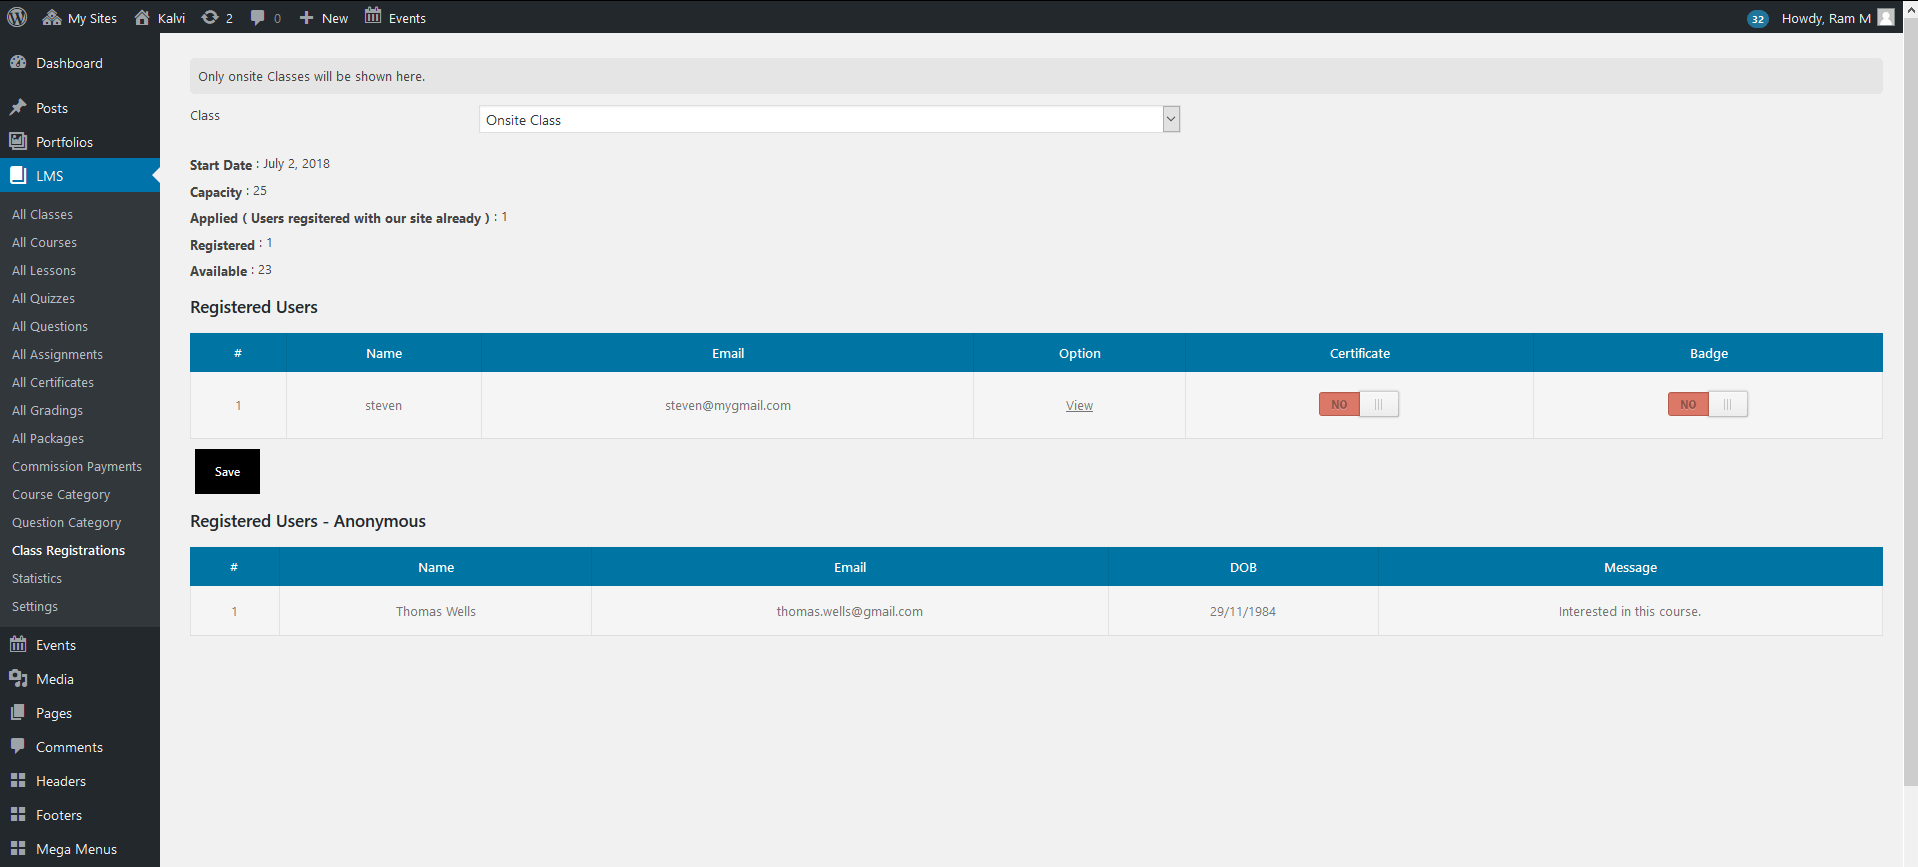
Previously in Onsite Class we have mentioned about the "Enable Purchases / Registration" section (3.11). If the admin wishes to enable a registration from so that the students can be registered for that particular course, then you can enable this option. The records in this section will be shown in 2 different types.
13.1 Registered Users
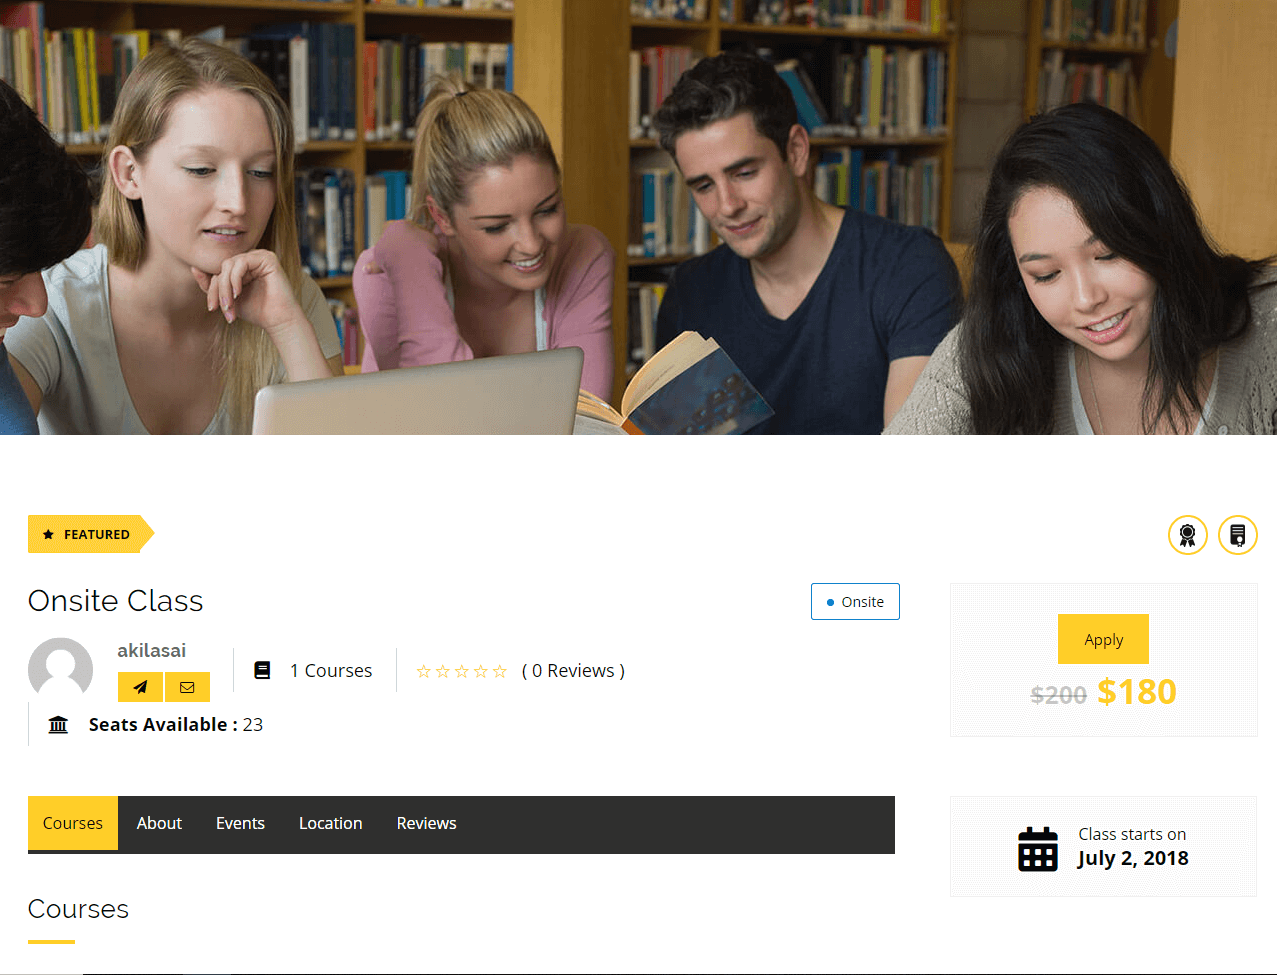
Suppose if you have enabled registration for a class named "Wordpress Basics" and the student who views that class is already logged in, then he will just see a button "Apply", since all the details of the student is already stored in our system. Clicking that "Apply" button will register that student to the "Wordpress Basics" class. Now a record will be inserted in "Registered Users" section and the admin can view the student who has been registered for that class. Similarly all the class students who have applied for this course can be easily found.
Apply Button
13.2 Registered Users - Anonymous
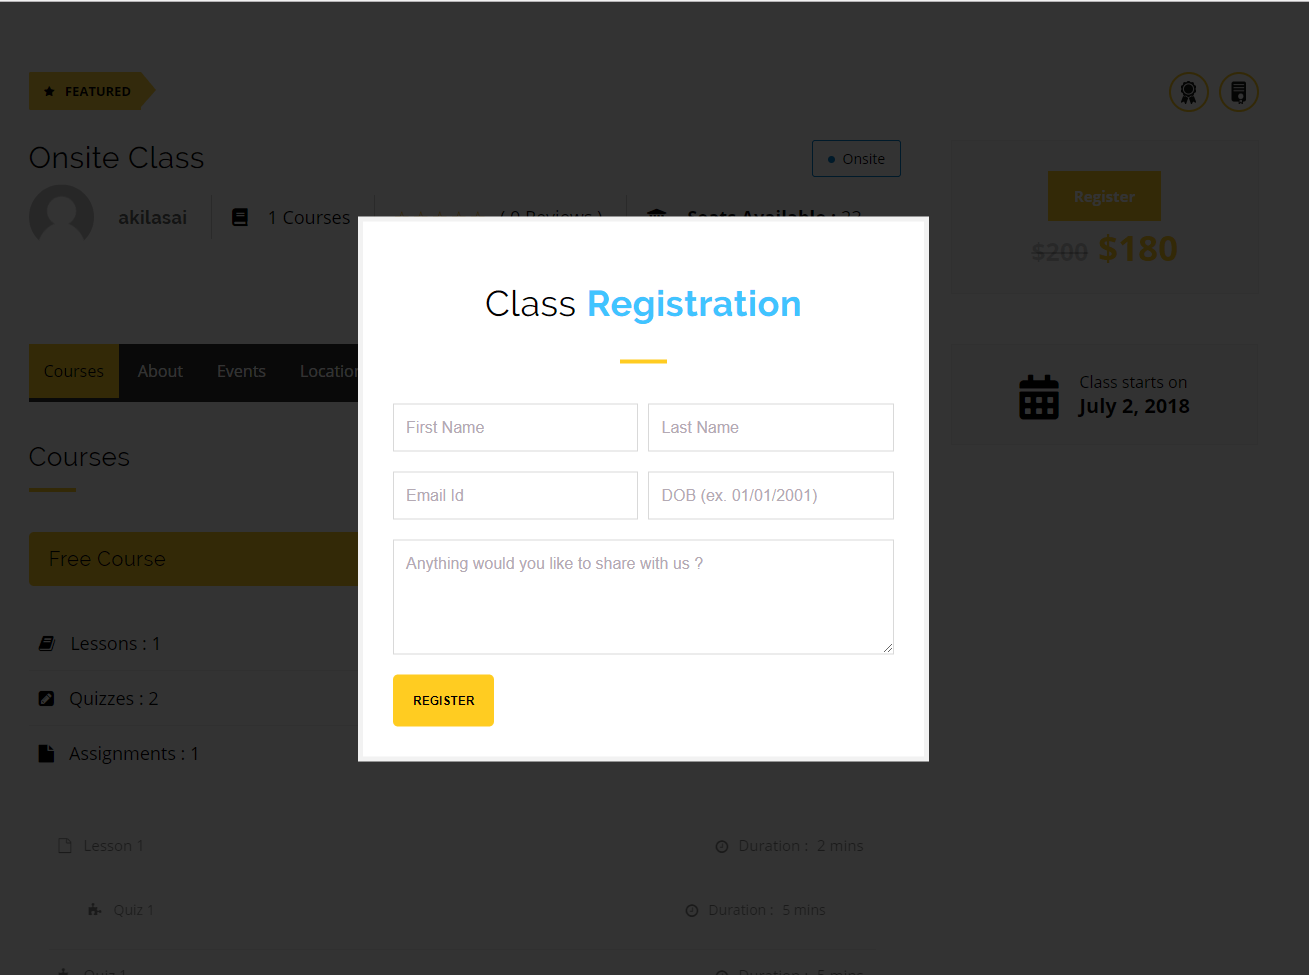
Suppose if you have enabled registration for a class named "Wordpress Basics" and the student who views that class is not logged in, then he will just see a button "Register". Clicking that "Register" button will open a registration form in which the student's First name, Last Name, Email id, DOB and Notes are being registered to the "Wordpress Basics" class. Now a record will be inserted in "Registered Users - Anonymous" section and the admin can view the student who has been registered for that class. Similarly all the class students who have applied for this course can be easily found.
Class Registration Button:

|
Class Registration Form:
|
Class Registration
14Statistics
14.1 Overview
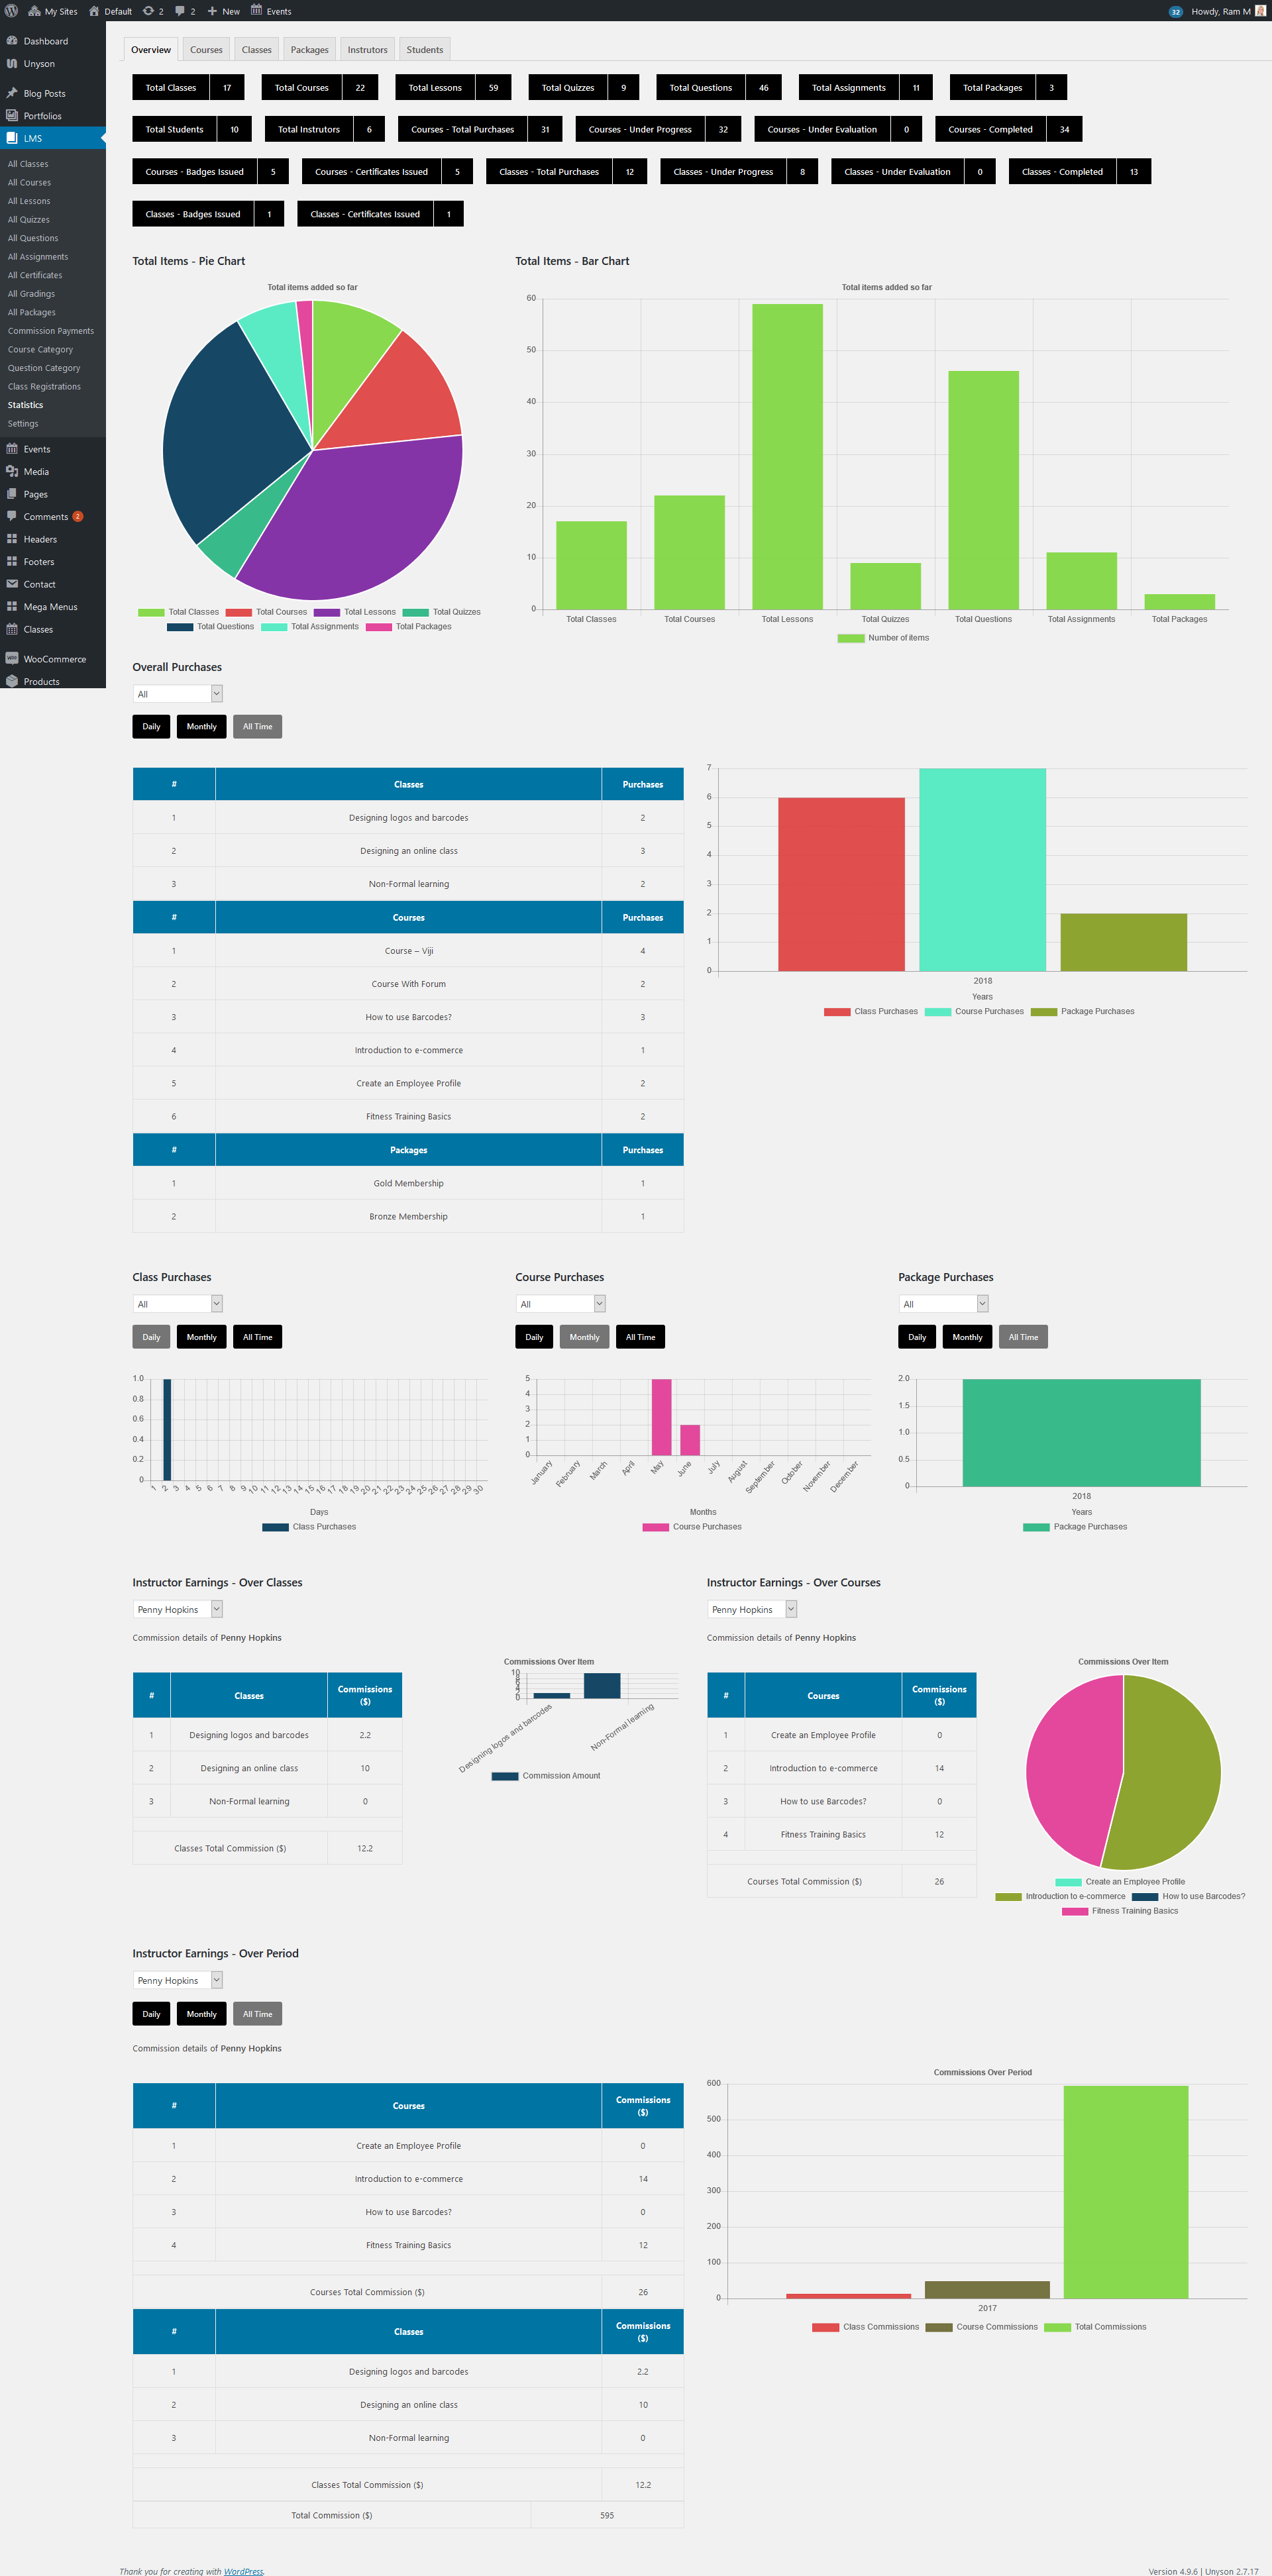
The Statistics section covers all the sections of LMS Addon. The data collection, analysis, interpretation, presentation, organization of data and everything is shown perfectly in our Statistics section. You can get any data that you need from this section with Piecharts, Bar Charts and many other options available.
First in this section the overall statics of the Addon is shown in Black tabs. The sections that are shown in tabs are Total Classes, Total Courses, Total Lessons, Total Quizzes, Total Questions, Total Assignments, Total Packages, Total Students, Total Instrutors, Courses - Total Purchases, Courses - Under Progress, Courses - Under Evaluation, Courses - Completed, Courses - Badges Issued, Courses - Certificates Issued, Classes - Total Purchases, Classes - Under Progress, Classes - Under Evaluation, Classes - Completed, Classes - Badges Issued, Classes - Certificates Issued.Then comes the chart section. There are 2 big charts (PIE Chart and Bar Chart) showing the overall items added so far. You can see your overall details of Total Classes, Total Courses, Total Lessons, Total Quizzes, Total Questions, Total Assignments, Total Packages using those 2 charts in this section.
14.1.1) Overall Purchases
Overall purchases show the purchased details of class purchases, course purchases, and packages purchases of all the authors totally. You can see these details in daily, monthly and all time. By default the details are shown in daily. And also you can see these details for individual instructor. Select the instructor from the dropdown and it will automatically loads the details for class purchases, course purchases, and packages purchases. You can see the details in a bar chart with daily, monthly and all time purchases.
14.1.2) Class Purchases
You can see the class purchase details in daily, monthly and all time. By default the details are shown in daily. And also you can also view the class purchase details for individual instructor. Select the instructor from the dropdown and it will automatically load the details of class purchases of that particular instructor. You can see the details in a bar chart with daily, monthly and all time purchases.
14.1.3) Course Purchases
You can see the course purchase details in daily, monthly and all time. By default the details are shown in daily. And also you can also view the course purchase details for individual instructor. Select the instructor from the dropdown and it will automatically load the details of course purchases of that particular instructor. You can see the details in a bar chart with daily, monthly and all time purchases.
14.1.4) Package Purchases
You can see the package purchase details in daily, monthly and all time. By default the details are shown in daily. And also you can also view the package purchase details for individual instructor. Select the instructor from the dropdown and it will automatically load the details of package purchases of that particular instructor. You can see the details in a bar chart with daily, monthly and all time purchases.
14.1.5) Instructor Earnings - Over Classes
You can see the details of instructor earned commissions for over classes. Choose the instructor from the dropdown and it will load the instructor earned commissions for classes, details with class name, commissions, classes total commission and bar chart for the each class commission.
Note: Please make sure that the Instructor is selected to get the details for instructor earning commissions - over classes.
14.1.6) Instructor Earnings - Over Courses
You can see the details of instructor earned commissions for over courses. Choose the instructor from the dropdown and it will load the instructor earned commissions for courses, details with course name, commissions, courses total commission and Pie chart for the each course commission.
Note: Please make sure that the Instructor is selected to get the details for instructor earning commissions - over courses.
14.1.7) Instructor Earnings - Over Period
You can see the details of instructor earned commissions for over period. Choose the instructor from the dropdown and it will load the instructor earned commissions for classes, courses and total commission with the bar chart details. You can see the details in a bar chart with daily, monthly and all time commissions.
Note: Please make sure that the Instructor is selected to get the details for instructor earning commissions - over courses.
Statistics Overview
14.2 Courses
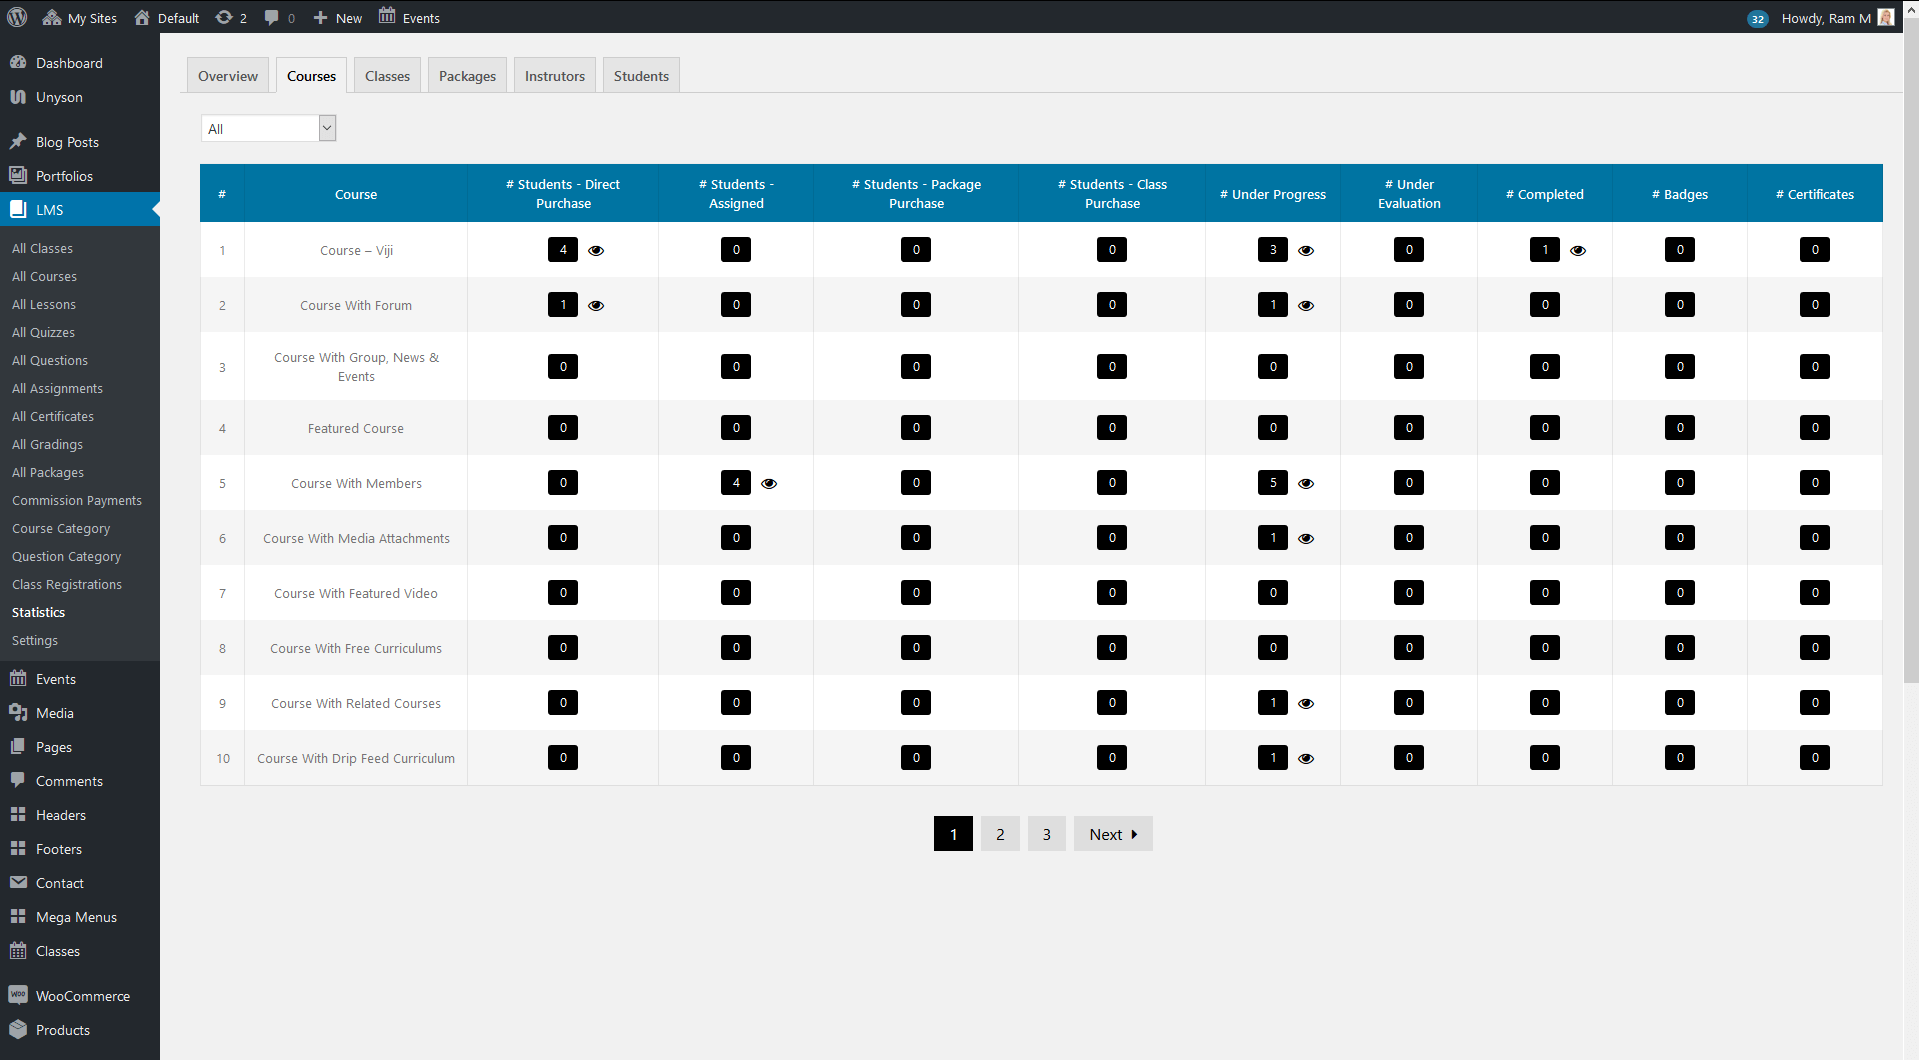
The Courses tab in the statistics section give us the details about the following details. Hovering the eye icon, the student names will be displayed for that particular count. The below mentioned counts can be viewed Instructor wise as well from the dropdown shown above the details table.
14.2.1) # Students - Direct Purchase
This column shows the count of the students who directly purchased the course. The count of each and every course which was purchased directly by the student can be viewed separately from this section.
14.2.2) # Students - Assigned
This column shows the count of the students who has been assigned to this course from Dashboard > LMS > Settings > Assigning > Course - Assign Students / Course - Assign Courses. The count of each and every course which has been assigned to the student can be viewed separately from this section.
14.2.3) # Students - Package Purchase
This column shows the count of the students who purchased the course which is inside the package. The count each and every course purchased by the student which is inside the package can be viewed separately from this section.
14.2.4) # Students - Class Purchase
This column shows the count of the students who purchased the course which is inside the class. The count each and every course purchased by the student which is inside the class can be viewed separately from this section.
14.2.5) # Under Progress
This column shows the count of the particular course if any students are under progress in that course, i.e., the students are currently taking that course and they have not yet completed that course.
14.2.6) # Under Evaluation
This column shows the count of the particular course if it has been submitted by the student and waiting for the instructor or admin for evaluation.
14.2.7) # Completed
This column shows the count of the particular course if it has been completed by the student. Completed state means that, student submitted the courses and the instructor or admin has evaluated it.
14.2.8) # Badges
This column shows the count of the badges that has been issued for the particular course.
14.2.9) # Certificates
This column shows the count of the certificates that has been issued for the particular course.
14.3 Classes
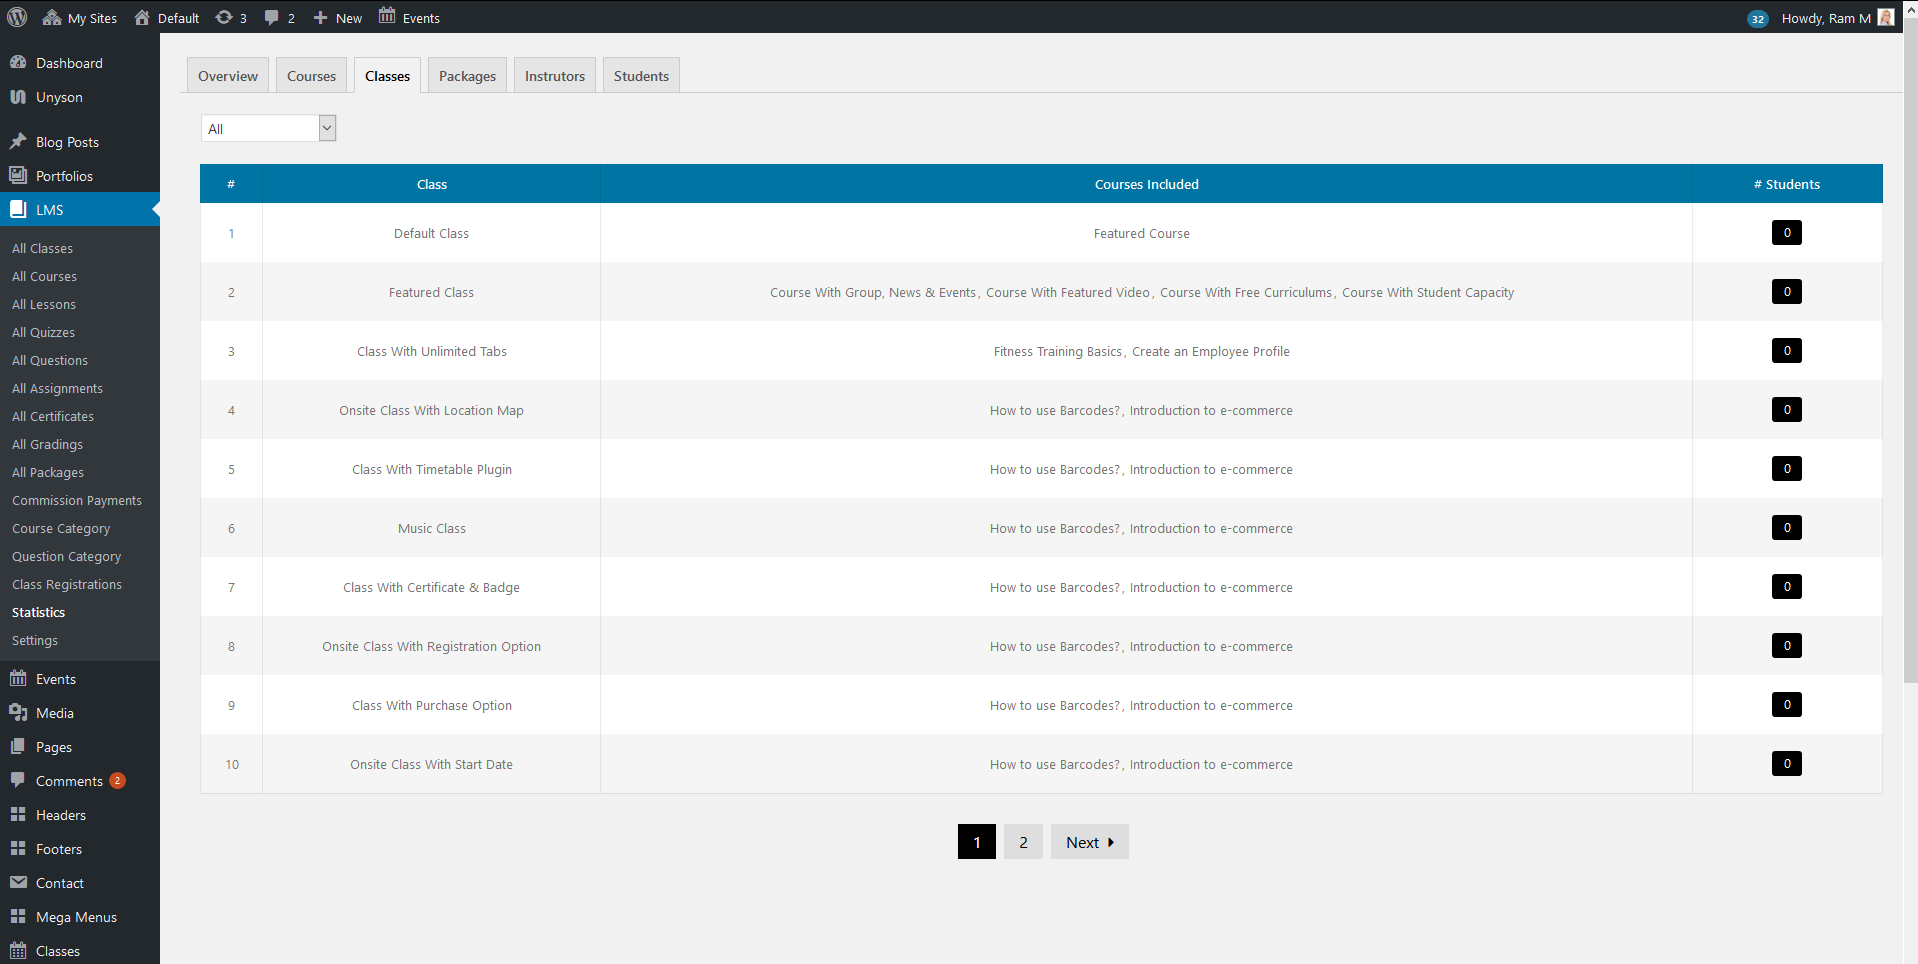
The Classes tab in the statistics section give us the count of the students who have purchased that particular class and the courses that are included in that particular class. Hovering the eye icon, the student names will be displayed for that particular count. The student purchase counts can be viewed Instructor wise as well from the dropdown shown above the details table.
14.4 Packages
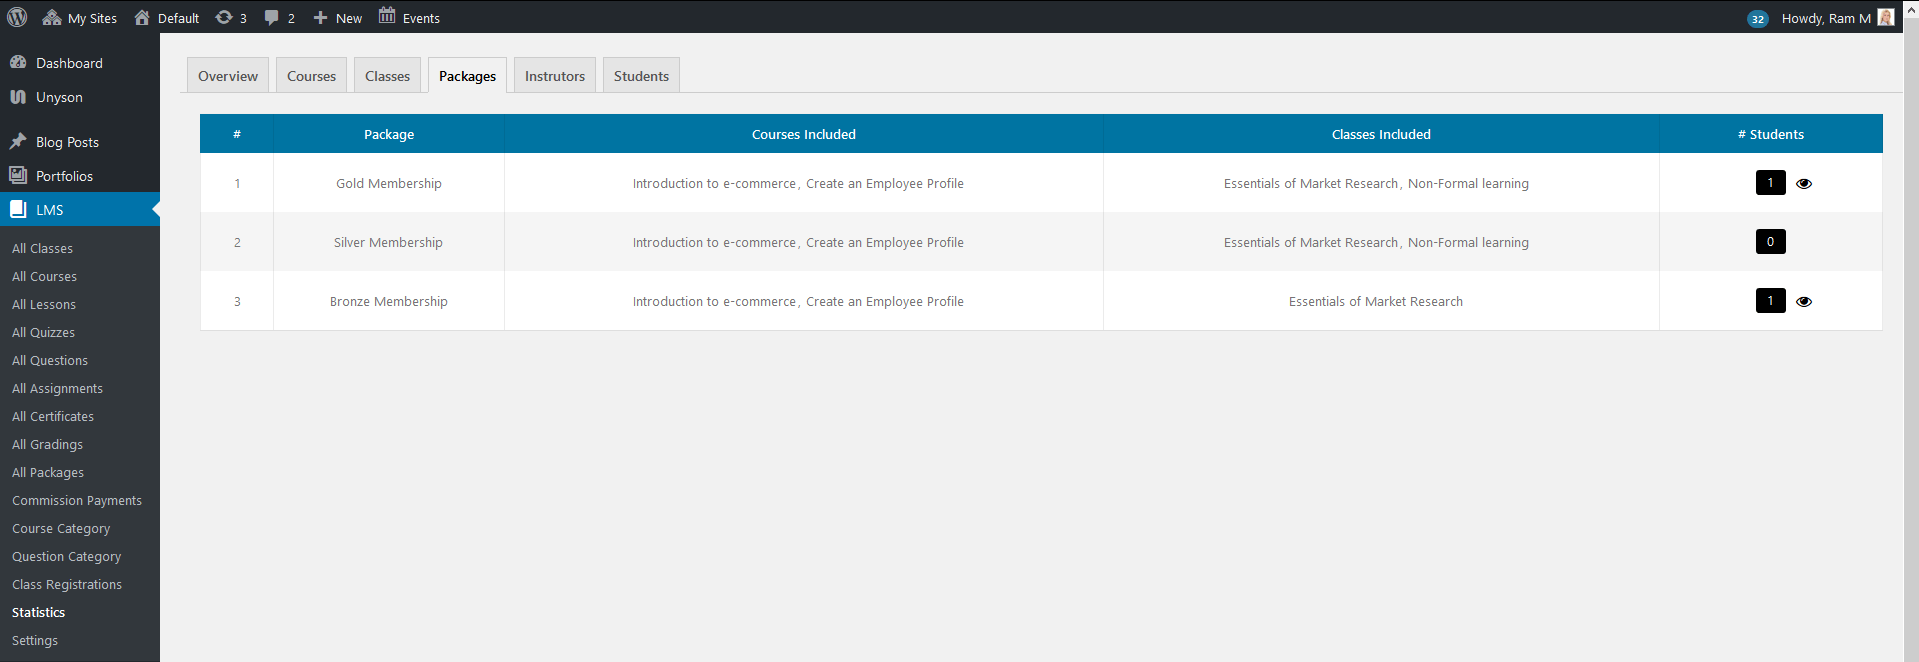
The Packages tab in the statistics section give us the count of the students who have purchased that particular package and the courses that are included in that particular package. Hovering the eye icon, the student names will be displayed for that particular count. The student purchase counts can be viewed Instructor wise as well from the dropdown shown above the details table.
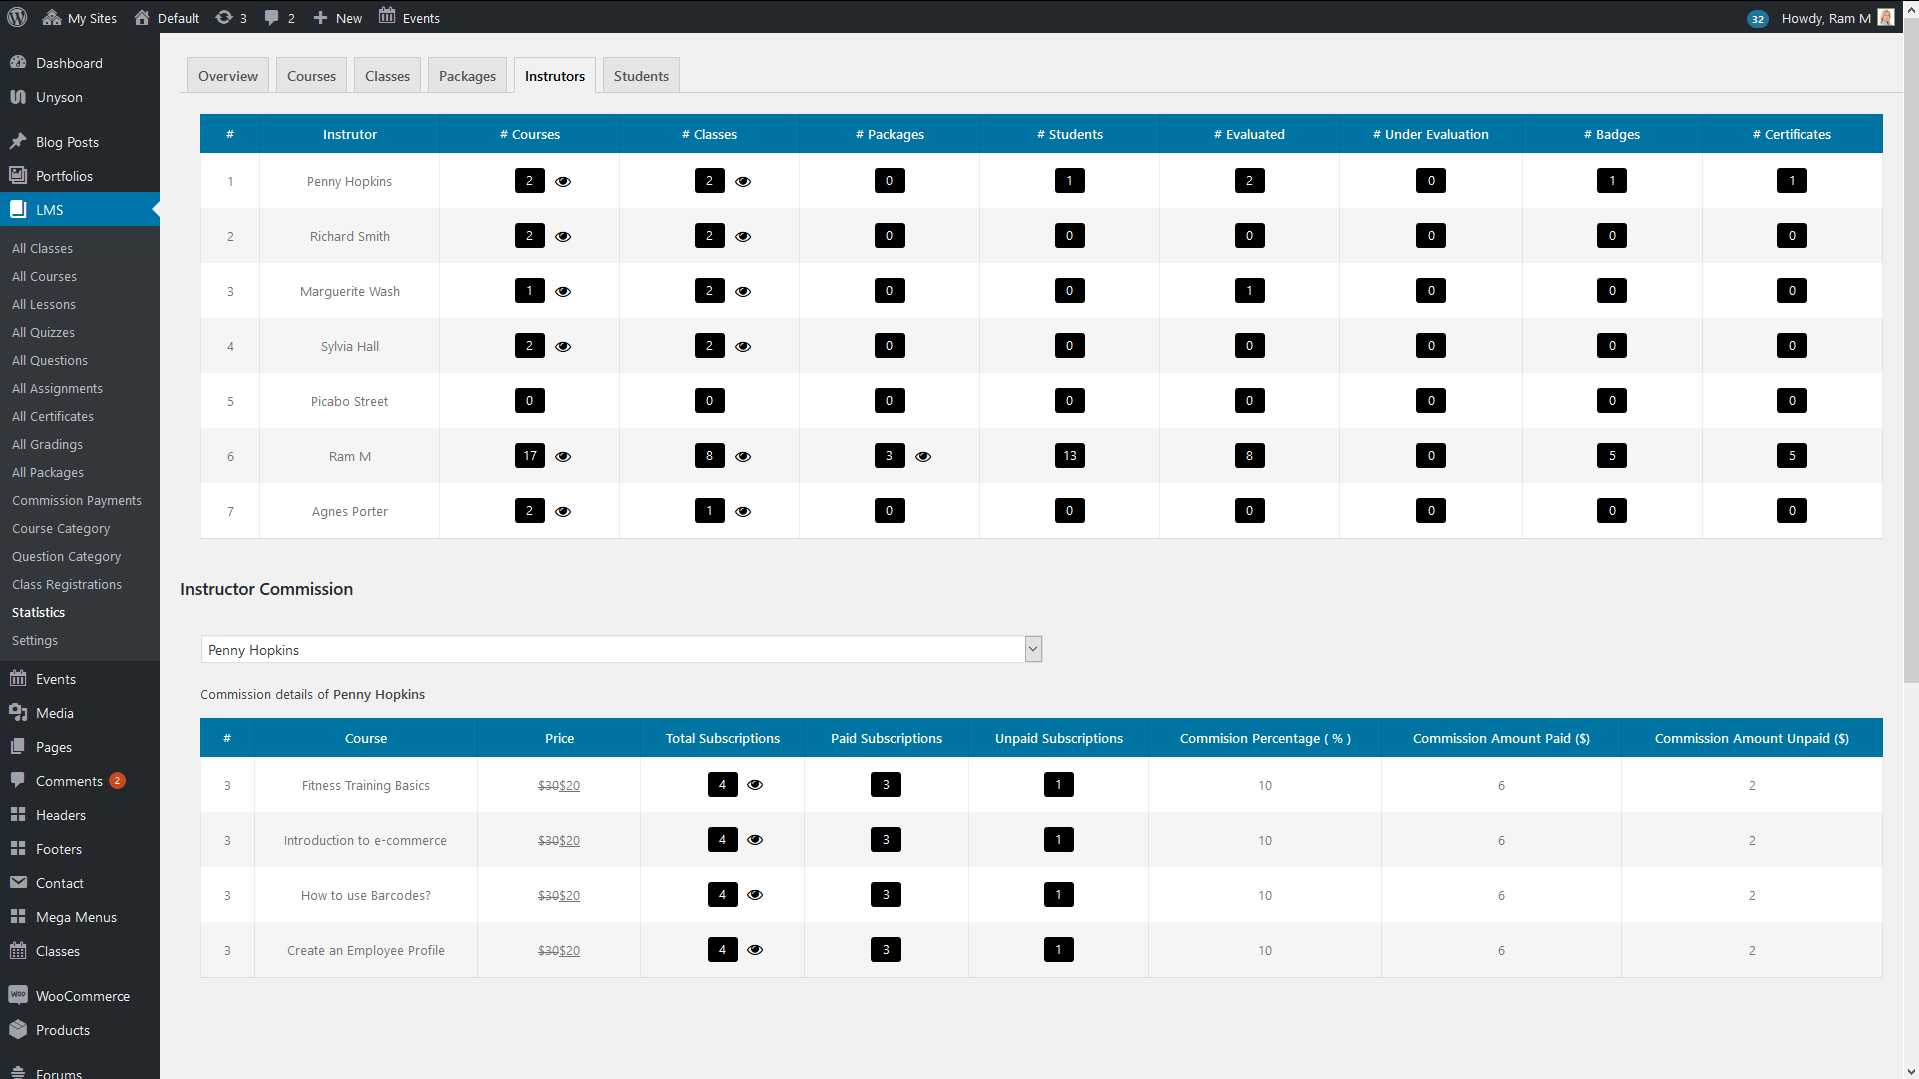
14.5 Instructors
The Students tab in the statistics section give us the count of the following,
14.5.1) # Courses
This column shows the total number of courses posted by the particular instructor.
14.5.2) # Classes
This column shows the total number of classes posted by the particular instructor.
14.5.3) # Packages
This column shows the total number of packages posted by the particular instructor.
14.5.4) # Students
This column shows the total number of students who have purchased from the particular instructor.
14.5.5) # Evaluated
This column shows the total number of items evaluated which are posted by the particular instructor.
14.5.6) # Under Evaluation
This column shows the total number of items under evaluation which are posted by the particular instructor.
14.5.7) # Badges
This column shows the total number of badges issued for the items posted by the particular instructor.
14.5.8) # Certificates
This column shows the total number of certificates issued for the items posted by the particular instructor.
14.5.9) # Instructor Commission
This Instructor Commission section shows the following details of particular instructor.
Price - This column shows the regular price and sale price of the particular course/class from the selected instructor.
Total Subscriptions - This column shows the total number of purchases for the particular course/class from the selected instructor.
Paid Subscriptions - This column shows the total number of subscriptions that are paid. That is, if 10 coursse/classes has been purchased from the selected instructor and if the commission for the instructor is only paid for 5 courses/classes. Then the Paid Subscriptions is 5.
Unpaid Subscriptions - This column shows the total number of subscriptions that are not paid.
Commission Percentage ( % ) - This column shows the Commission Percentage ( % ) of the particular course/class for the selected instructor.
Commission Amount Paid ($) - This column shows the Commission Amount Paid for the selected instructor.
Commission Amount Unpaid ($) - This column shows the Commission Amount Unpaid for the selected instructor.
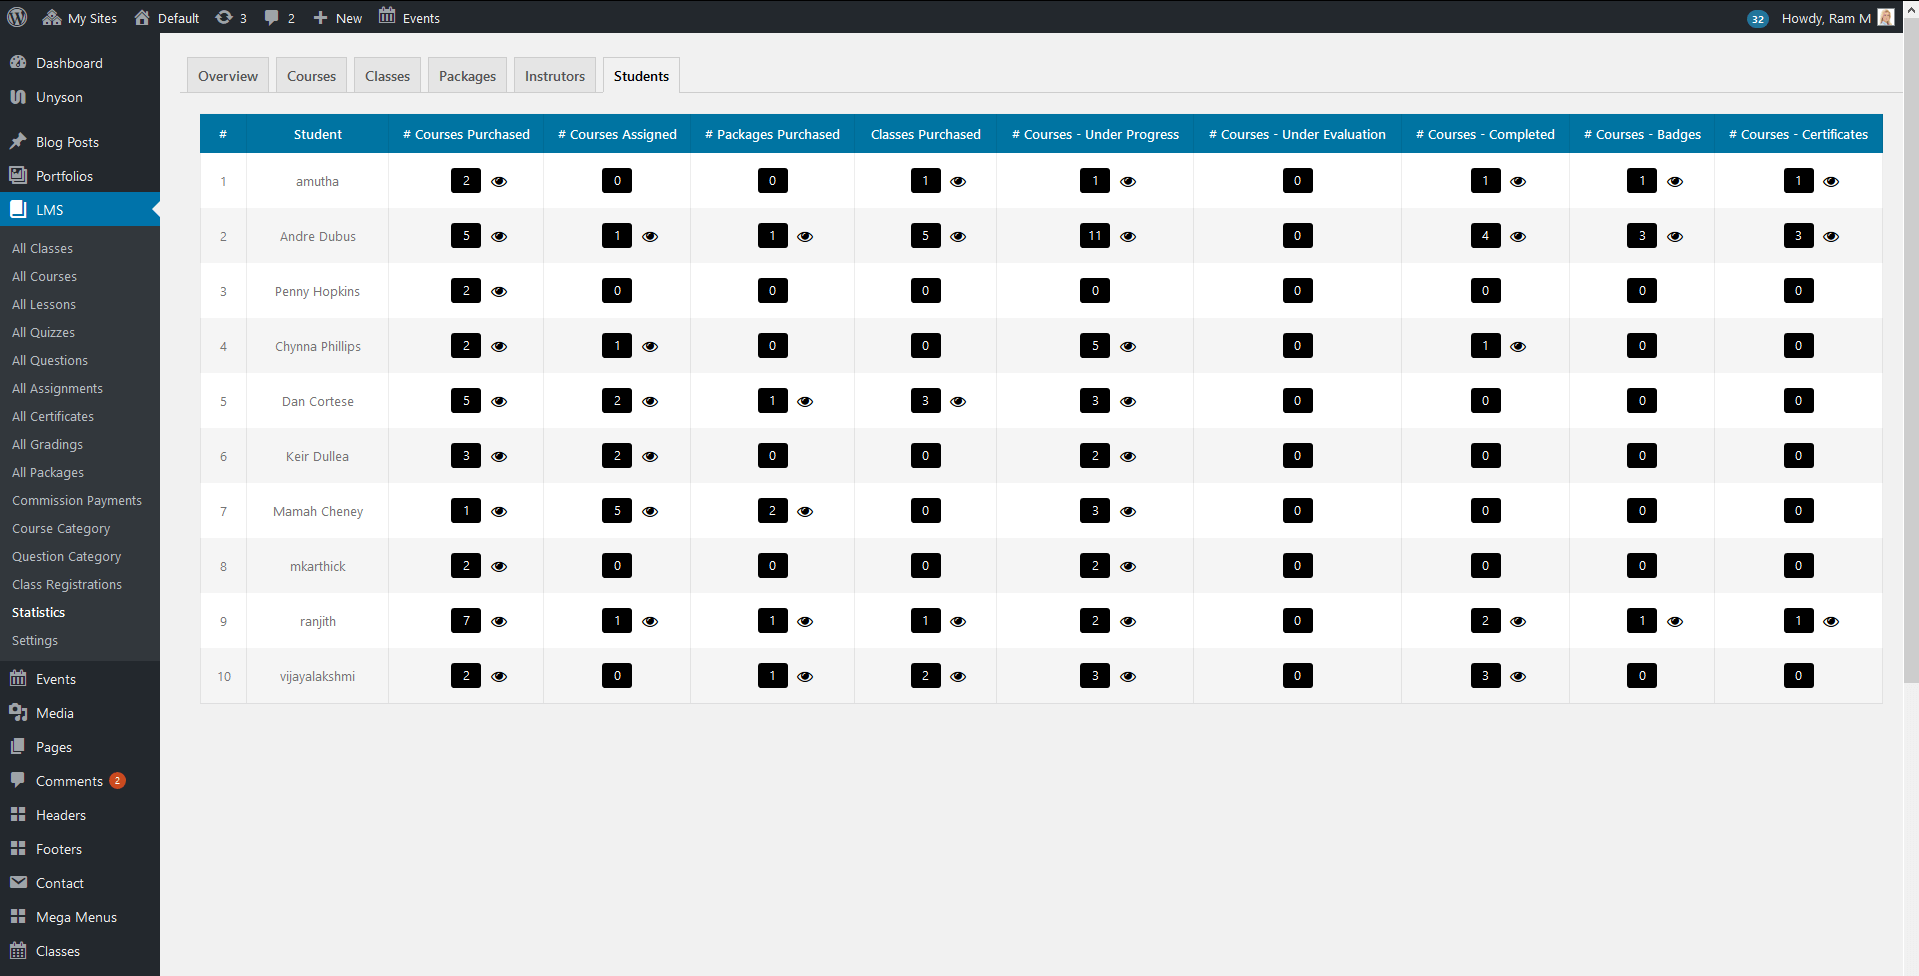
14.6 Students
The Students tab in the statistics section give us the count of the following,
14.6.1) # Courses Purchased
This column shows the total number of courses purchased by the particular student.
14.6.2) # Courses Assigned
This column shows the total number of courses assigned to the particular student.
14.6.3) # Packages Purchased
This column shows the total number of packages purchased by the particular student.
14.6.4) # Classes Purchased
This column shows the total number of classes purchased by the particular student.
14.6.5) # Courses - Under Progress
This column shows the total number of Courses that are under progress and not completed by the particular student.
14.6.6) # Courses - Under Evaluation
This column shows the total number of courses that are submitted by the particular student and which are under evaluation by the instructor or admin.
14.6.7) # Courses - Completed
This column shows the total number of courses completed by the particular student. Completed state means that, student submitted the courses and the instructor or admin has evaluated it.
14.6.8) # Courses - Badges
This column shows the total number of Badges that the particular student has gained.
14.6.9) # Courses - Certificates
This column shows the total number of Certificates that the particular student has gained.
Courses Statistics
Classes Statistics
Packages Statistics
Instructor Statistics
Student Statistics
15Settings
The LMS Addon all main features can be controlled and customized from this settings section. Mainly the General Settings, Assigning Settings, Commission settings, Point Of Contact settings, Import settings, Skin settings and Typography Settings.
15.1General
15.1.1) GENERAL SETTINGS
1. Allow Instructors to set commission for their courses & classes- You can enable or disable this option to allow Instructors to set commission for their courses & classes. If it is not enabled, then the Set Commission tab will not be viewed by the Instructor.
2. Instructor Singular Label - Here you can set your instructor singular label. This will update the instructor label throughout the site.
For E.g: Instructor / Author / Teacher
3. Instructors Plural Label - Here you can set your instructor plural label. This will update the instructor label throughout the site.
For E.g.: Instructors / Authors / Teachers
4. Administrator Dashboard Content - Here you can choose the page for administrator dashboard. You can design your own admin dashboard using the Visual Composer available modules or the shortcodes available in a new page and choose that page in this dropdown. If not chosen, the default page layout will be applied for the Administrator Dashboard.
5. Instrutor Dashboard Content - Here you can choose the page for Instrutor dashboard. You can design your own admin dashboard using the Visual Composer available modules or the shortcodes available in a new page and choose that page in this dropdown. If not chosen, the default page layout will be applied for the Instrutor Dashboard.
6. Student Dashboard Content - Here you can choose the page for Student dashboard. You can design your own admin dashboard using the Visual Composer available modules or the shortcodes available in a new page and choose that page in this dropdown. If not chosen, the default page layout will be applied for the Student Dashboard.
7. Add Instructor role to administrator - You can enable or disable this option to add Instructor role to administrator. If you wish you can enable this option to act Instructor as administrator. If this is enabled the administrator will also be listed in the dropdowns where the instructors are listed.
8. Google Map - API Key – Here you can add your google map API key. The Google maps are shown in Onsite Class pages in the location tab and also in the same Onsite Class page backend there is feature to get the GPS Location. For these 2 features this API key field is needed. To generate a new API key, please click the link below.
https://developers.google.com/maps/documentation/javascript/get-api-key
9. Backend - Post Per Page – Enter the number of items to show in backend content listing, ex. statistics,
10. Frontend - Post Per Page - Enter the number of items to show in front-end course and class result popup.
Progress bar Color – You can choose your own progress bar color. Select a color from progress bar color palette.
11. Enable Instructor Menu - If you wish you can enable this option to get a separate menu location for Instructors. If any Instructors login to the site, and if any menu items are assigned to that menu location, then that menu items will be shown for the instructor.
12. Enable Student Menu - If you wish you can enable this option to get a separate menu location for Student. If any Student login to the site, and if any menu items are assigned to that menu location, then that menu items will be shown for the student.
General Settings
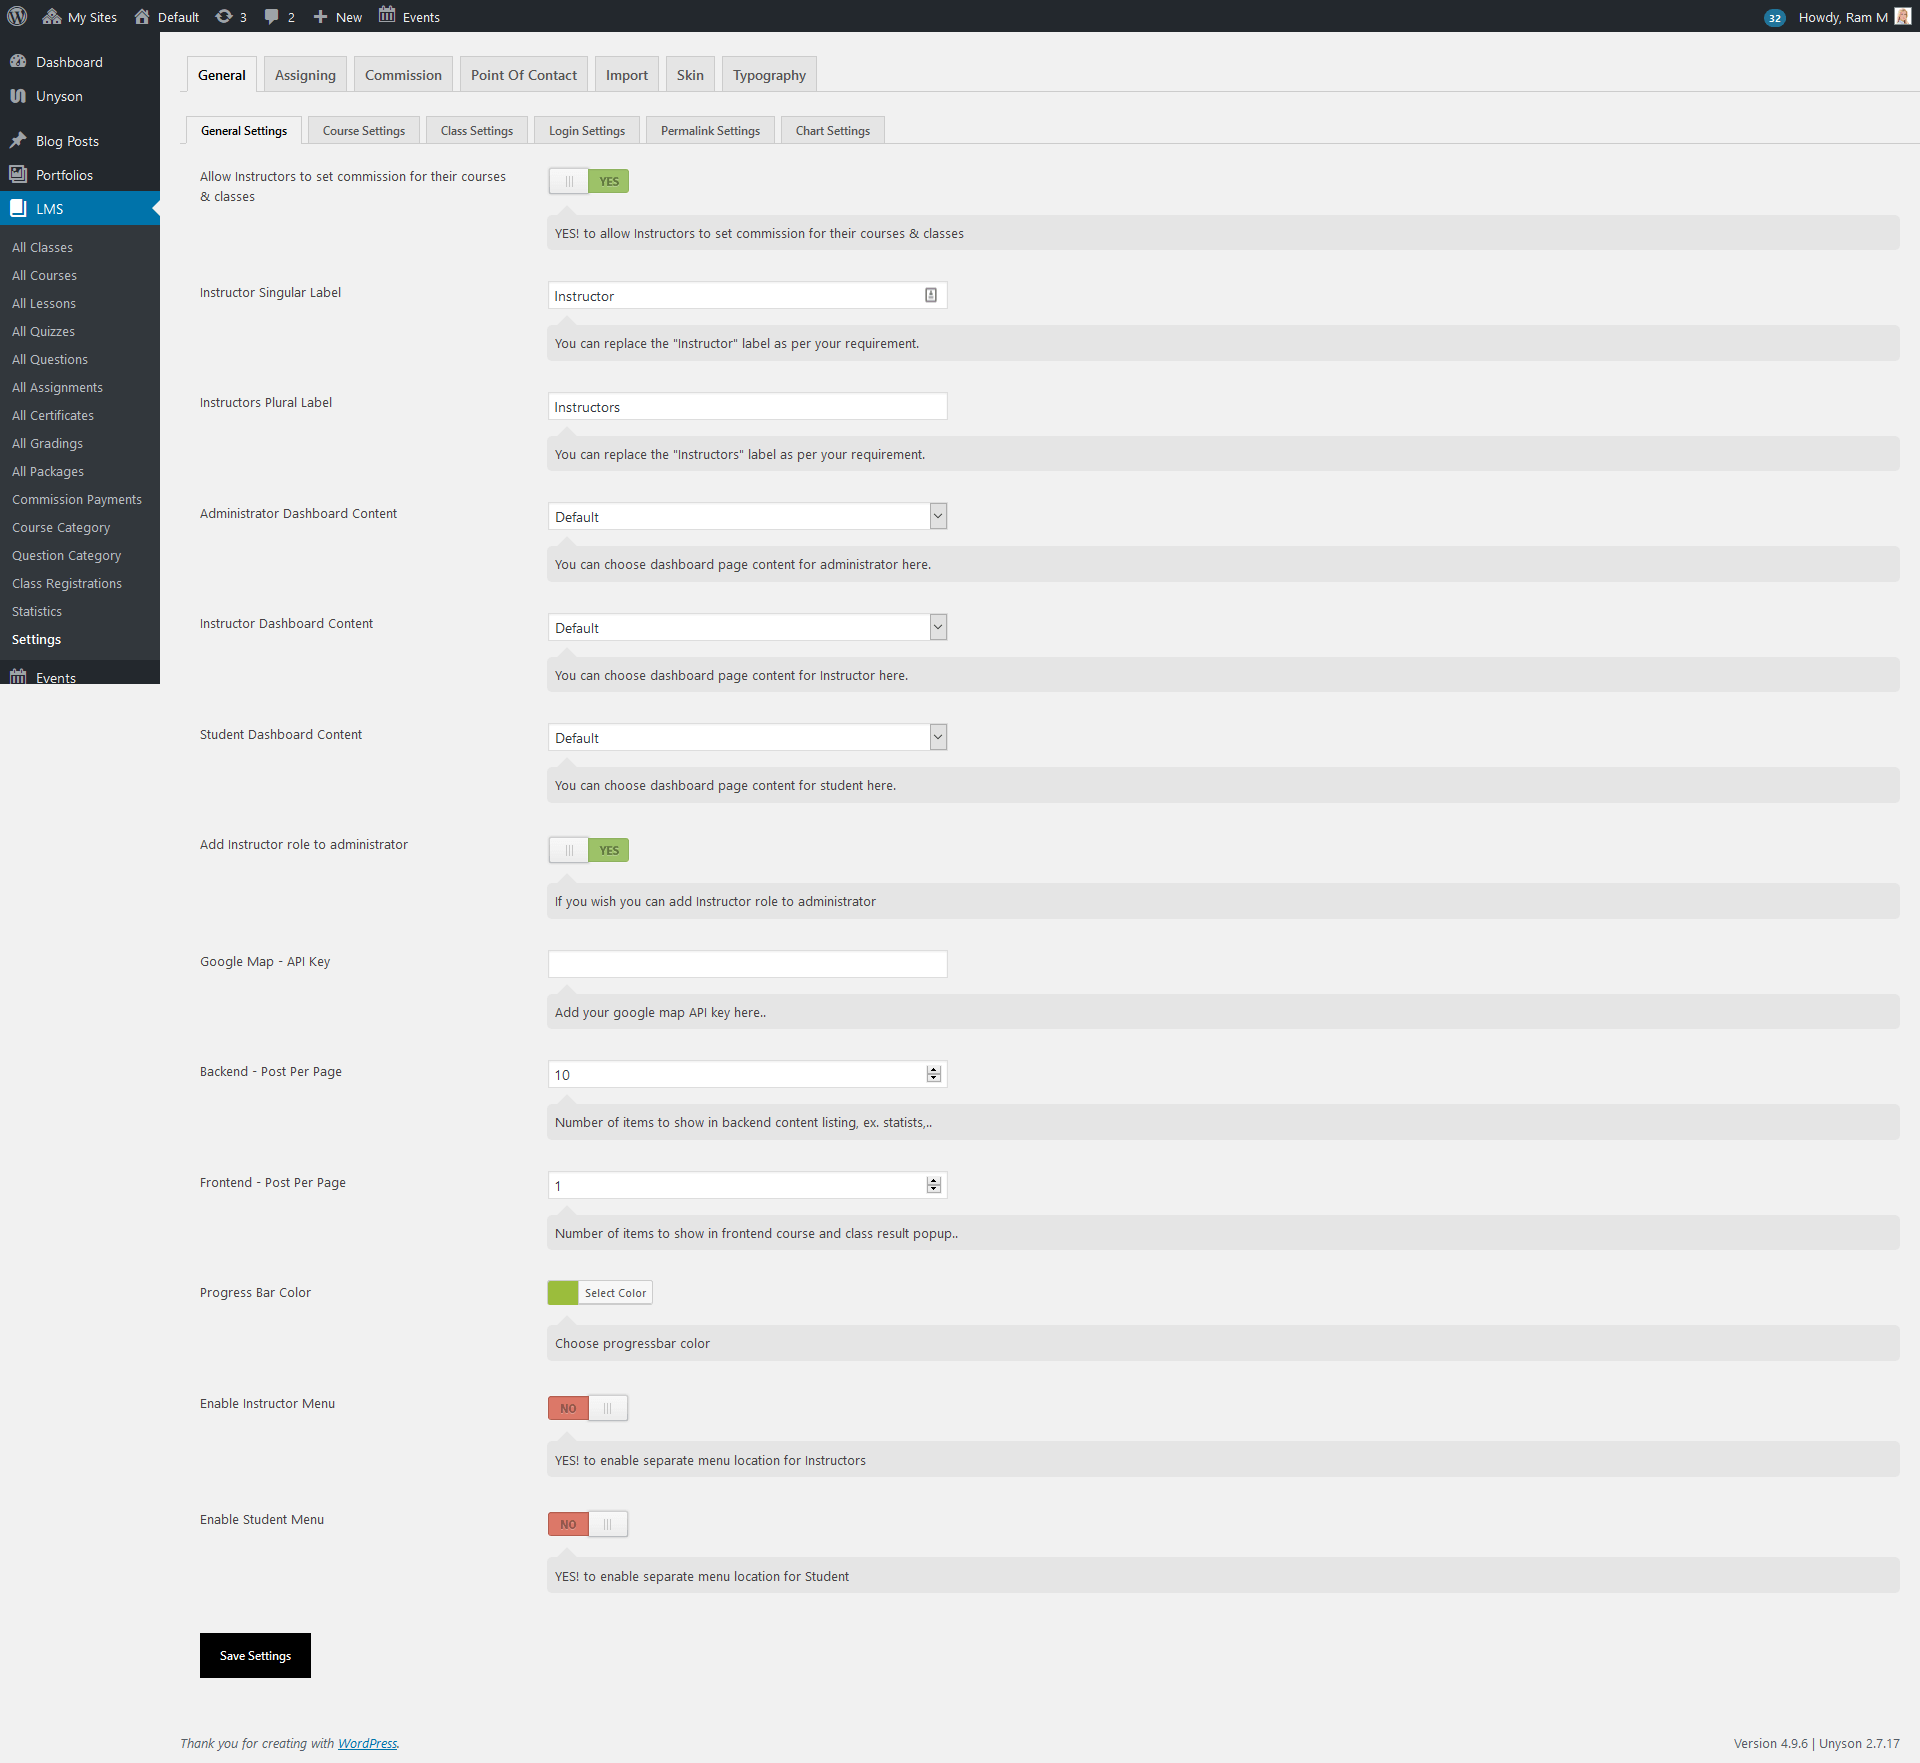
15.1.2) COURSE SETTINGS
1. Enable Count Down Timer - Course Start Date - If the Courses start date is set for any future dates, then you can use this feature to enable the Count Down timer, until the course gets started.
2. Enable Contact Instrutor Options In Course Page - If this option is enabled, the course details page will have the option to send message through buddypress plugin or send email to the instructor.

3. Course Prerequisite - On Complete - Once this option is enabled, student will have to wait for prerequisite course to be evaluated. By default its enough if prerequisite course is submitted by student. Hope the Course Prerequisite is already explained in the Course details page.
4. Curriculum Visibility - - You can enable/disable the Curriculum tab in the course details page based the dropdown selection in this section. You can show/hide the curriculum tab to Everyone, Logged In Users, Purchased Users, Instructors and Administrators.
5. Members Visibility - - Similar to the Curriculum Visibility, you can show/hide the Members tab to Everyone, Logged In Users, Purchased Users, Instructors and Administrators.
6. Events Visibility - - Similar to the Curriculum Visibility, you can show/hide the Events tab to Everyone, Logged In Users, Purchased Users, Instructors and Administrators.
7. BuddyPress Group Visibility - - Similar to the Curriculum Visibility, you can show/hide the Group tab to Everyone, Logged In Users, Purchased Users, Instructors and Administrators.
8. News Visibility - - Similar to the Curriculum Visibility, you can show/hide the News tab to Everyone, Logged In Users, Purchased Users, Instructors and Administrators.
Course Settings
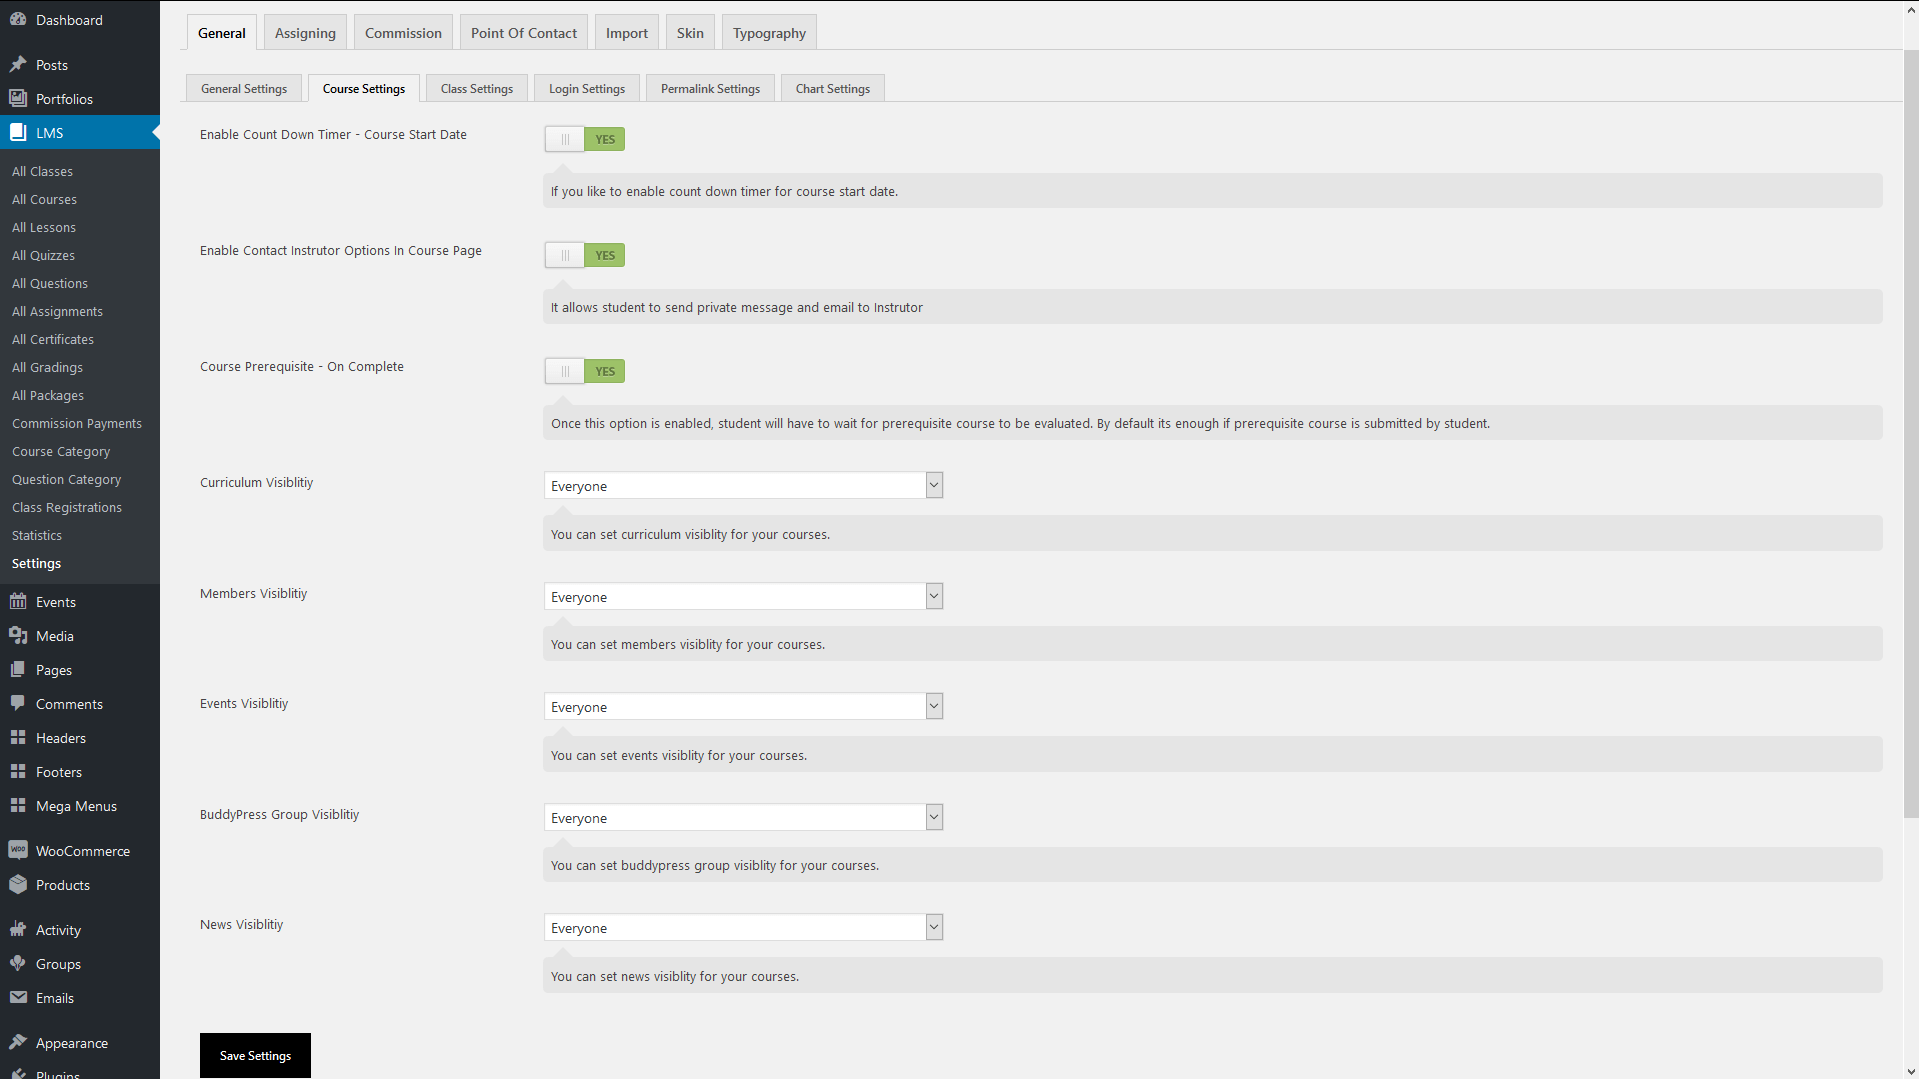
15.1.3) CLASS SETTINGS
1. Class Singular Label - Here you can set your Class singular label. This will update the Class label throughout the site.
2. Classes Plural Label - Here you can set your Classes singular label. This will update the Classes label throughout the site.
3. Enable Count Down Timer - Class Start Date - If the Classes start date is set for any future dates, then you can use this feature to enable the Count Down timer, until the class gets started.
4. Enable Contact Instructor Options In Class Page - - You can enable/disable the Curriculum tab in the course details page based the dropdown selection in this section. You can show/hide the curriculum tab to Everyone, Logged In Users, Purchased Users, Instructors and Administrators.

5. Class Registration - Without Login - - If you want the users to allow to Apply for Onsite courses without logging in, this option can be used. If this option is enabled, the logged out users can see the "Register" button for applying the onsite course. If this is not enabled, then the logged out users can see "Login to Apply" button for applying for the onsite course. By clicking the "Login to Apply" button the login popup will be opened.
6. Include Class In Commission - - If you like to include Classes in commission settings choose "Yes". If this option is not included, then the classes section will not be included in the Set Commission feature.
Class Settings
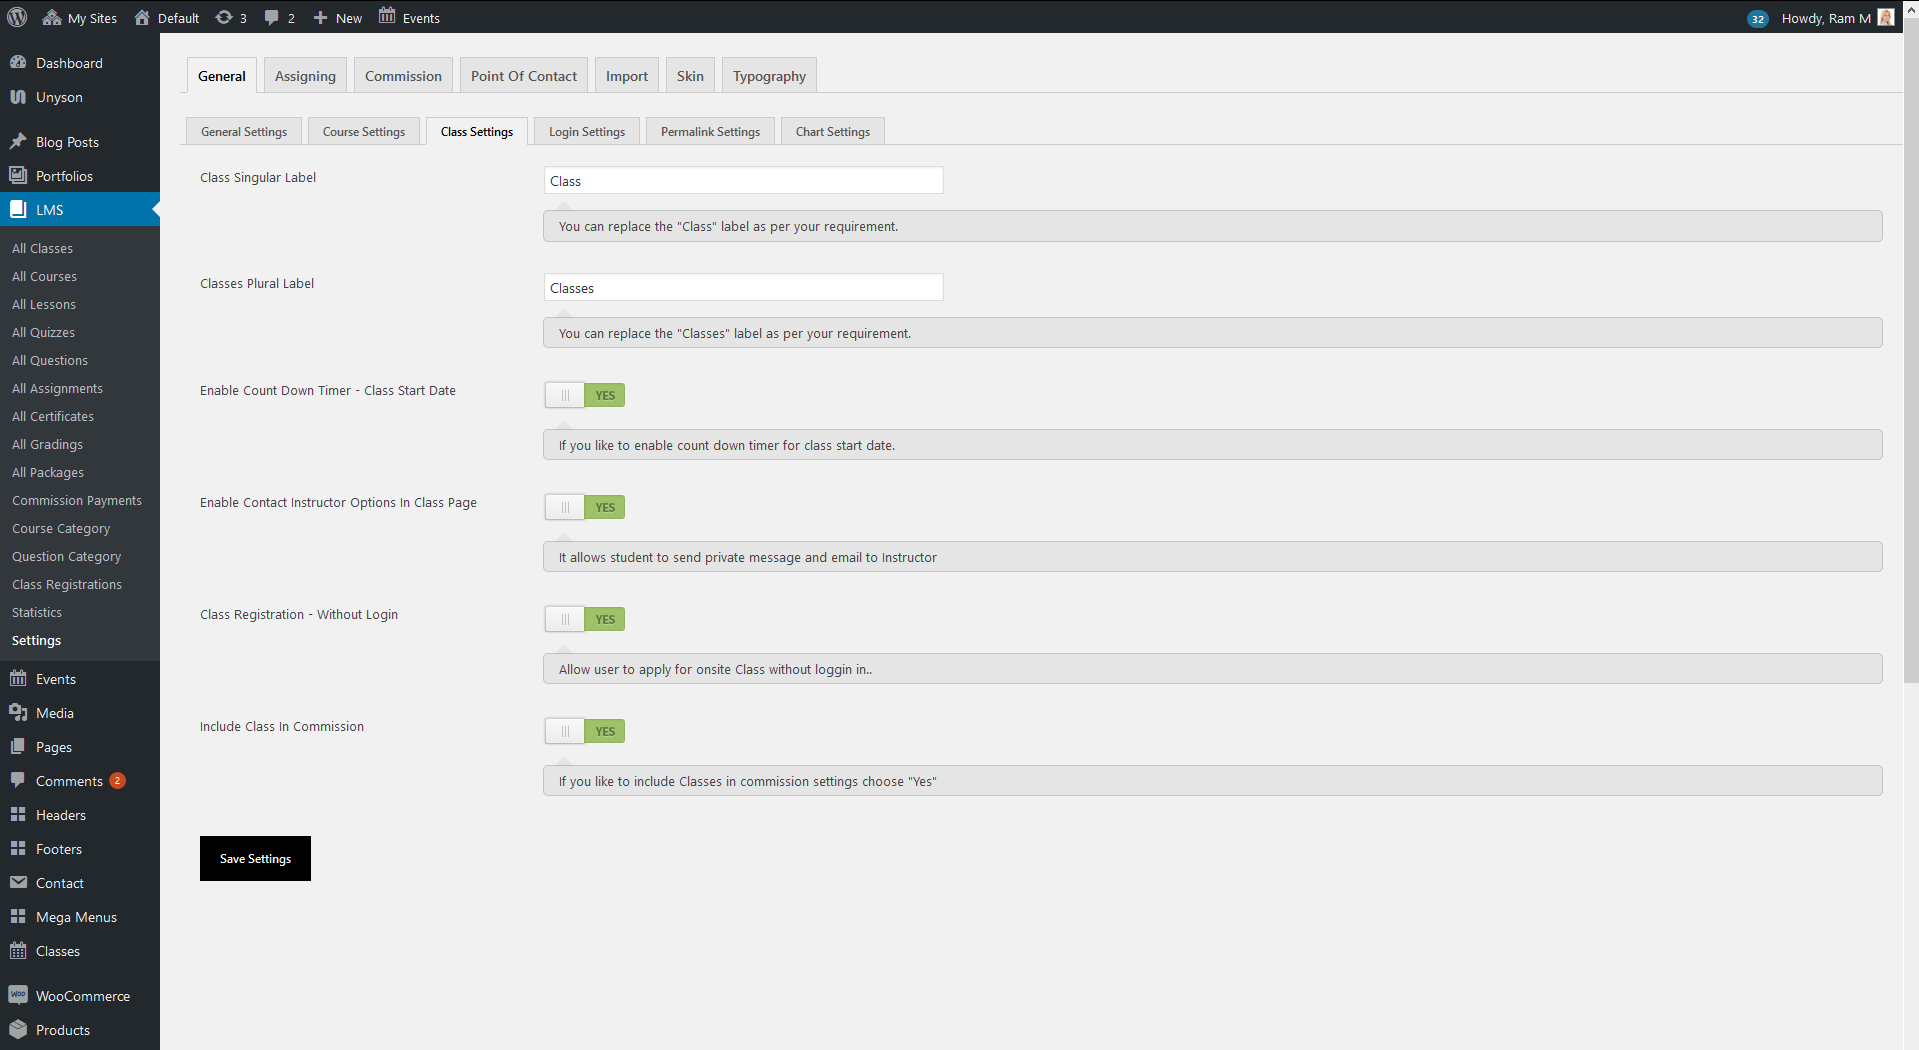
15.1.4) LOGIN SETTINGS
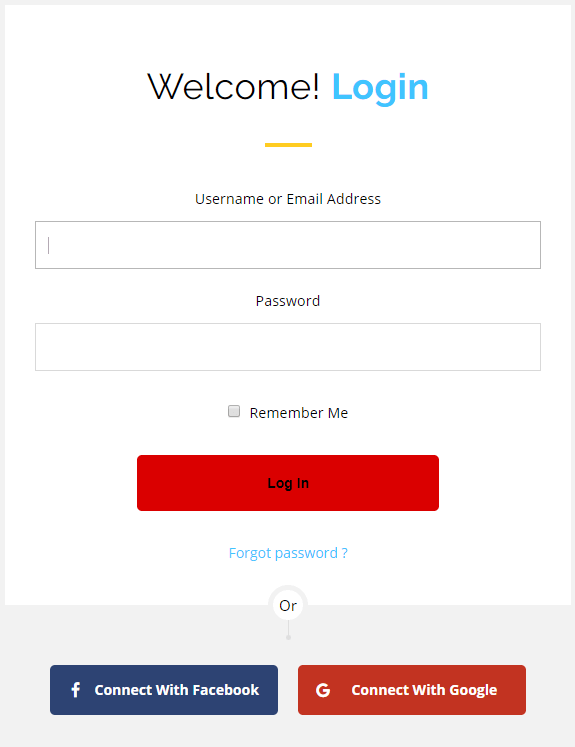
1. Enable Facebook Login - Enable the facebook login feature from this option.
2. App Id - Enter the Facebook App Id needed for the facebook login.
3. App Secret - Enter the Facebook App Secret needed for the facebook login.
4. Enable Google Login - Enable the Google Login feature from this option.
5. Client Id - Enter the Facebook Client Id needed for the Google login.
6. Client Secret - Enter the Facebook Client Secret needed for the Google login.
7. Administrator Login Redirect Page - If the administrator login from frontend, then choose a page where the administrator needs to be redirected after login. You can choose any pages from the dropdown list.
8. Instrutor Login Redirect Page - If the Instructor login from frontend, then choose a page where the Instructor needs to be redirected after login. You can choose any pages from the dropdown list.
9. Student Login Redirect Page - If the student logs in, then choose a page where the student needs to be redirected after login. You can choose any pages from the dropdown list.
Login Settings
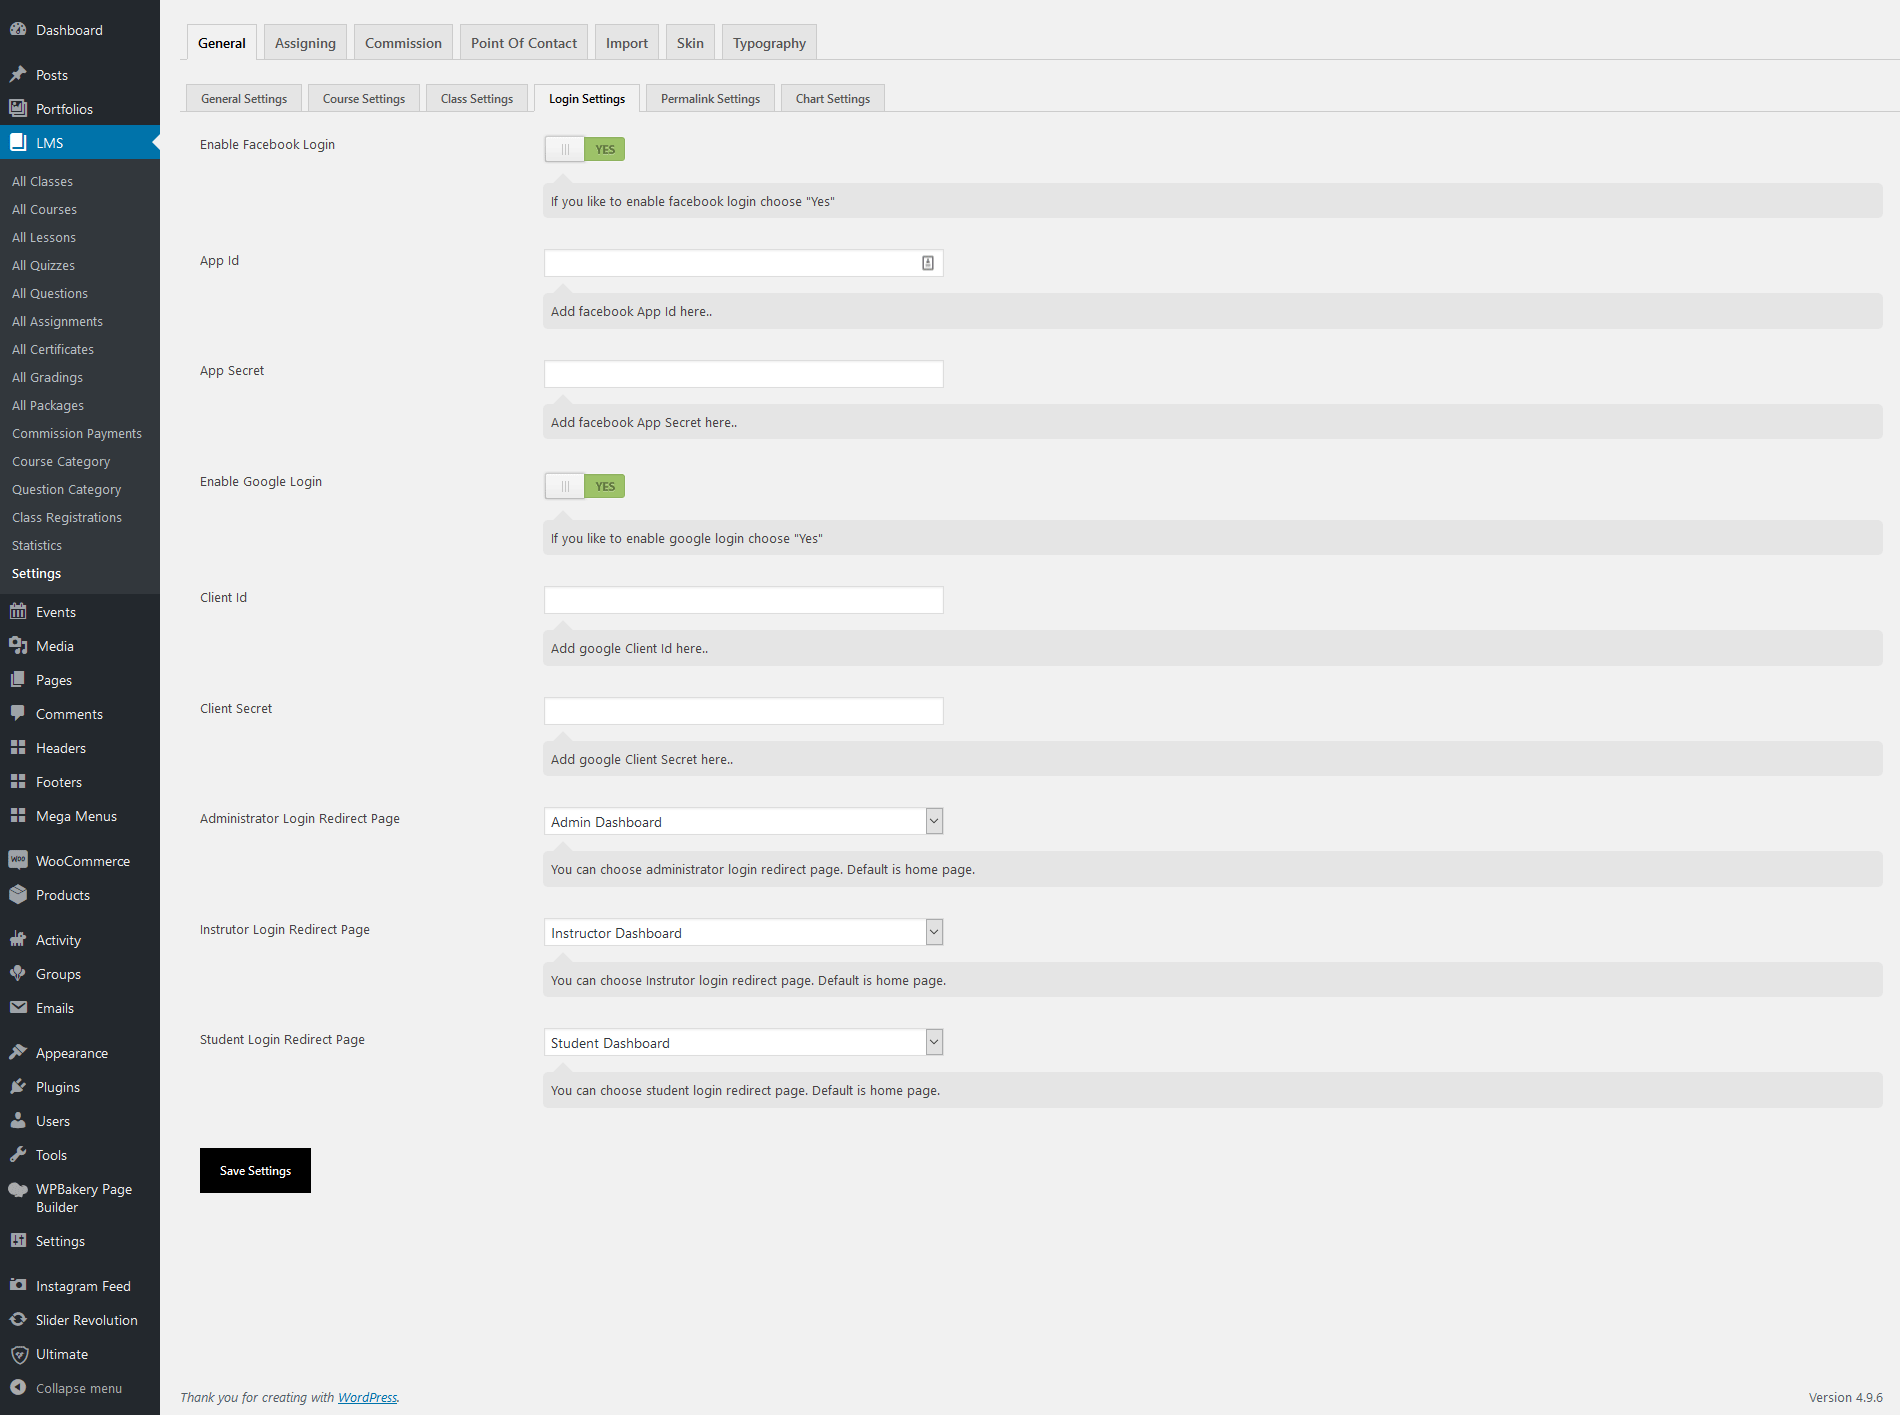
15.1.5) PERMALINK SETTINGS
1. Course Slug - From this option you can change the slug of the Courses details page. You can set the course page slug whatever needed. Do not use characters which are not allowed in links/urls. After updating the slug, go to Settings > Permalinks and click Save changes twice.
2. Course Category Slug - From this option you can change the slug of the Course Category page. You can set the course category page slug whatever needed. Do not use characters which are not allowed in links/urls. After updating the slug, go to Settings > Permalinks and click Save changes twice.
3. Class Slug - From this option you can change the slug of the Class details page. You can set the class page slug whatever needed. Do not use characters which are not allowed in links/urls. After updating the slug, go to Settings > Permalinks and click Save changes twice.
Permalink Settings

15.1.6) CHART SETTINGS
1. Color Options - We do have 12 color palette selectors for the PIE chart and Bar Chart. You can select your own colors for all the 12 color palettes. Those 12 colors will be shown in the PIE Chart and Bar chart one by one for each items.
2. Shuffle Colors - If you enable this option, the 12 colors will be shuffled upon in the PIE chart and Bar Chart for each page load.
3. Legend Position - The Legends position can be changed to Top, Right, Bottom or Left.
Chart Settings
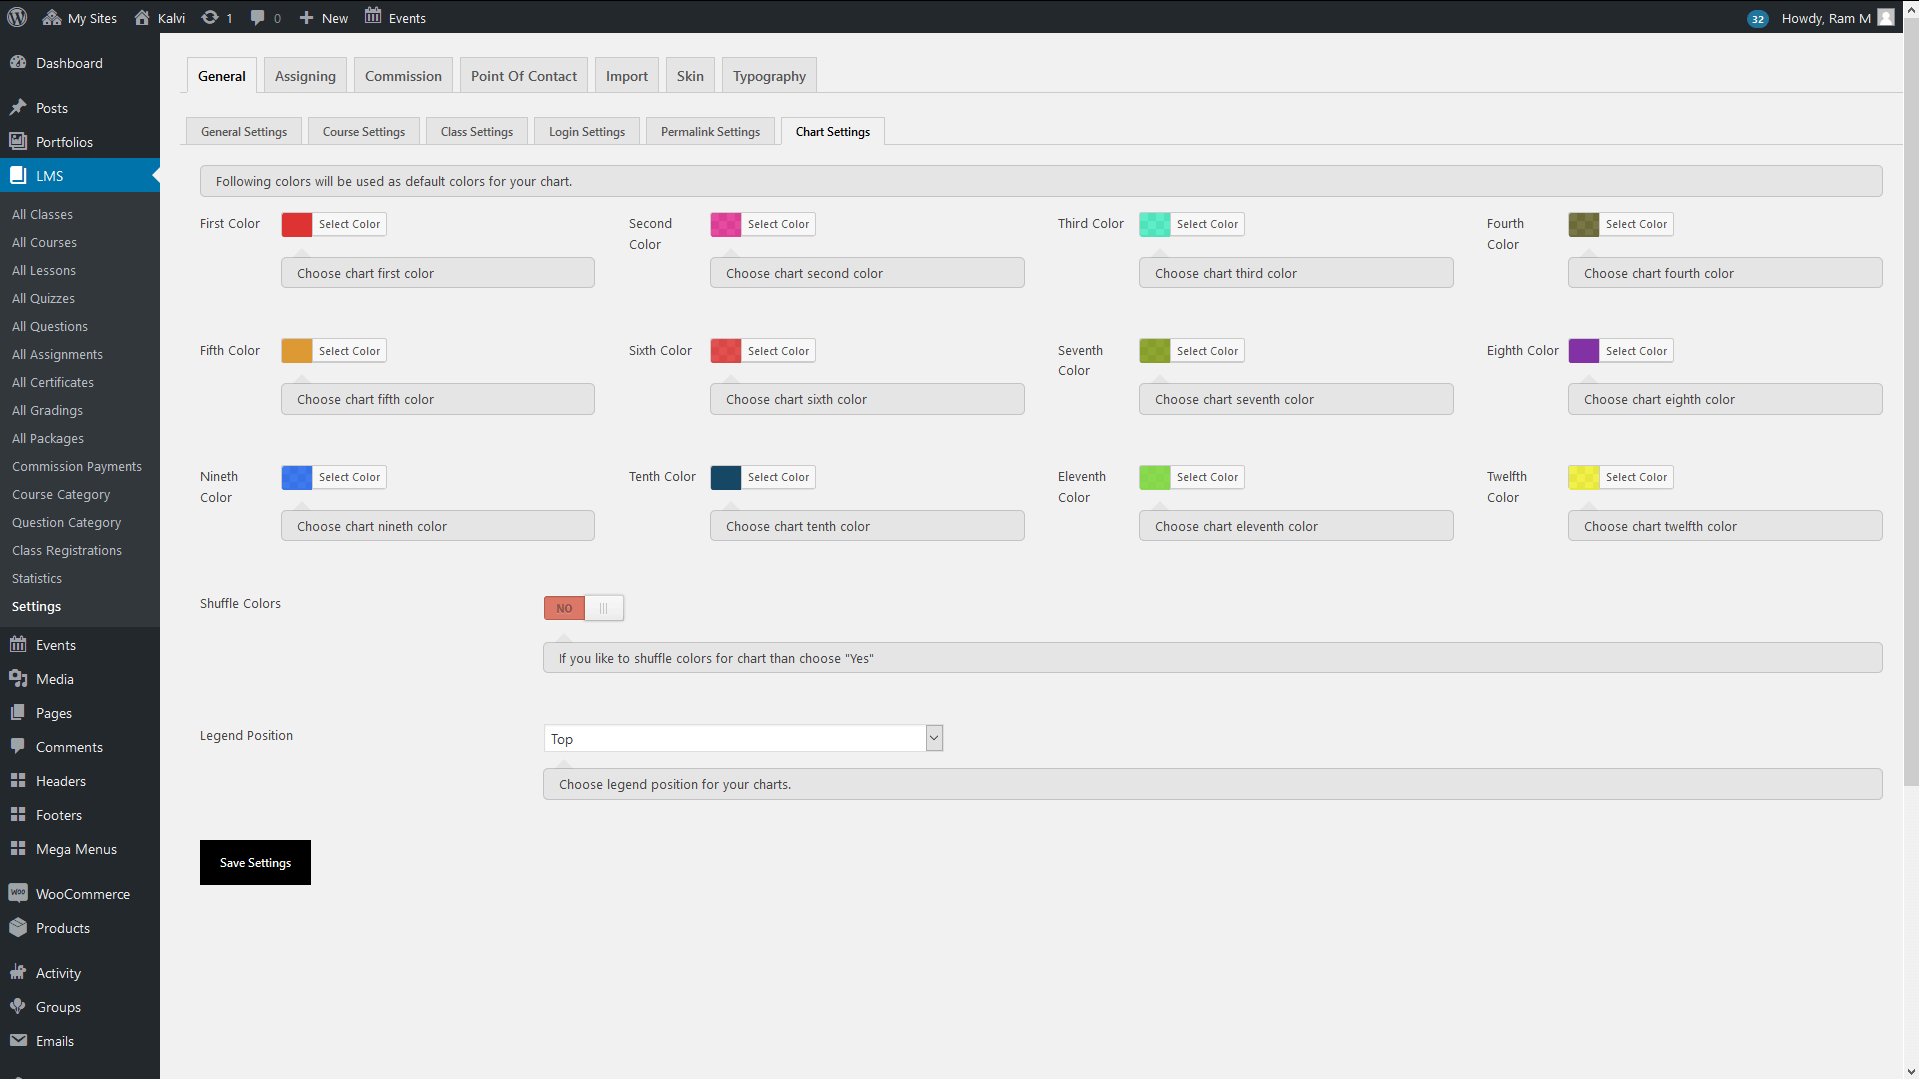
15.2Assigning Settings
From this assigning settings tab you can assign the Courses to Students, Students to Courses, Classes to Students and Students to Classes.
Note: Admin only can make these settings.
15.2.1) Course - Assign students
From this section, the admin can assign courses to individual stduents directly. Just select the course which needs to be assigned to the students, and the list of all students will be loaded. Just switch the button to "Yes" in the assigned column for the particular student and click "Assign" button at the bottom and the course will be assigned to that student automatically. The "Purchased" column shows whether the course is already purchased by the student or not.
15.2.2) Course - Assign courses
From this section, the admin can assign students to individual courses directly. Just select the student who needs to be assigned to the course, and the list of all courses will be loaded. Just switch the button to "Yes" in the "Assigned" column for the particular course and click "Assign" button at the bottom and the student will be assigned to that course automatically. The "Purchased" column shows whether the student has already purchased that course or not.
15.2.3) Class - Assign students
From this section, the admin can assign classes to individual stduents directly. Just select the class which needs to be assigned to the students, and the list of all students will be loaded. Just switch the button to "Yes" in the assigned column for the particular student and click "Assign" button at the bottom and the class will be assigned to that student automatically. The "Purchased" column shows whether the class is already purchased by the student or not.
15.2.4) Class - Assign classes
From this section, the admin can assign students to individual classes directly. Just select the student who needs to be assigned to the class, and the list of all classes will be loaded. Just switch the button to "Yes" in the "Assigned" column for the particular class and click "Assign" button at the bottom and the student will be assigned to that class automatically. The "Purchased" column shows whether the student has already purchased that class or not.
Course - Assign students

Course - Assign courses

Class - Assign students

Class - Assign classes

15.3Commission
In commission settings tab the administrator or the instructor can set the commission for the particular instructor or pay the commission for the particular instructor.
15.3.1) Set Commission
From this Set Commission tab the administrator can set the commission percentage for the particular instructor. Just select the Particular Instructor for which the Commission needs to be set and the Courses, Classes posted by the Instructor will be listed in a table format and there will be listed the price of the Course/Class and a number type textbox will be there for each Course/Class. Just mentioned the percentage (%) of the commission that needs to be set for the particular Course/Class and click "Save Settings". Thats it!!!
15.3.2) Pay Commission
From this Pay Commission tab only the administrator can pay the commission percentage for the particular instructor. Just select the Particular Instructor for which the Commission needs to be paid and select the "From Date", "To Date" and the Courses, Classes posted by the Instructor along with the Subscriptions, Commision Percentage ( % ), Amount To Pay ($) will be listed in a table format. Also there will be a textbox for "Instructor PayPal Email". The administrator needs to fill the paypal email of that particular instructor for making payment via paypal. Just select the Course/Class for which the commission is going to be paid from the Select Column by switching the button to "Yes". Once the button is switched to "Yes", the total amount will be automatically loaded. If you have any other amount to be paid for the instructor, just add that amount in Other Amount textbox and it will be added to the Total Amount ($) textbox.
Now Click the button "Pay Via Paypal" and a new tab will be opened to Paypal page with the amount that needs to be paid for that particular instructor. The administrator can make the payment from his paypal account. After that return back to the same Pay Commission page and click the button "Mark As Paid". This step needs to be done manually, since automatically we cannot detect if the payment from paypal is made or not.
Set Commission
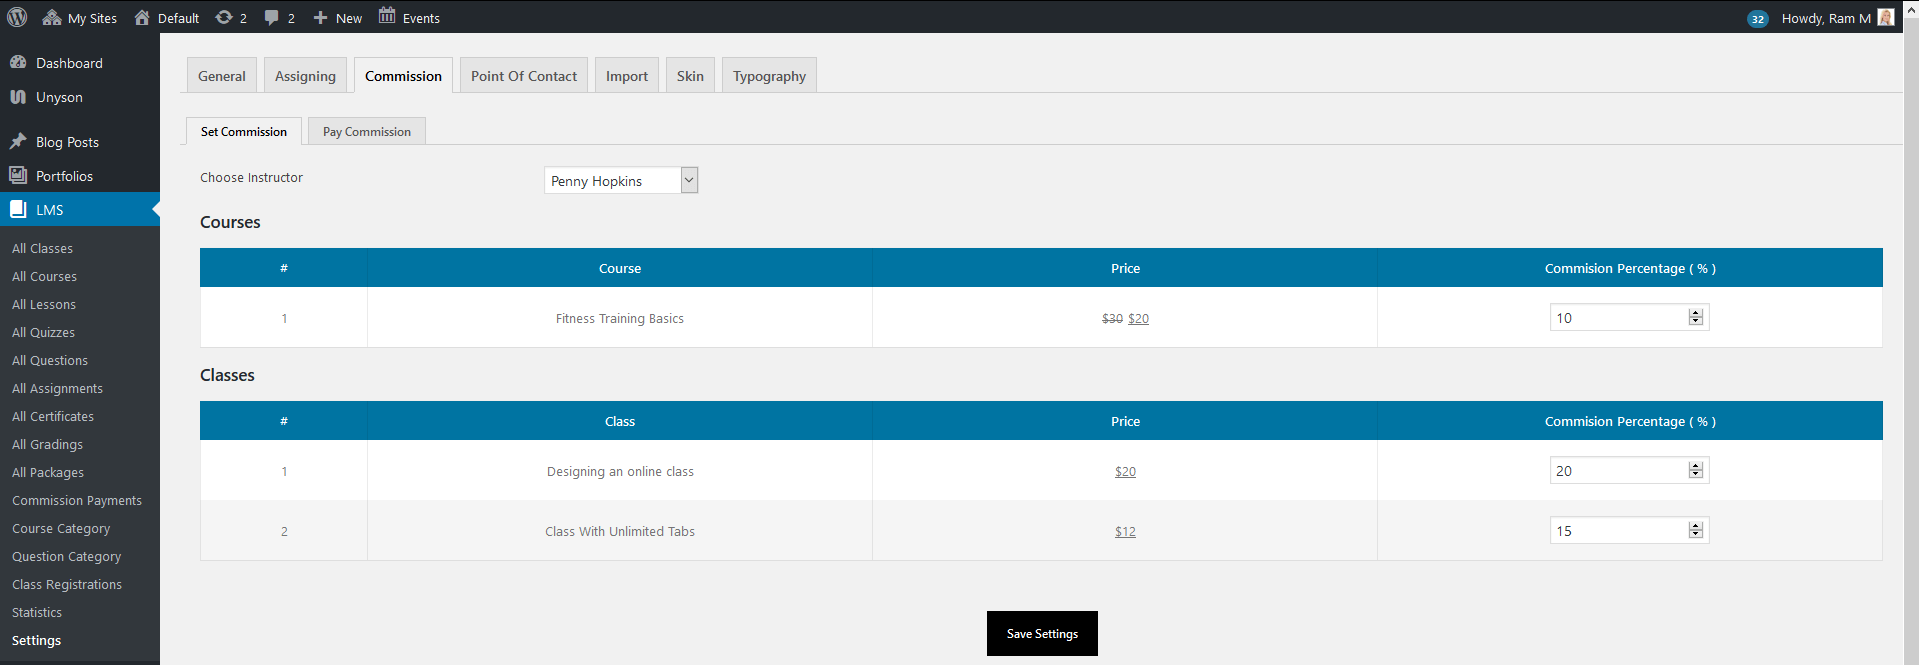
Pay Commission
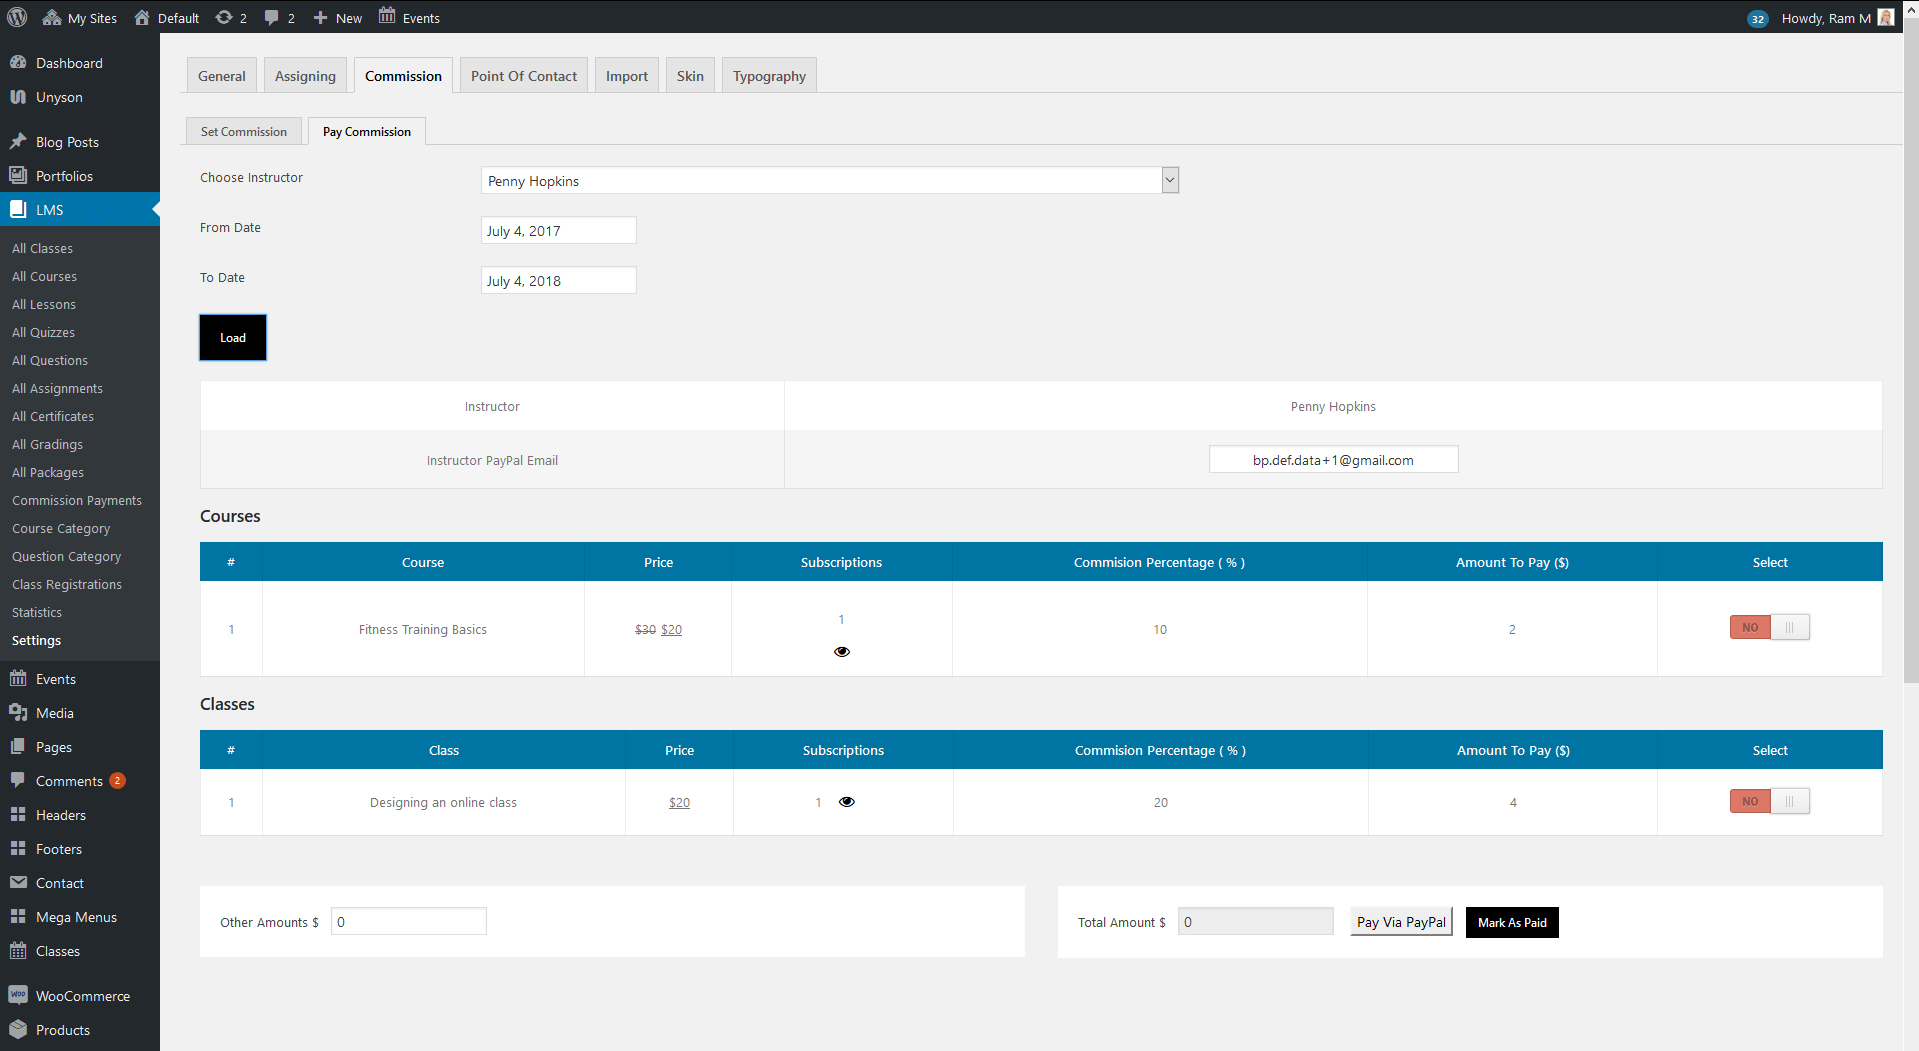
15.4Point Of Contact
In point of contact settings tab you can customize the settings to select your Email Template Page, Email Subject Prefix and you can enable or disable the options to send Email and Notification to the Student and Instructor. Make sure "BuddyPress" plugin is activated for notification concept. The Notifications will be shown in the frontend
1) Email Template Page – You can create your own template as page and you can choose your Email template page from email template page dropdown.
2) Email Subject Prefix – If you wish, you can set your own email subject prefix here. It will display the email subject prefix of receiving mail of the Student and Instructor.
You can enable or disable the following options to send Email and Notification to the Student and Instructor.
3) New Course Added - If you wish, you can enable this option to receive Email and Notification to the Student and Instructor when a new course added by the admin or an instructor.
4) Course Subscribed Student - If you wish, you can enable this option to receive Email and Notification to the Student and Instructor when the course has been subscribed by the student.
5) Course Subscription Cancellation - If you wish, you can enable this option to receive Email and Notification to the Student and Instructor when a student cancelled the subscribed course.
6) Course Assigned - If you wish, you can enable this option to receive Email and Notification to the Student and Instructor when a course assigned to the student by the admin.
7) Course Started - If you wish, you can enable this option to receive Email and Notification to the Student and Instructor when a student started the course.
8) Course Submitted - If you wish, you can enable this option to receive Email and Notification to the Student and Instructor when the course has been submitted by the student.
9) Course Evaluated - If you wish, you can enable this option to receive Email and Notification to the Student and Instructor when the course has been evaluated by the course instructor.
10) Course Certificate Achieved - If you wish, you can enable this option to receive Email and Notification to the Student and Instructor when the student achieved the certificate by grading the course by the course instructor.
11) Course Badge Achieved - If you wish, you can enable this option to receive Email and Notification to the Student and Instructor when the student achieved the badge by grading the course by the course instructor.
12) Course Submission Revoke - If you wish, you can enable this option to receive Email and Notification to the Student and Instructor when the course instructor revokes the course submission by the student.
13) Course Drip Content Agenda - If you wish, you can enable this option to receive Email for the course drip content agenda to the Student and Instructor when the course has been subscribed by the student.
14) Package Subscribed - If you wish, you can enable this option to receive Email and Notification to the Student and Instructor when a package has been subscribed by the student.
15) Package Subscription Cancellation - If you wish, you can enable this option to receive Email and Notification to the Student and Instructor when a student cancelled the Package Subscription.
16) New Class Added - If you wish, you can enable this option to receive Email and Notification to the Student and Instructor when a new class added by the admin or an instructor.
17) Class Subscribed - If you wish, you can enable this option to receive Email and Notification to the Student and Instructor when the class has been subscribed by the student.
18) Class Subscription Cancellation - If you wish, you can enable this option to receive Email and Notification to the Student and Instructor when a student cancelled the subscribed class.
19) Class Assigned - If you wish, you can enable this option to receive Email and Notification to the Student and Instructor when a class assigned to the student by the admin.
20) Class Submitted - If you wish, you can enable this option to receive Email and Notification to the Student and Instructor when the class has been submitted by the student.
21) Class Evaluated - If you wish, you can enable this option to receive Email and Notification to the Student and Instructor when the class has been evaluated by the course instructor.
22) Class Certificate Achieved - If you wish, you can enable this option to receive Email and Notification to the Student and Instructor when the student achieved the certificate by grading what are the courses included in the class by the course instructor.
23) Class Badge Achieved - If you wish, you can enable this option to receive Email and Notification to the Student and Instructor when the student achieved the badg by grading what are the courses included in the class by the course instructor.
24) Class Submission Revoke - If you wish, you can enable this option to receive Email and Notification to the Student and Instructor when the course instructor revokes the class submission by the student.
Instructor Notification Panel:
The instructor notification panel can be accessed by the following steps.
1. Login as instructor
2. The page will be redirected to the instructor dashboard or Buddypress dashboard(if buddypress dashboard page is selected from LOGIN SETTINGS)
3. If it is Normal Intructor Dashboard you can view the notifications from the Wordpress admin bar > Hover the Name ( Top right corner) > Notiifications.
4. The notifications section in the buddypress dashboard will be opened.
5. The instructor can mark the notifications as Read and Unread from the options.
Student Notification Panel:
The Student notification panel can be accessed by the following steps.
1. Login as student
2. The page will be redirected to the Student Buddypress dashboard (if student buddypress dashboard page is selected from LOGIN SETTINGS)
3. From the notifications section, the student can view all the notifications that has been received for him. The student mark the notifications as Read and Unread from the options.
Point of Contact
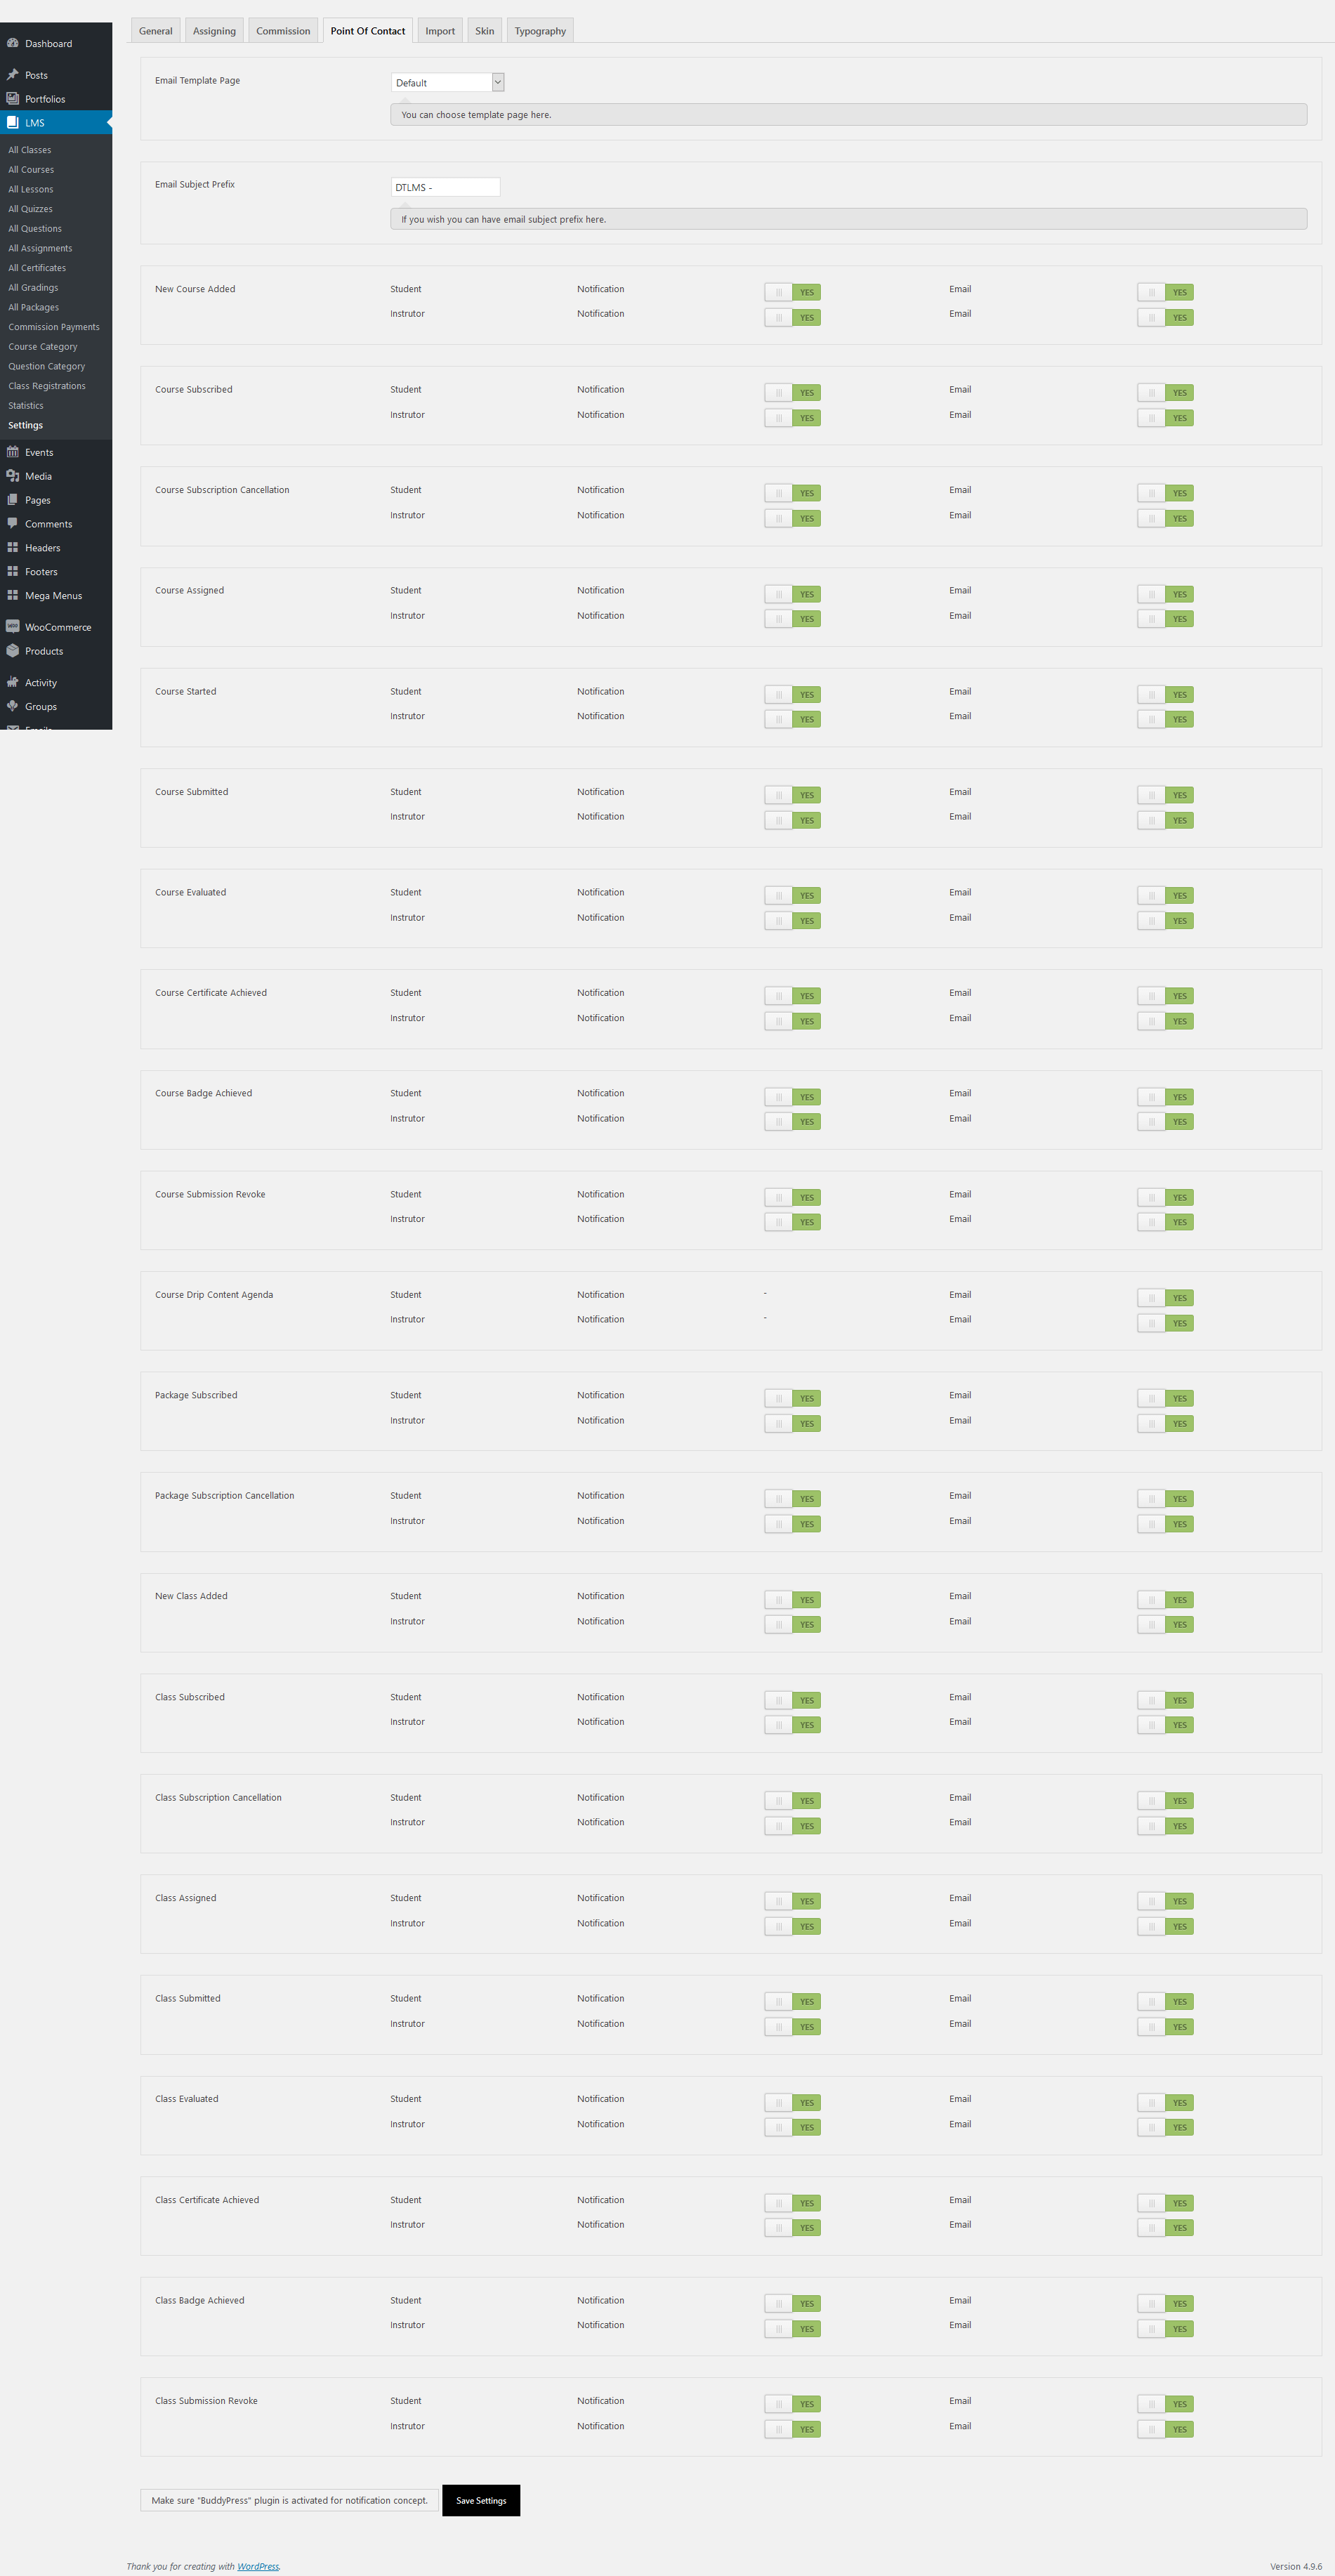
Instructor Notification Panel Unread
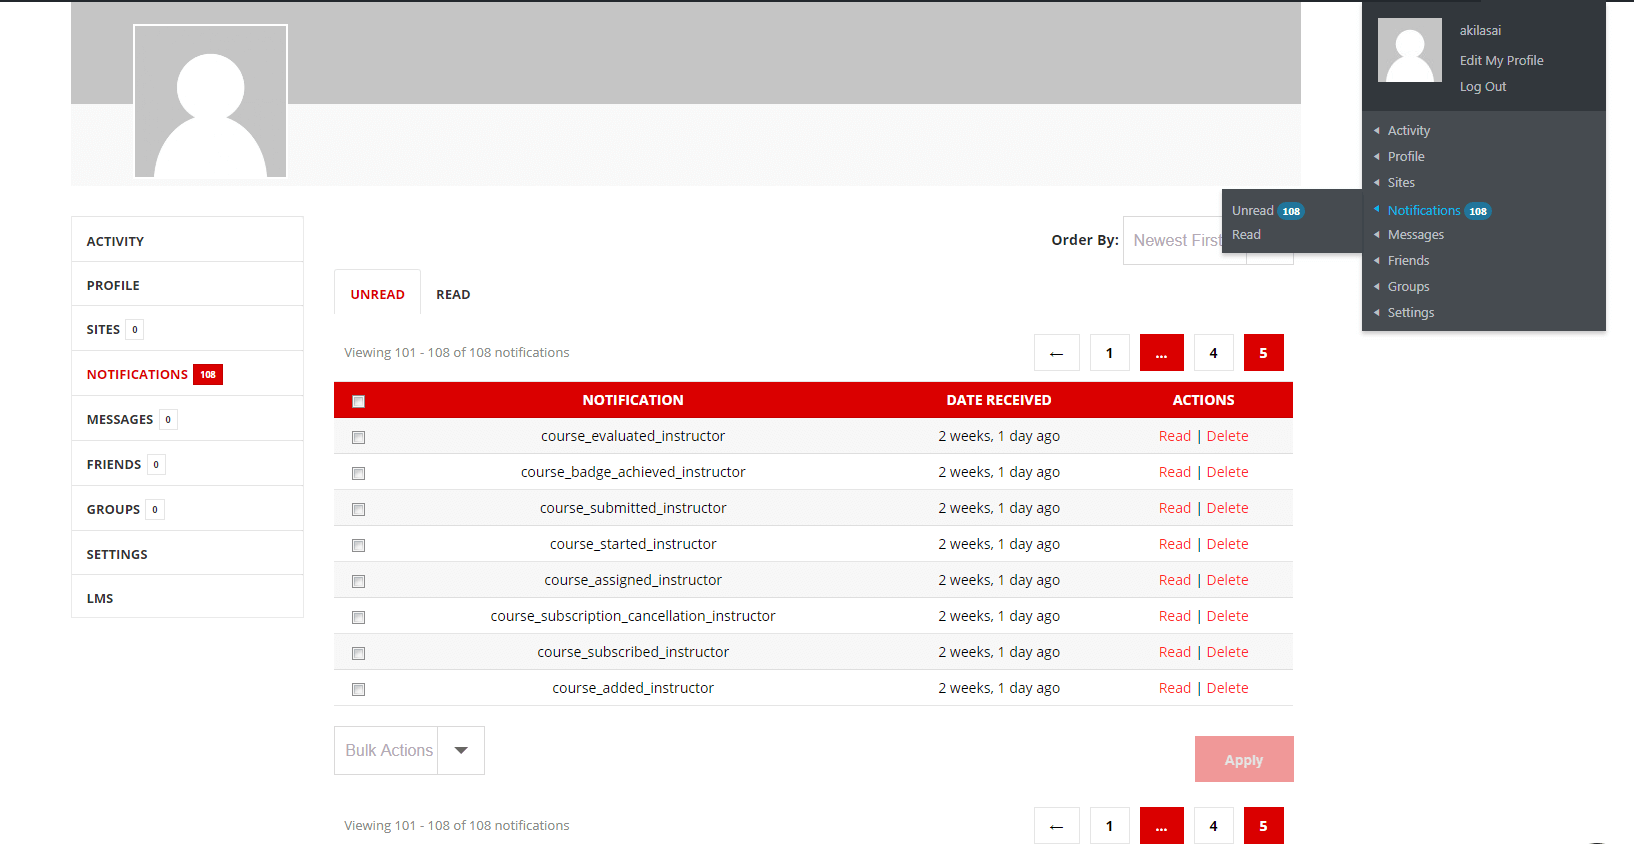
Student Notification Panel Read
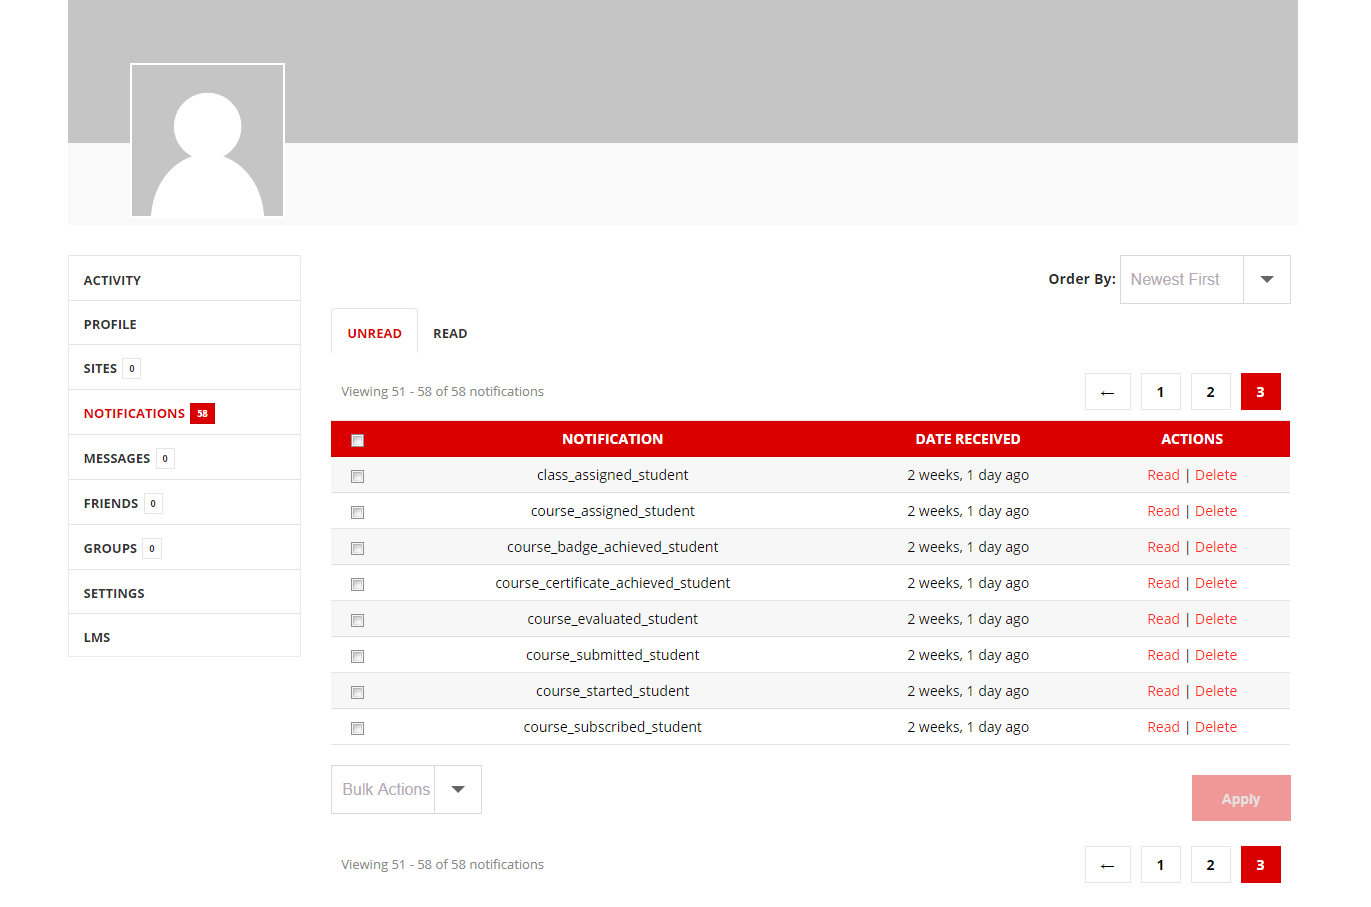
15.5Import
In Import settings tab you can import Questions and Quizzes in CSV file format. Select the type (Question / Quiz) of item do you need to import from Import Option dropdown and click Choose / Upload File button to select the type of CSV file from your media library, then click “IMPORT” button to import the selected type of the file content to your desired section.
The sample file format is attached with the theme files itself. Just build your contents with that sample file format. You can add as many as records in the csv file and import it using this option. Please have a look.
The sample files will be inside the folder import-sample-files in the LMS Addon plugin files. The files names will be Questions.csv, Quizzes.csv.
Import Options
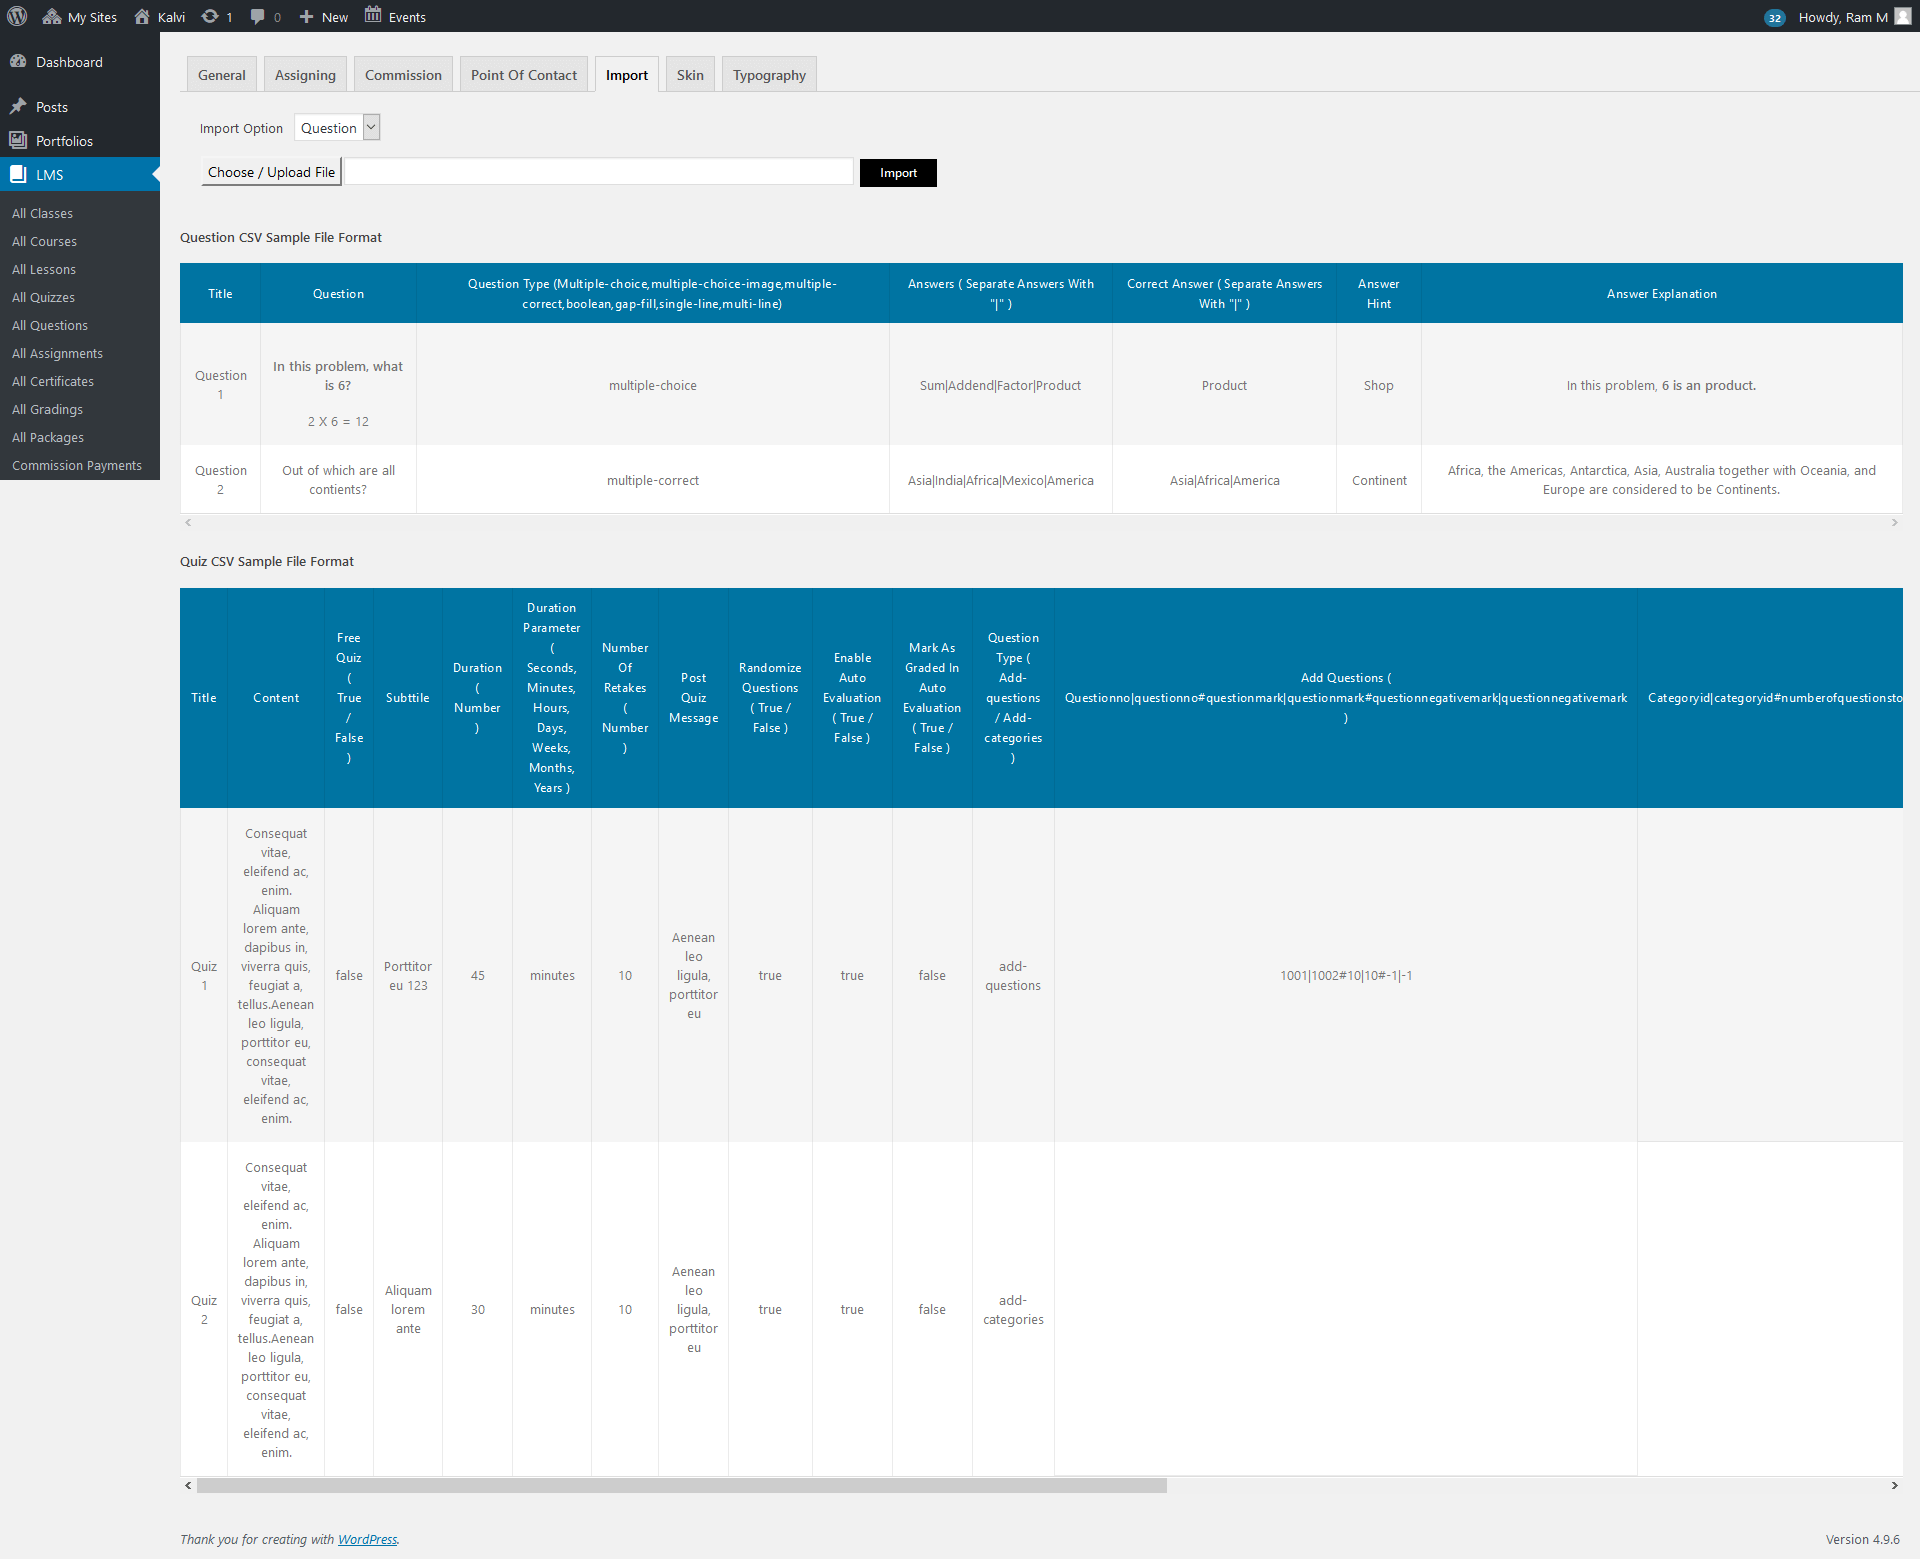
15.6Skin
In skin settings tab you can customize the skin color settings for "LMS Add-on". Select the colors for the LMS Add-on primary color, primary alternate color, secondary color, secondary alternate color, tertiary color, tertiary alternate color for DesignThemes LMS Add-on module skin and also you can select quiz timer foreground color and quiz timer background color.
You can choose your own colors from the desired color palette for the above DesignThemes LMS Add-on module skin. Mostly the Primary Color, Secondary Color and Tertiary Color will be used in the Course listing and Class listing pages. And also in the Course Category pages. The alternate colors of Primary, Secondary and Tertiary will be the text colors and the Primary, Secondary and Tertiary colors will be the background colors.
Note: Following colors will be used as default colors for " LMS Add-on".
Primary Color – You can choose your own primary color for module skin.
Primary Color – Alternate - You can choose your own primary alternate color for module skin.
Secondary Color - You can choose your own secondary color for module skin.
Secondary Color – Alternate - You can choose your own secondary alternate color for module skin.
Tertiary Color - You can choose your own tertiary color for module skin.
Tertiary Color – Alternate - You can choose your own tertiary alternate color for module skin.
Quiz Timer - Foreground Color - You can choose your own quiz timer foreground color.
Quiz Timer - Background Color - You can choose your own quiz timer background color.
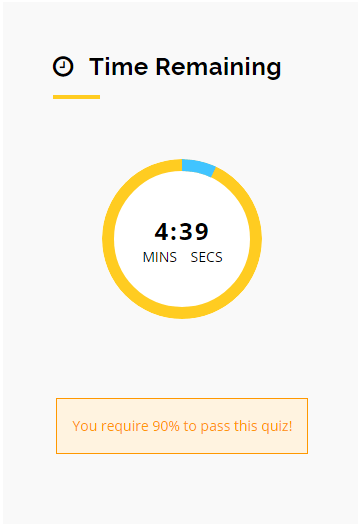
Skin Settings

Skin Color Example
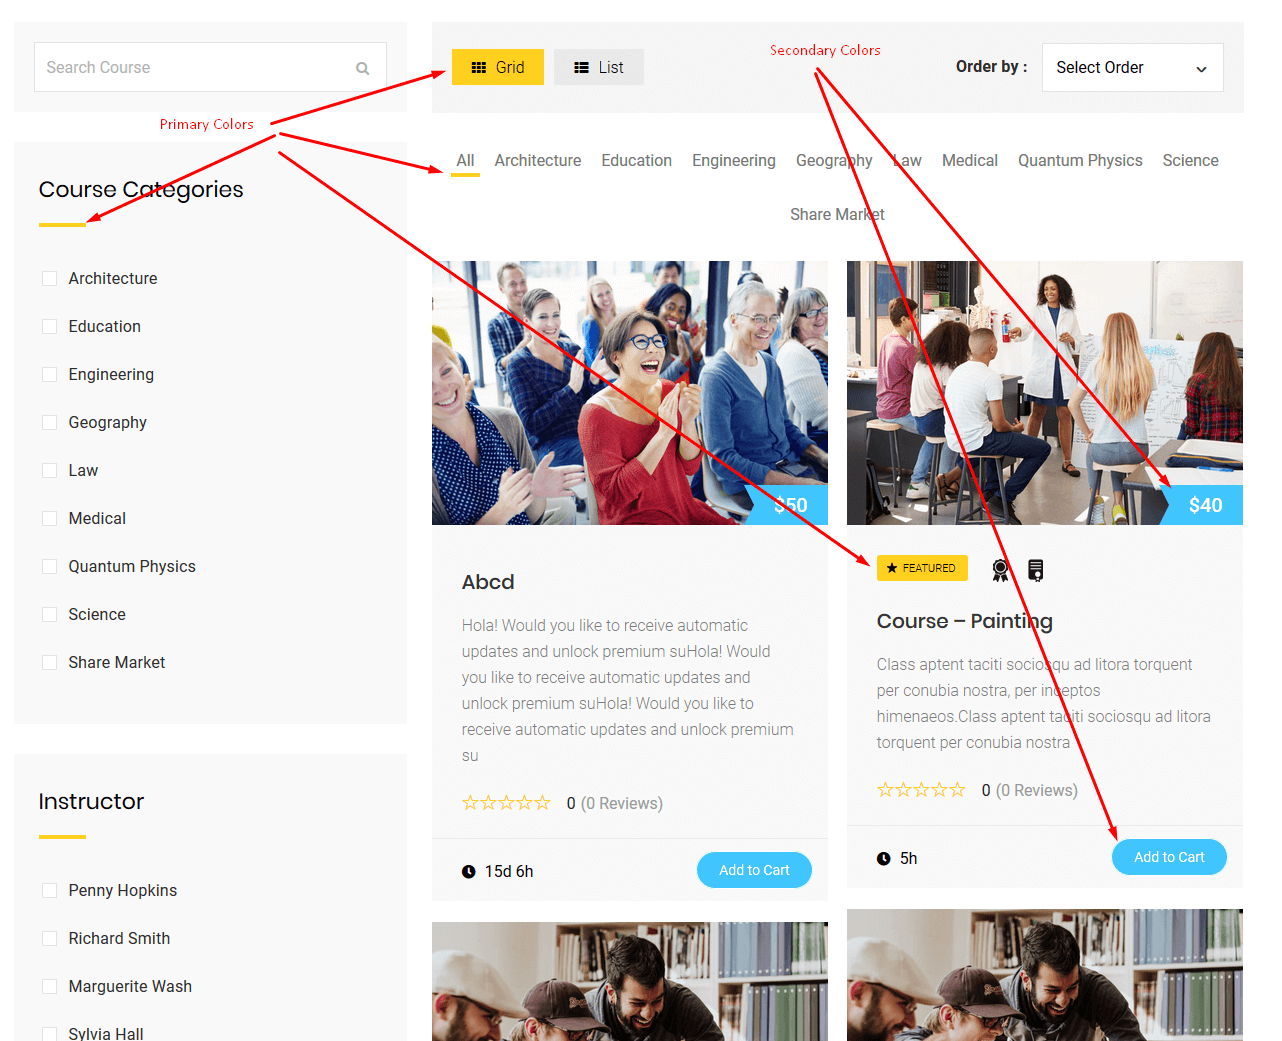
15.7Typography
From the Typography settings tab you can select the Title Font Family for the courses and classes details page. You can select the default font family as well the google fonts from the dropdown list available.
Typography Settings

16Dashboard
16.1 Admininstrator Dashboard
The administrator dashboard is the default page to which the admin will be redirected once he login. The default administrator dashboard page content will look like the screenshot that is shown in the right side. If you do not like the administrator dashboard, the admin can himself build the dashboard page as per his needs using the numerous shortcodes or visual composer modules and redirect to that custom page after login.
The default administrator dashboard is built with the help of Visual Composer modules. Each and every Visual Composer module is explained in the Addon shortcodes section in detail.
This dashboard gives us details about Total Items created by the administrator and all instructors. And all the details separately like All Courses, All Classes, All Packages, All Student Details, All Instructor Details, Commission Details, Instructing Items, My Courses, etc.
Admininstrator Dashboard

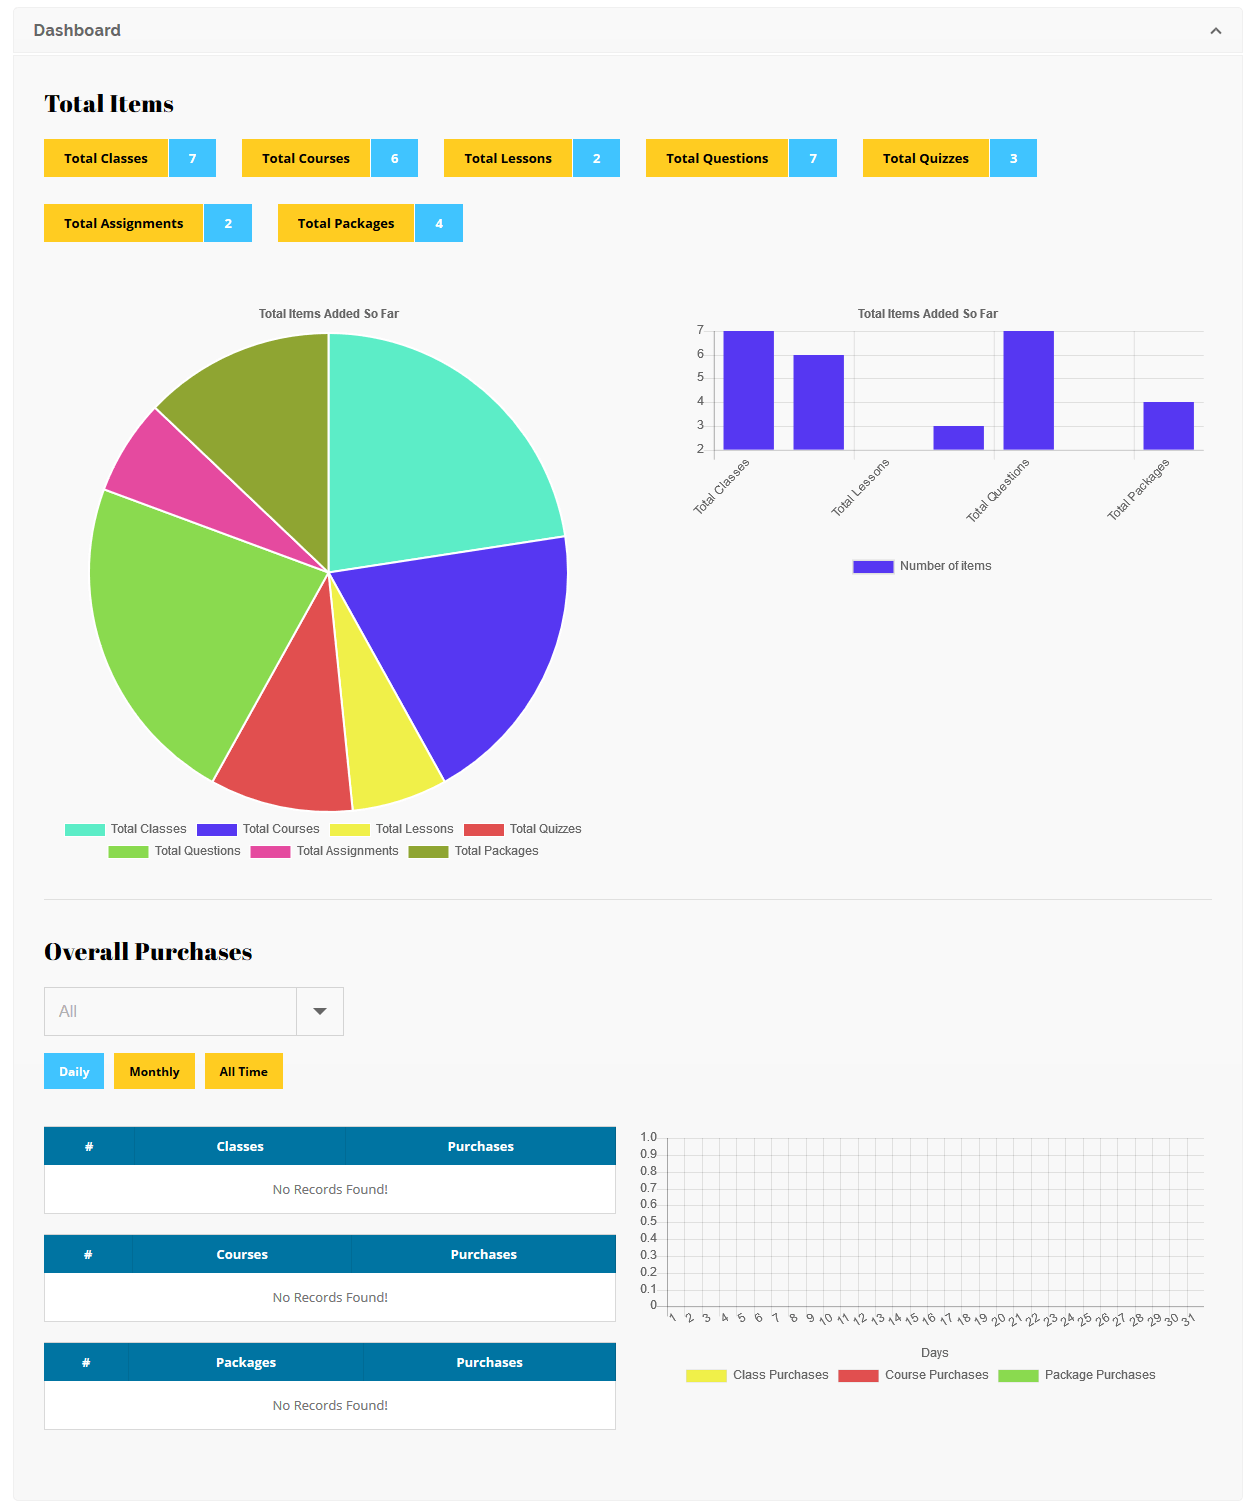
16.2 Instructor Dashboard
The Instructor dashboard is the default page to which the Instructor will be redirected once he login. The default Instructor dashboard page content will look like the screenshot that is shown in the right side. If you do not like the Instructor dashboard, the admin can build the dashboard page as per his needs using the numerous shortcodes or visual composer modules and redirect to that custom page after login.
The default Instructor dashboard is built with the help of Visual Composer modules. Each and every Visual Composer module is explained in the Addon shortcodes section in detail.
This dashboard gives us details about Total Items created by the instructor, the courses and classes which are instructed by the instructor, the commission details.
Instructor Dashboard
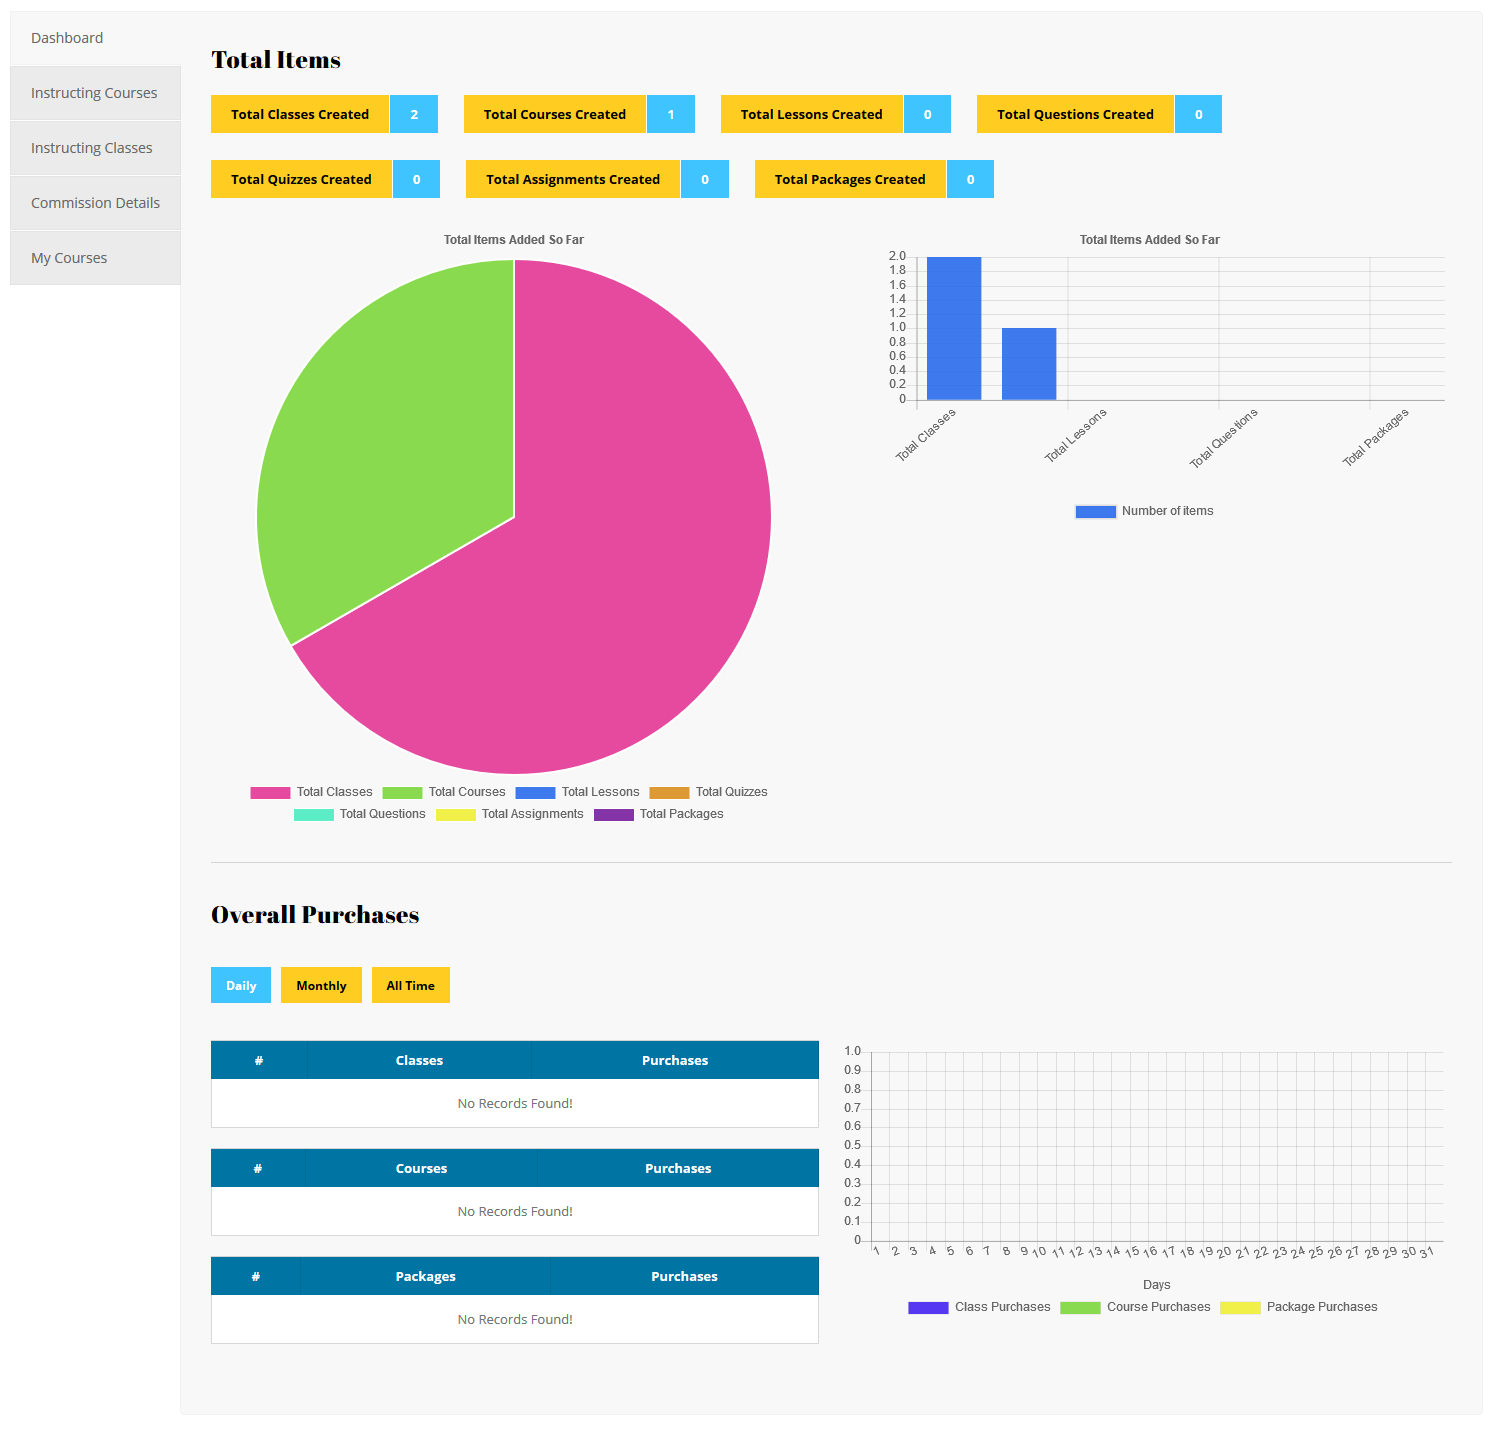
16.3 Student Dashboard
The Student dashboard is the default page to which the Student will be redirected once he login. The default Student dashboard page content will look like the screenshot that is shown in the right side. If you do not like the Student dashboard, the admin can build the dashboard page as per his needs using the numerous shortcodes or visual composer modules and redirect to that custom page after login.
The default Student dashboard is built with the help of Visual Composer modules. Each and every Visual Composer module is explained in the Addon shortcodes section in detail.
This dashboard gives us details about the Total Classes, Courses and Packages purchased, assigned, under evaluation, undergoing and completed items and many more details as well.
Student Dashboard


